
How to Install Vinyl Siding Around Windows Without Trapping Water
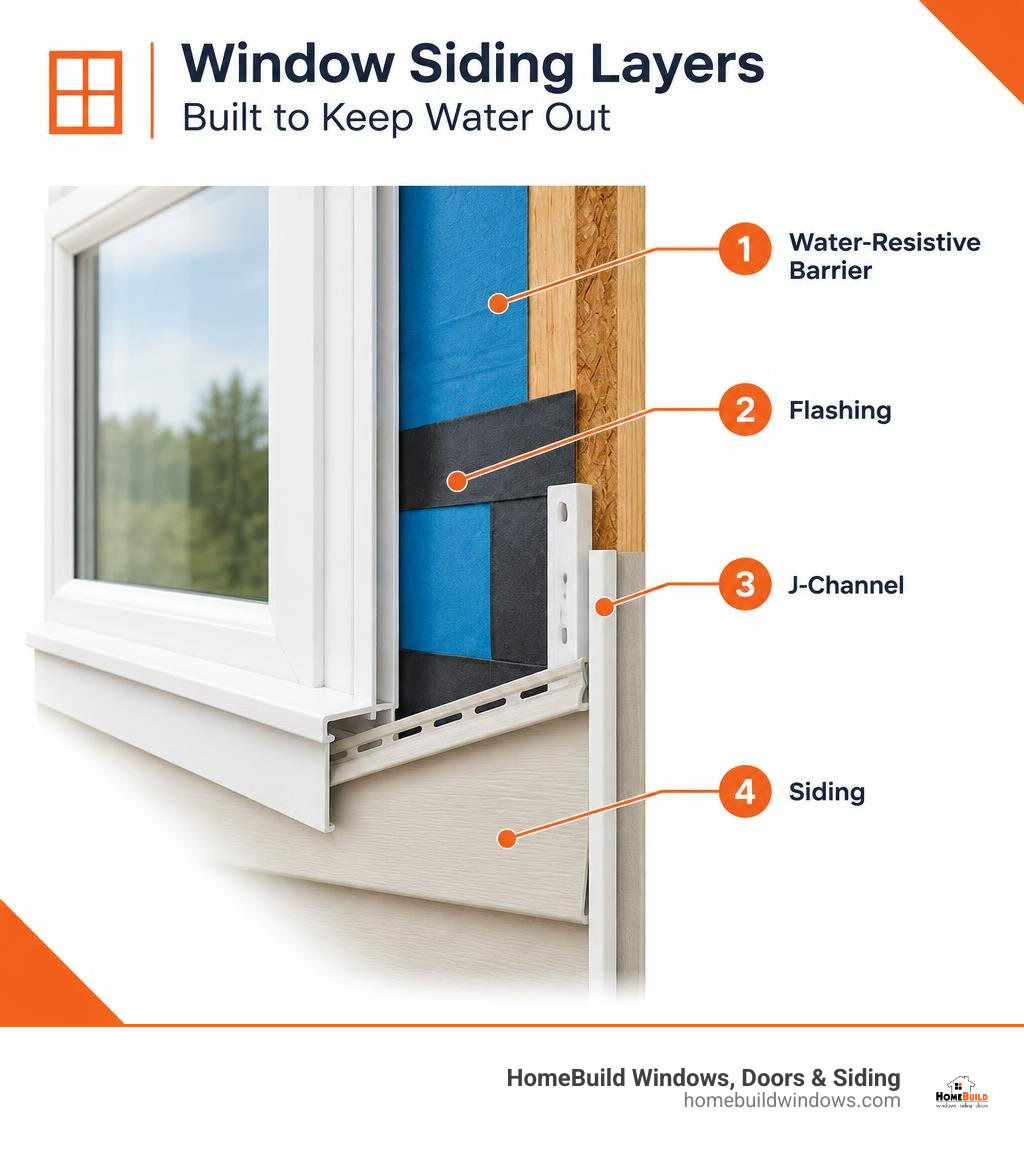
If you’re wondering how to install vinyl siding around windows, the order of work matters: a professional flashes the opening and connects it to the wall’s water-resistive barrier, fits the window trim, then cuts and fastens the siding with room to expand. J-channel hides the cut edges, but the flashing behind it is what directs water away from the wall.
I’m Steve Mlynek, founder of HomeBuild Windows, Doors & Siding, and I’ve spent over 20 years overseeing window and siding work in the Chicago area. In this guide, I’ll explain how to install vinyl siding around windows and why each layer needs to work with the next.
How to install vinyl siding around windows glossary:
- vinyl siding installation services
- vinyl soffit installation
- expert siding installation services in Chicago
Window Weatherproofing and Flashing Preparation
Before any exterior trim or siding panel goes up, the window opening must be sealed against wind-driven rain. In our Chicago climate, where harsh lake winds, winter blizzards, and summer downpours test exterior walls, siding alone cannot act as a waterproof barrier. Vinyl siding is designed to shed the bulk of bulk water while allowing air circulation and drainage behind the panels. The true defense against moisture intrusion relies on a continuous water-resistive barrier (WRB) and layered self-adhering flashing tape.
To create a weather-tight opening, flashing must follow a strict “shingle-lap” sequence from bottom to top:
- Sill Flashing Membrane: Self-adhering sill flashing is applied across the bottom rough opening, extending a minimum of 9 inches (229 mm) beyond each side jamb to catch any stray moisture.
- Jamb Flashing Extensions: Side jamb flashing strips run vertically over the window’s side flanges, extending approximately 8 1/2 inches (216 mm) above the head of the window and overlapping the sill flashing below.
- Rigid Head Flashing & Drip Cap: A metal drip cap is installed above the top casing, followed by head flashing tape that extends at least 1 inch (25.4 mm) beyond the vertical jamb flashing on both sides.
- Water-Resistive Barrier Integration: The top flap of housewrap is folded down over the head flashing tape and secured, creating an unbroken drainage plane that directs water away from the wall cavity.
Mastering leak-proof window flashing techniques protects framing, insulation, and interior drywall from rot, mold, and costly structural damage across seasonal freeze-thaw cycles.
Flashing Nail-Fin Windows vs. Exterior Casing
How a window is flashed depends heavily on whether it features an integrated nailing fin (common in new construction and full-frame replacements) or existing exterior decorative casing, such as brick mold (frequent on historic Chicago bungalows, Victorians, and classic two-flats).
When dealing with nail-fin windows, the flashing membrane adheres directly over the mounting flange, creating an airtight seal against the sheathing. For windows with exterior brick mold, counter-flashing and rigid drip caps must bridge the wider wooden profile, requiring careful sealant application to ensure compatibility with vinyl trim accessories.
| Feature / Step | Nail-Fin Windows | Windows with Exterior Brick Mold Casing |
|---|---|---|
| Primary Attachment | Fastened through integrated vinyl/aluminum nailing flange | Fastened through window jambs into rough opening framing |
| Flashing Application | Self-adhering flashing tape applied directly over the nailing fin | Flashing membrane applied around casing; rigid metal drip cap over top trim |
| Head Protection | Tape seals top fin directly under the upper WRB layer | Z-flashing / drip cap extends over brick mold with counter-flashing tape |
| Sealant Placement | Continuous bead behind the nailing flange before fastening | Compatible sealant bead placed between casing edge and accessory channels |
| Trim Integration | J-channel nails directly over the flashed nailing flange | J-channel butts against the outer edge of the flashed brick mold |
Trimming Openings: How to Install Vinyl Siding Around Windows with J-Channel
J-channel is the standard perimeter trim used to receive siding panels, conceal cut edges, and provide a neat transition around windows and doors. However, J-channel is not merely decorative; when assembled correctly, it functions as a secondary drainage trough.
Proper installation starts with corrosion-resistant galvanized steel or aluminum roofing nails. Fasteners should be placed every 8 to 12 inches (203 mm to 305 mm) along the nailing flange, centered within the pre-punched slots. Crucially, nails must never be driven flush against the vinyl. Leaving roughly 1/16 inch of clearance between the fastener head and the trim allows the vinyl to slide freely as temperatures rise and fall.
Consulting the Fine Homebuilding guide to cutting and installing J-channel reinforces how vital clean cuts and proper drainage tabs are for maintaining long-term building envelope integrity.
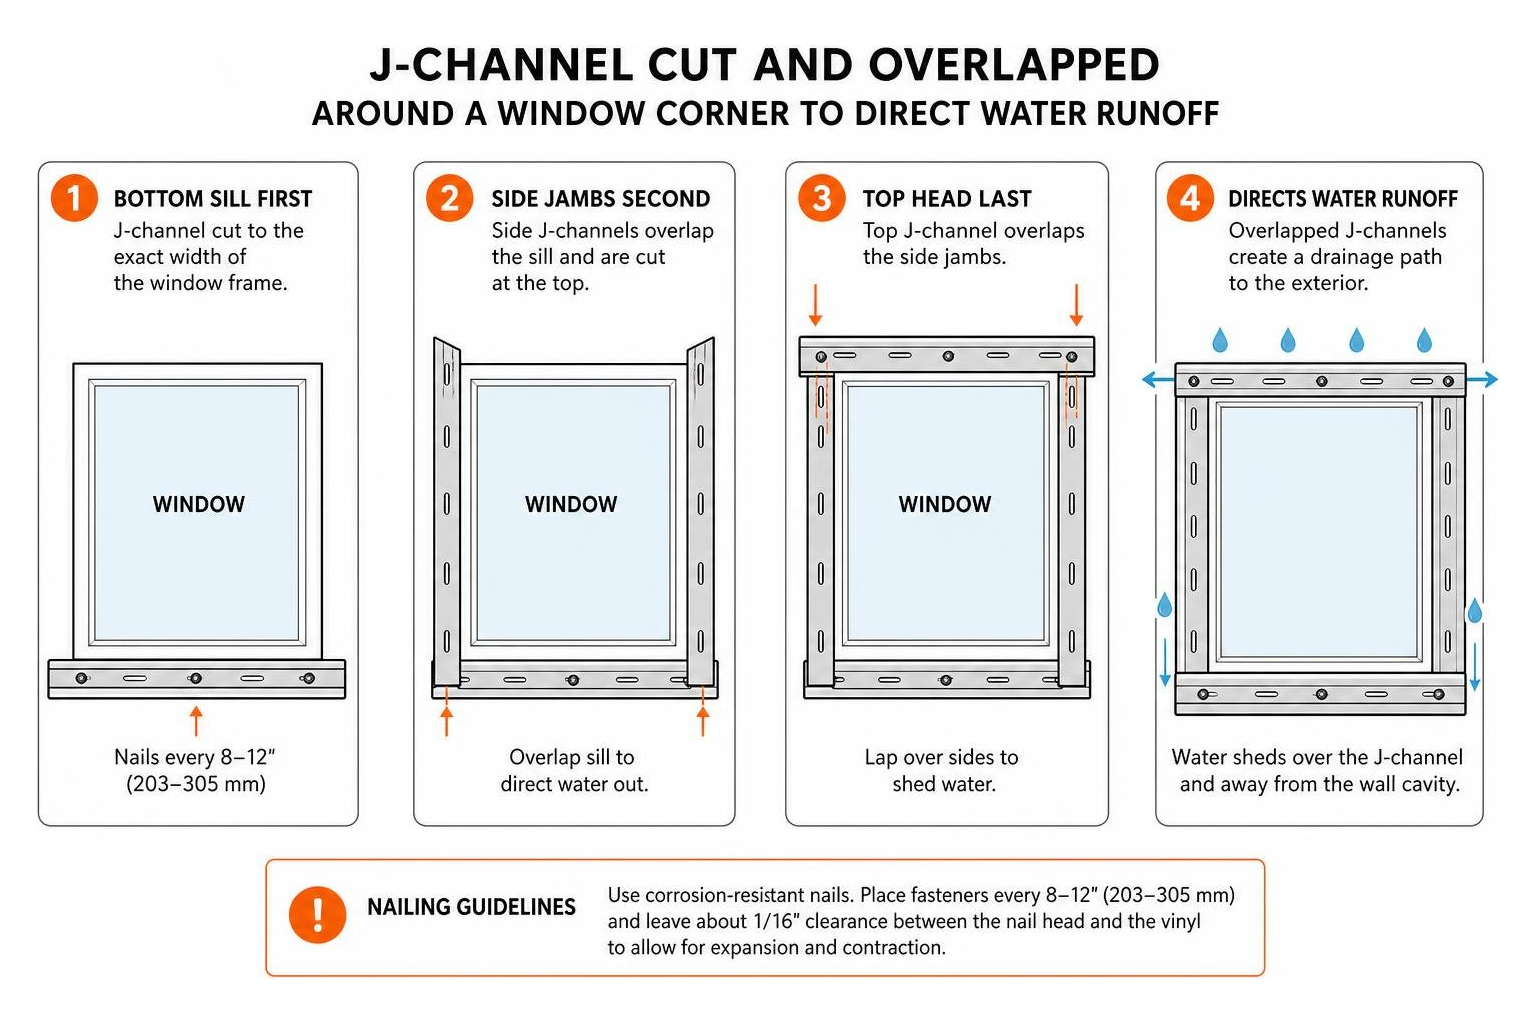
J-Channel Drainage Around Window Openings
To prevent water from finding its way behind siding panels at window corners, J-channel pieces must be installed in a specific order: bottom sill first, side jambs second, and top head channel last.
- Sill Piece: The bottom J-channel is cut to the exact width of the window frame and nailed into place.
- Side Jamb Pieces: Side pieces are cut longer than the window height—specifically adding the width of the J-channel face (typically around 2 inches) at both ends. At the bottom, a notch is cut to overlap the bottom channel, and a small water-drainage tab is folded inward.
- Head Piece: The top J-channel is cut wider than the window by twice the face width of the trim. At each end, a 1-inch drainage flap is scored and folded downward into the side channels. When water runs down the top trim, these tabs guide moisture directly into the side J-channels and safely out the bottom, preventing corner leaks.
Integrated J-Channel vs. Traditional Field-Installed Trim
Many modern replacement windows, such as premium vinyl lines, are manufactured with integrated J-channels built directly into the exterior frame. This factory design eliminates the need to nail separate trim channels around the window perimeter, speeding up installation and providing a streamlined look.
However, traditional field-installed J-channel offers greater flexibility when working around custom trim sizes, exterior insulation boards, or decorative brick mold casing. Whether using integrated or field-installed trim, our crews maintain proper expansion spacing and flashing layers behind the trim to ensure water drains safely.
Panel Fit and Thermal Movement Around Windows
Vinyl siding can expand and contract up to 3/8 of an inch over a standard 12-foot panel as temperatures swing from sub-zero Chicago winter lows to humid summer highs. Failing to plan for thermal movement results in unsightly buckling, warping, or panels pulling out of their tracks.
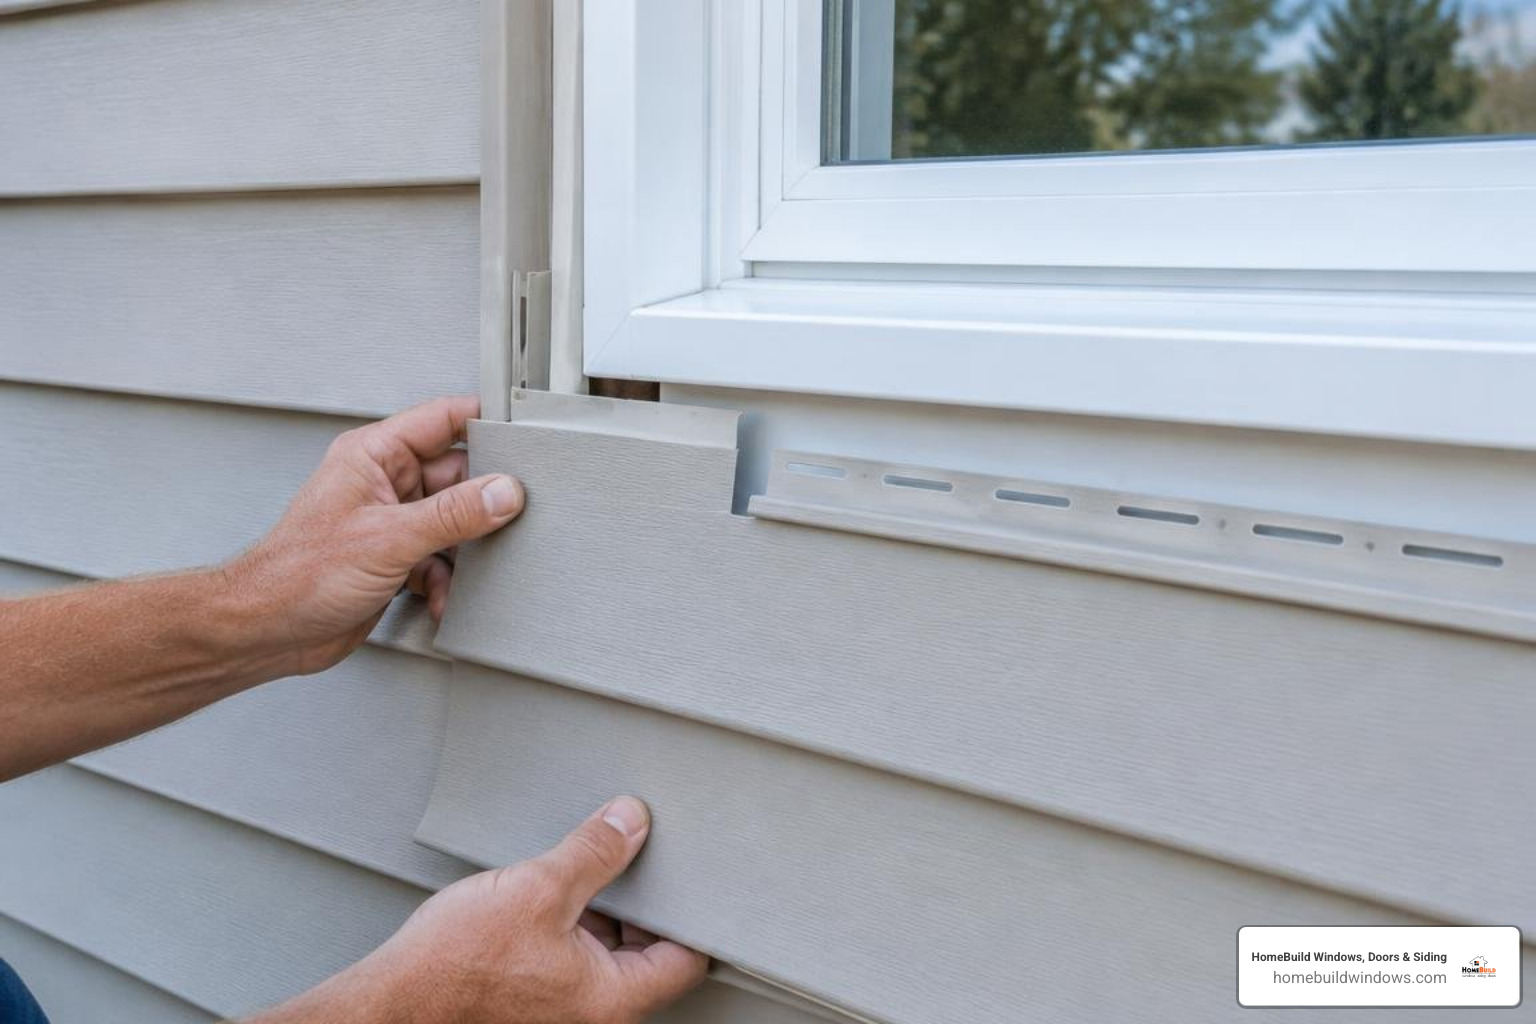
When fitting siding under or over a window, a professional installer measures from the buttlock of the course below to the recess inside the J-channel, then deducts 1/4 inch from vertical and horizontal measurements for normal temperature installations to allow for natural expansion and contraction. That clearance increases to 3/8 inch when installing in temperatures below 40°F. The panel is then cut with aviation snips for vertical cuts and scored with a utility knife for horizontal lines before being fitted into the receiving channel without binding against window frames.
Following systematic step-by-step home siding installation principles ensures that every cut panel fits neatly into its receiving channel without binding against window frames.
Undersill Trim and Snap-Lock Punch Detailing
When a horizontal siding panel is cut to fit beneath a window sill, its top nailing hem is completely removed. Without a nailing strip, the panel would flap loosely in high winds.
To solve this, installers place undersill trim (also called utility trim or finish trim) inside the bottom J-channel beneath the window. Using a specialized snap-lock punch, raised lugs (or “ears”) are punched every 6 to 8 inches along the cut top edge of the siding panel, with the raised tabs facing outward. When the panel is pushed up into the undersill trim, these lugs lock firmly into the trim’s internal lip, securing the panel without visible face nails.
Fastening Practices to Prevent Buckling
Securing vinyl siding requires precision. Driving fasteners too tight or placing them off-center restricts movement and causes permanent waves in the wall. Industry standards, such as the certified siding installation standards published by polymeric exterior associations, dictate strict rules:
- Center Every Fastener: Place nails directly in the center of the pre-punched nailing slots. Fastening at the far ends pins the vinyl and causes it to buckle when it expands.
- Maintain Nailhead Clearance: Leave approximately 1/16 inch (roughly the thickness of a dime) between the nail head and the vinyl panel so the siding hangs loosely.
- Space Correctly: Space fasteners 12 to 16 inches on-center for horizontal panels.
- Never Face-Nail: Never drive nails directly through the visible face of vinyl siding panels.
Frequently Asked Questions About Window Siding and Trim
Why is an expansion gap required when installing vinyl siding around windows?
Vinyl is a polymer that naturally expands in summer heat and contracts in winter freezing conditions. Leaving a 1/4-inch clearance (or 3/8-inch when working in freezing temperatures below 40°F) inside J-channels and corner stops gives panels room to move freely, preventing warping, bowing, and cracked seams.
What is the difference between undersill trim and J-channel beneath a window?
J-channel conceals cut panel edges and channels water around the opening. Undersill trim is an accessory designed to physically grip and lock the cut edge of a siding panel whose top nailing hem was removed, keeping the panel flat and secure beneath the sill.
How does proper J-channel layering prevent water leaks?
By installing the bottom channel first, overlapping the side channels, and folding drainage tabs from the top head channel into the side pieces, water follows gravity downward. This shingle-style overlap keeps rain from sneaking behind the window corners and onto the wood sheathing.
Conclusion
Installing vinyl siding around windows demands meticulous attention to detail, strict adherence to flashing sequences, and a deep understanding of thermal expansion. From selecting high-performance components by ProVia, Pella, and Andersen to executing clean corner drainage tabs, professional craftsmanship is what keeps your home weathertight and protected against Chicago’s demanding weather.
At HomeBuild Windows, Doors & Siding, we have proudly served homeowners across Chicago and the surrounding suburbs since 2004. As an Elite Platinum Pella Certified Contractor and Andersen Premier Certified Contractor, we never use subcontractors; every project is completed exclusively by our skilled in-house crews and personally inspected on site by our owner, Steve Mlynek. Our dedication to quality has earned us the Angi Super Service Award 2025, the 2025 Nextdoor Neighborhood Faves Winner recognition, and a 4.9-star rating across 220+ Google reviews. Every installation is backed by our 10-year labor warranty and a complimentary VIP Protection Plan.
When you are ready to enhance your home’s exterior with expert siding installation services in Chicago, contact our team to schedule your free estimate today.