

Choose Vinyl Siding Installation Services That Protect Your Home
The right vinyl siding installation services do more than make your home look updated. They should inspect the wall surface, install a weather-resistive barrier and flashing, use corrosion-resistant fasteners, and leave room for panels to expand and contract through Chicago’s seasonal temperature swings.
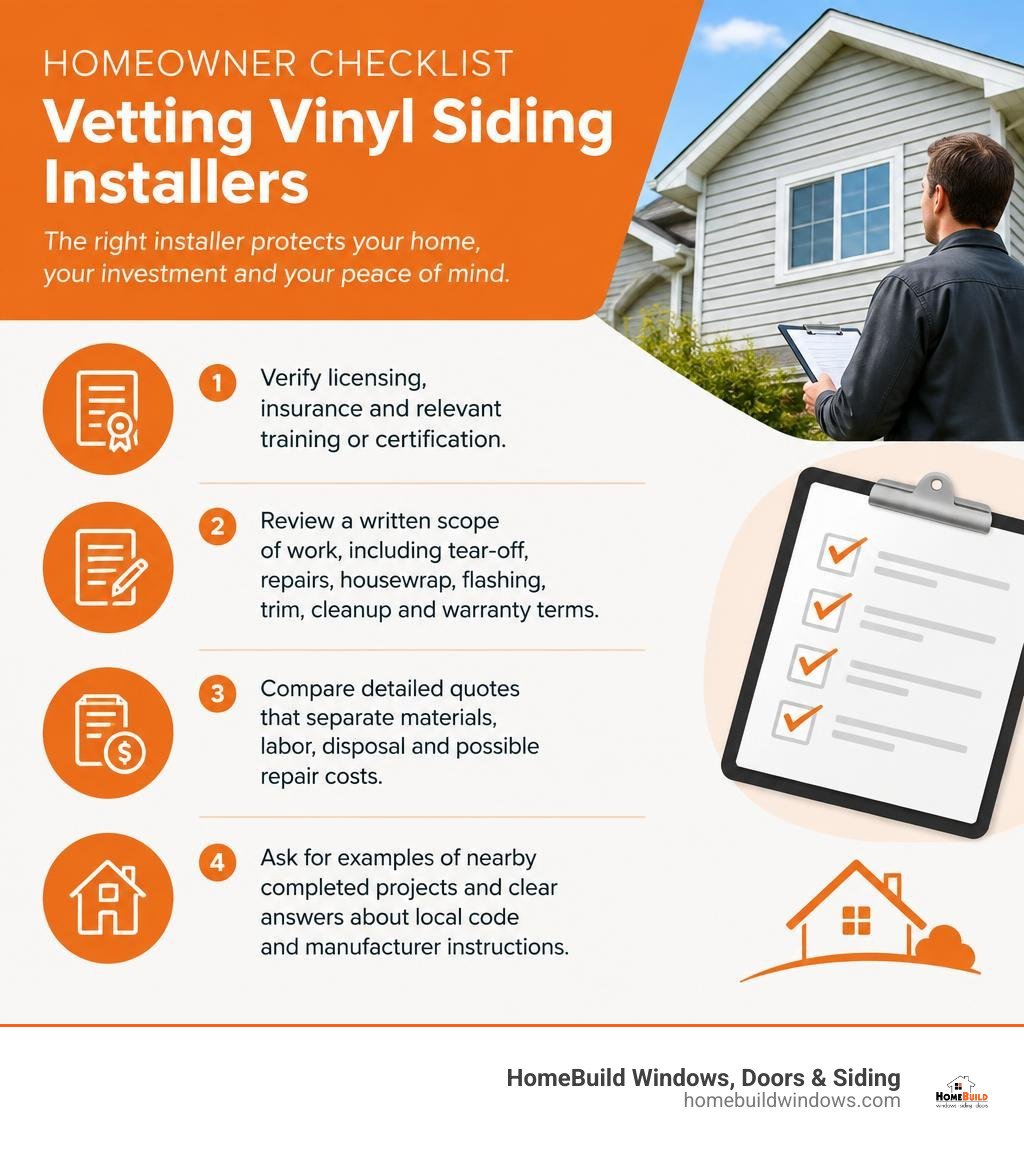
Before you sign a contract, ask each installer for:
- Proof of licensing, insurance, and relevant siding training or certification.
- A written scope covering tear-off, wall repairs, housewrap, flashing, trim, cleanup, and warranty terms.
- A detailed quote that separates materials, labor, disposal, and any necessary wall preparation.
- Examples of nearby completed projects and clear answers about how they follow local code and manufacturer instructions.
Vinyl siding is durable and low-maintenance, but it is not a waterproof wall system on its own. Proper preparation and flashing matter just as much as the panels themselves. A careful contractor plans for moisture control and thermal movement, helping prevent buckling, leaks, and costly callbacks.
I’m Steve Mlynek, founder of HomeBuild Windows, Doors & Siding, with more than 20 years of experience guiding Chicago-area homeowners through exterior upgrades, including vinyl siding installation services. In this guide, I’ll show you how to compare installers with confidence and spot the details that separate a sound installation from a short-term cosmetic fix.
Vinyl siding installation services terms to learn:
What to Expect from Professional Vinyl Siding Installation Services
Hiring an exterior remodeling team involves much more than picking out a color palette. Cladding acts as a primary rainscreen and aesthetic barrier, meaning that the assembly behind the panels dictates how well your home handles severe weather. When properly executed, modern siding projects strictly adhere to national building guidelines like ASTM D4756, which outlines standard practices for the application of vinyl siding and soffits.
A key step in planning your project is thoroughly evaluating siding installation and replacement needs for your home’s exterior envelope. Vinyl siding is designed as an exterior water-shedding layer, not an impermeable seal. Because wind-driven rain can penetrate weep holes and panel laps, installing a continuous weather-resistive barrier (WRB) over structural sheathing is critical under local building codes.
Industry benchmarks detailed in resources like the CertainTeed Technical Guide show that building wrap must be integrated with self-adhering flashing around all architectural penetrations. This setup channels water away from wall studs, insulation, and interior drywall, preventing unseen rot and structural decay.
Fastening Standards and Thermal Expansion Management
Polyvinyl chloride (PVC) expands and contracts significantly as outdoor temperatures change. A standard 12-foot-6-inch vinyl panel can shift up to half an inch over an annual freeze-thaw cycle in the Midwest. Competent crews accommodate this natural movement through precise fastening methods.
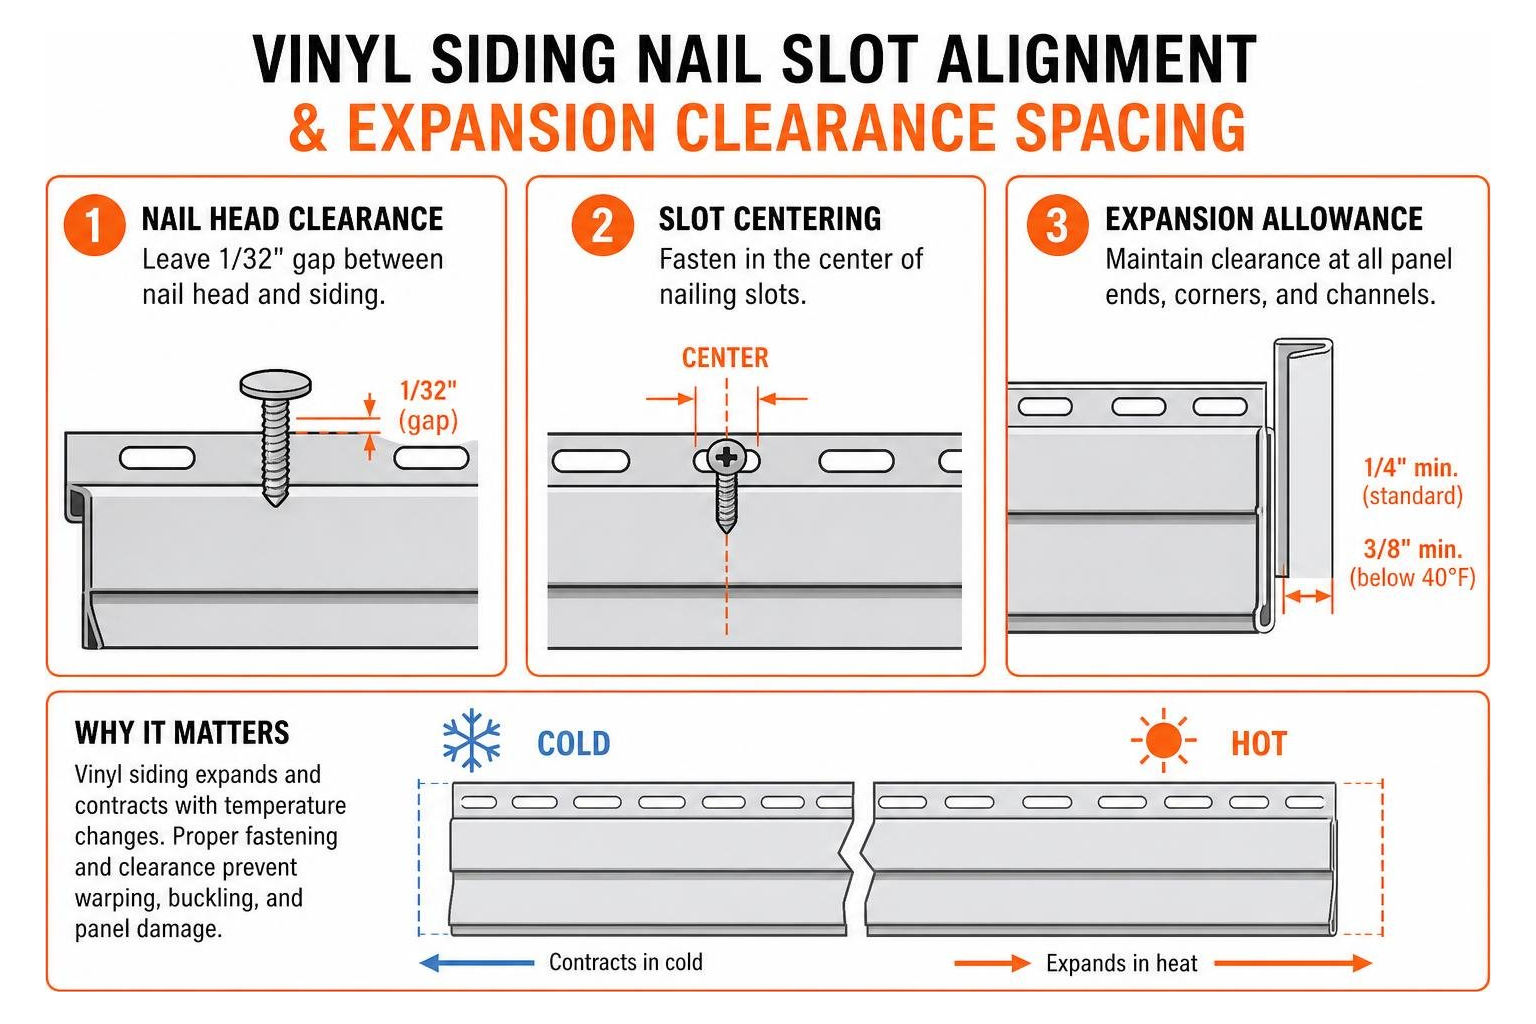
Technicians must observe the following fastening protocols:
- Nail Head Clearance: Fasteners must never be driven flush against the siding hem. Installers should maintain a 1/32-inch gap (roughly the thickness of a dime) to allow panels to slide freely horizontally.
- Slot Centering: Fasteners belong directly in the center of pre-punched nailing slots. Driving nails into the edges pins the vinyl, leading to warped panels during hot summer afternoons.
- Expansion Allowances: Installers maintain a minimum 1/4-inch clearance at all panel ends, corner posts, and receiving channels. When temperatures dip below 40°F during fall or winter installations, this gap expands to 3/8-inch to account for future thermal expansion.
- Spacing Rules: Horizontal panels require fasteners placed every 12 to 16 inches along wall studs, while trim accessories require nailing every 8 to 10 inches.
- Fastener Composition: Skilled teams use corrosion-resistant fasteners—such as aluminum, galvanized steel, or stainless steel—with minimum 5/16-inch head diameters and 1/8-inch shank widths to resist uplift from high winds.
Proper Integration of Trim, Soffits, and Flashing
A clean installation relies heavily on proper accessory placement. Starter strips must be laser-leveled along the bottom perimeter of the home to establish a straight baseline for every row that follows. Corner posts, J-channels, and utility trims wrap transitions cleanly around eaves, masonry junctions, and fenestrations.
Crews should know how to install vinyl soffits correctly to maintain intake airflow through your attic while sealing off exterior wall assemblies from moisture and pests. At window and door headers, specialized rigid drip caps prevent rainwater from seeping behind exterior casings, directing water straight into drainage planes.
How to Vet and Select the Right Exterior Contractor
Selecting an exterior contractor requires a structured review process. With hundreds of regional options available across northern Illinois, choosing a reliable siding contractor in Chicago comes down to confirming technical credentials, transparent business practices, and proven local experience.
To protect your property, verify that your prospective contractor meets these criteria:
- Proven Regional Track Record: Look for established companies with decades of experience handling severe Midwest weather.
- Supervised Workmanship: Ensure the company uses dedicated project managers or on-site owners rather than handing your job off to unvetted third parties.
- Code Familiarity: The contractor must secure all necessary municipal building permits and schedule required inspections.
- Comprehensive Warranties: Workmanship warranties should accompany manufacturer product warranties to protect your investment over the long term.
Verifying Credentials of Vinyl Siding Installation Services
Always verify active credentials directly with local licensing boards and manufacturers before signing a contract. A qualified team should carry certifications from organizations such as the Vinyl Siding Institute (VSI), which confirms their crews are trained in proper expansion management, wind-load resistance, and water-resistive barrier detailing.
Ensure your contractor holds active municipal licenses, commercial general liability coverage, and full workers’ compensation policies. Reputable companies will readily supply certificates of insurance listing you as an additional certificate holder. Finally, check authenticated client reviews and past projects in nearby communities to confirm consistent customer satisfaction.
Comparing Quotes from Different Vinyl Siding Installation Services
When reviewing contractor proposals, prioritize clarity, detail, and scope of work. A professional quote outlines specific materials, thicknesses, insulation values, and accessory profiles rather than vague generalities. Reviewing a comprehensive siding installation guide helps you understand how different materials and project requirements are reflected in a formal scope of work.
Expect transparent proposals to factor in a standard 10% material waste calculation to handle complex roof gables, dormers, and geometric wall cuts. Confirm that the estimate includes old siding tear-off, site protection, dumpster staging, and post-project magnetic nail sweeps.
| Project Scope Component | Comprehensive Contractor Proposal | Vague or Incomplete Proposal |
|---|---|---|
| Substrate Preparation | Detailed inspection of sheathing with hourly repair protocols | Surface-level visual inspection only; extra charges added later |
| Moisture Management | Brand-name WRB with taped seams and window head flashing | “Standard housewrap” without flashing specifications |
| Material Specifications | Specific panel profile, thickness, color, and trim system | Unspecified grade of standard vinyl |
| Waste Allowance | Explicit 10% calculation to handle cuts, slopes, and gables | Omitted from written scope, risking project delays |
| Debris & Disposal | On-site disposal containers, daily cleanup, and magnetic sweeps | Ambiguous cleanup terms leaving disposal to the homeowner |
| Warranty Details | Distinct manufacturer material and contractor labor coverage | Generic “satisfaction guarantee” without written timeframes |
Key Technical and Performance Factors That Impact Siding Projects
Material performance and wall prep directly influence the lifespan and protection your new siding provides. Learning how vinyl siding makes homes more energy efficient can help you select the best siding profile for your home.
Technical resources like the Georgia-Pacific Installation Guidelines stress that a siding system’s performance depends heavily on the surface beneath it. Understanding the baseline mechanics behind calculating siding square footage helps you determine your home’s total surface area and select the right trim accessories.
Wall Preparation and Substrate Inspection
Applying new siding over compromised exterior walls creates long-term structural issues. Professional installations start with stripping old claddings down to the original wood sheathing. Crews inspect the underlying oriented strand board (OSB) or plywood for water stains, mold growth, and structural rot.
Wall plumbness must be verified with long spirit levels or laser guides. Uneven wall studs require shimming or furring strips to prevent visible dips across finished siding runs. When working on older homes with historic layers, reputable siding contractors follow EPA Lead-Safe Certified work practices to contain and dispose of lead-based coatings safely.
Insulated vs. Standard Vinyl Cladding
Insulated vinyl siding incorporates rigid, contoured foam backing permanently fused to the PVC panel exterior. This design delivers several key performance advantages:
- Eliminating Thermal Bridging: Standard wall studs account for roughly 25% of an exterior wall’s surface area, acting as thermal bridges where heat escapes. Continuous foam backing insulates the studs, improving your home’s thermal envelope.
- Enhanced Impact Resistance: The foam backing fills the void behind the panel profile, absorbing strikes from hail, falling branches, and neighborhood sports equipment.
- Improved Acoustic Insulation: Denser insulated panels dampen exterior noise from traffic, lawn equipment, and severe storms.
- Crisp Architectural Lines: The rigid backing keeps long horizontal runs flat and straight across wall variations, preventing waviness.
- Midwest Freeze-Thaw Durability: Rigid-backed panels resist cracking and brittle fractures caused by shifting winter temperatures.
Frequently Asked Questions About Siding Replacement
How much clearance is required for vinyl siding expansion?
Under normal conditions (temperatures above 40°F), install horizontal and vertical vinyl siding panels with a 1/4-inch clearance at all panel ends, receiving channels, corner posts, and trim components.
When working in cold weather (temperatures below 40°F), increase this expansion gap to 3/8-inch. Because vinyl panels contract in cold weather, this extra clearance ensures they have adequate room to expand during hot summer months without buckling.
What type of fasteners should be used during installation?
Always use corrosion-resistant fasteners, such as hot-dipped galvanized steel, aluminum, or stainless steel nails. Fastener heads must have a minimum diameter of 5/16-inch, with shanks measuring at least 1/8-inch in diameter.
Fasteners should penetrate a minimum of 1-1/4 inches into solid wood framing members. Always place nails directly in the center of the pre-punched nailing hem slots, leaving a 1/32-inch gap between the nail head and the vinyl surface to allow for thermal movement.
How do I know if my existing siding needs a complete tear-off?
A complete tear-off is recommended if your home’s exterior shows signs of hidden moisture damage, pest intrusion, warped sheathing, or noticeable drafts near exterior walls.
Removing the old cladding allows installers to inspect the underlying framing, replace damaged sheathing, and install an updated weather-resistive barrier with proper flashing. Starting with a fresh, flat substrate ensures your new siding looks clean and performs reliably for decades.
Conclusion: Choosing the Right Installation Partner
Upgrading your home’s exterior siding enhances curb appeal, boosts energy efficiency, and protects against harsh weather. Finding the right partner means choosing a contractor that prioritizes quality materials, clear communication, and proven craftsmanship.
At HomeBuild Windows, Doors & Siding, we bring more than 20 years of hands-on exterior renovation experience to homeowners throughout Chicago and the surrounding northwest suburbs. Our owner-supervised installations ensure every detail—from wall prep and weather-resistive barriers to precision expansion clearances—meets rigorous manufacturer standards.
As a licensed and insured contractor, we provide dependable exterior upgrades designed for the Midwest climate. Contact our team today to schedule an on-site consultation for your upcoming siding installation in Chicago or suburban home project.