
How Professionals Install an Aluminum Window Without Leaks
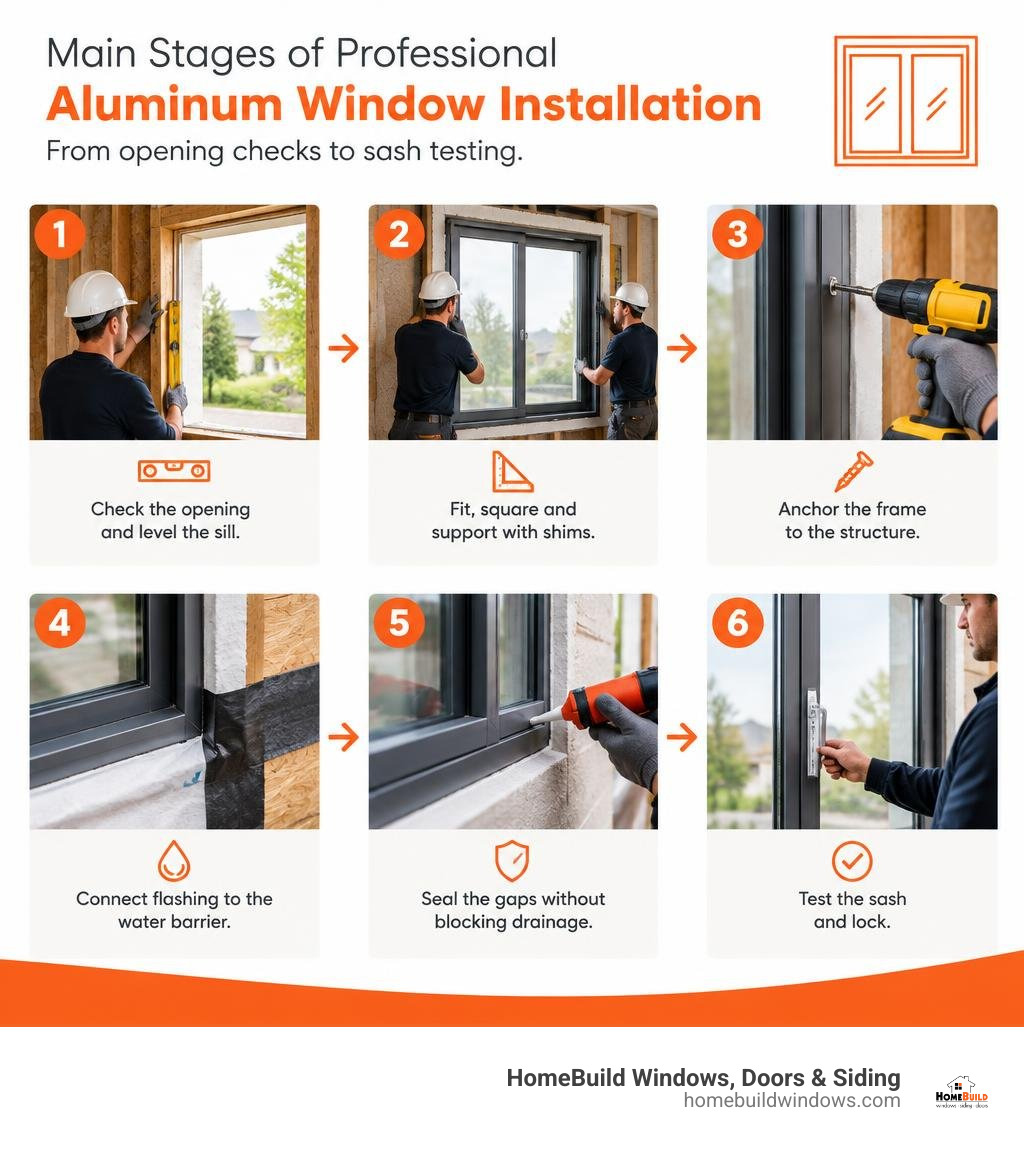
A professional installation starts with checking the rough opening and leveling the sill. The crew fits and squares the frame, supports it with shims, and anchors it to the structure. They then connect the flashing to the wall’s water barrier, seal the gaps without blocking drainage, and test the sash and lock. Clearances, fasteners, and flashing must suit the window, wall, and local code; getting them wrong can lead to leaks, drafts, or a sash that sticks.
I’m Steve Mlynek, founder of HomeBuild Windows, Doors & Siding. Over my 20-plus years in Chicago-area window replacement, I have seen that understanding how to install an aluminum window correctly comes down to precision at every step. If you are weighing options for your own home, our window installation guide walks through what a professional fitting involves from start to finish. For homeowners comparing frame materials and performance, our replacement window buying guide can help you evaluate aluminum alongside other options before scheduling a free estimate.
Related window installation resources:
- how to install vinyl windows new construction
- window replacement guide
- how to size replacement windows
Preparing the Rough Opening and Checking Tolerances
A durable window installation begins well before the unit touches the wall. When our crews arrive at a home in Arlington Heights, Naperville, or a classic brick bungalow within Chicago city limits, the first step is an exhaustive site survey of the aperture. Our installation team measures the height and width at three separate points—top, middle, and bottom—to identify any variations in framing. They also pull diagonal corner-to-corner measurements to confirm the opening is perfectly square.
Understanding how to measure a rough opening for a window ensures that the manufactured frame fits with proper tolerances. The opening must typically be 20 mm wider and 30 mm higher (roughly 3/4 inch to 1 inch of clearance overall) than the window unit. This perimeter gap gives technicians the necessary clearance to plumb and square the frame without binding.
The structural condition of the rough opening requires careful inspection:
- Inspecting wood framing or masonry lintels for rot, structural cracks, or deflection.
- Checking that the sill plate is completely level across its full span.
- Confirming that a sub-sill overhang provides at least 25 mm (1 inch) of projection past the exterior cladding to deflect rainwater away from the foundation.
- Verifying that building paper, house wrap, and moisture barriers are clean and intact.
Assessing Clearances and Plaster Allowances
Aluminum window profiles expand and contract as temperatures fluctuate across Chicagoland’s seasonal extremes. In cold winters, aluminum contracts; in hot, humid summers, it expands. To prevent structural stress from transferring into the frame, technicians establish specific perimeter clearances.
In traditional wood-framed homes with drywall or plaster interiors, a standard 10 mm (3/8-inch) interior plaster reveal allowance is factored in so the finished wall sits perfectly flush against the window frame. For brick veneer walls—common across Chicago two-flats and suburban colonials—our crews leave a dedicated 12 mm gap beneath the lintel and a 10 mm clearance above the sill brick. These intentional gaps prevent masonry settlement from crushing the window frame, avoiding what the industry refers to as “brick binding.”
Professional Flashing and Sill Integration
Water management separates an amateur installation from a professional, long-lasting barrier against the elements. Because the secret to leak-proof windows is all in the flashing, our crews build a self-draining sill pan directly into the rough opening before inserting the frame.
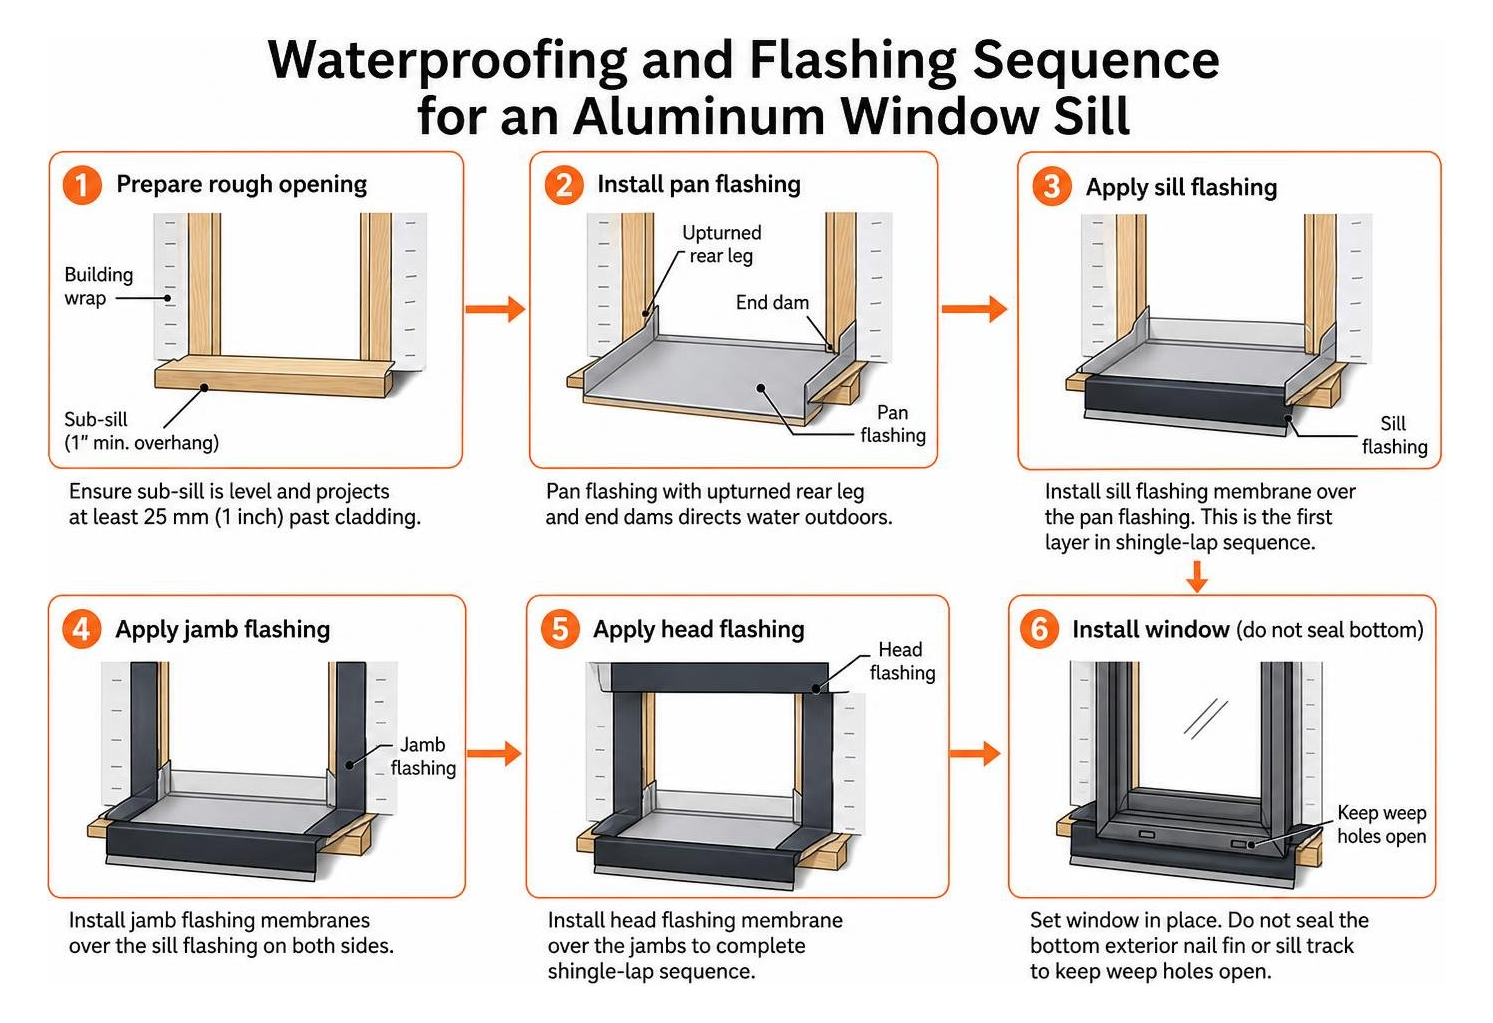
Pan flashing is installed with an upturned rear leg and end dams to redirect any incidental water outdoors. Self-adhering flashing membranes are applied in a strict shingle-lap fashion: sill flashing goes down first, followed by jamb membranes overlapping the sill, and finally the head flashing overlapping the jambs. On units equipped with pan flashing, technicians avoid sealing the bottom exterior nail fin or sill track. This design ensures the window’s built-in weep holes remain open and unobstructed, allowing condensation and driving rain to escape harmlessly. For joint sealing, we specify high-elasticity, low-modulus sealants (meeting Class 20LM/25LM standards) that maintain their elastomeric bond across freeze-thaw cycles without tearing away from the metal.
How Professionals Fit Aluminum Window Frames

Once opening tolerances and weatherproofing are complete, the window is dry-fitted to confirm reveal alignments before permanent mechanical fasteners are driven. Our comprehensive window installation guide emphasizes that aluminum frames must never be forced or twisted into an opening.
Setting, Shimming, and Squaring the Frame
To set the window, installers place dense, rot-proof composite packers on the sill plate beneath the jambs and mullions. Wooden shims can compress or rot over time when exposed to moisture; composite packers retain their exact dimensions indefinitely.
The crew uses a spirit level—rotating it 180 degrees to verify calibration—and adjusts the sill packers until the base is flat. The frame is then set in place, closed and latched to prevent frame distortion. Installers insert side shims at fixing points, ensuring jambs remain straight and without inward or outward bowing. Technicians verify squareness by checking diagonal dimensions across opposing corners; both diagonal measurements must match within 1/16 of an inch.
| Installation Factor | New Construction (Nail Fin) | Pocket Replacement (Existing Frame) |
|---|---|---|
| Primary Attachment | Exterior nailing flange fastened to framing | Through-jamb screws into existing structural buck |
| Siding / Trim Impact | Exterior trim and siding overlap the fin | Exterior and interior stops removed and reset |
| Water Barrier Tie-in | Flashing tape laps directly to house wrap | Perimeter elastomeric seal against exterior stop |
| Expansion Clearance | 1/8″ to 1/4″ perimeter margin to siding | 1/8″ shim gap around existing pocket frame |
| Sill Pan Method | Full pre-formed pan flashing beneath nail fin | Sloped sill profile with foam backer rod & sealant |
Frame Anchoring and Structural Support
Securing an aluminum frame requires adherence to manufacturer fastener schedules. Fasteners driven directly through the bottom sill track risk puncturing the water barrier and inviting leaks; therefore, anchoring is concentrated on the jambs and head.
Corner jamb fixings are positioned between 100 mm and 150 mm (4 to 6 inches) from each external corner. Intermediate fixings are spaced along the perimeter at centers no greater than 600 mm (24 inches), with a minimum of two fixings per jamb. For wider spans exceeding 1,800 mm (roughly 6 feet), central head and sub-sill anchors provide additional wind-load resistance. Every fastener penetrates a minimum of 25 mm to 38 mm (1 to 1.5 inches) into structural timber framing, or into plugged masonry anchors. Shims are always placed directly behind fastener locations to prevent the screw tension from bowing the aluminum profile.
Weatherproofing, Sealing, and Interior Finishes
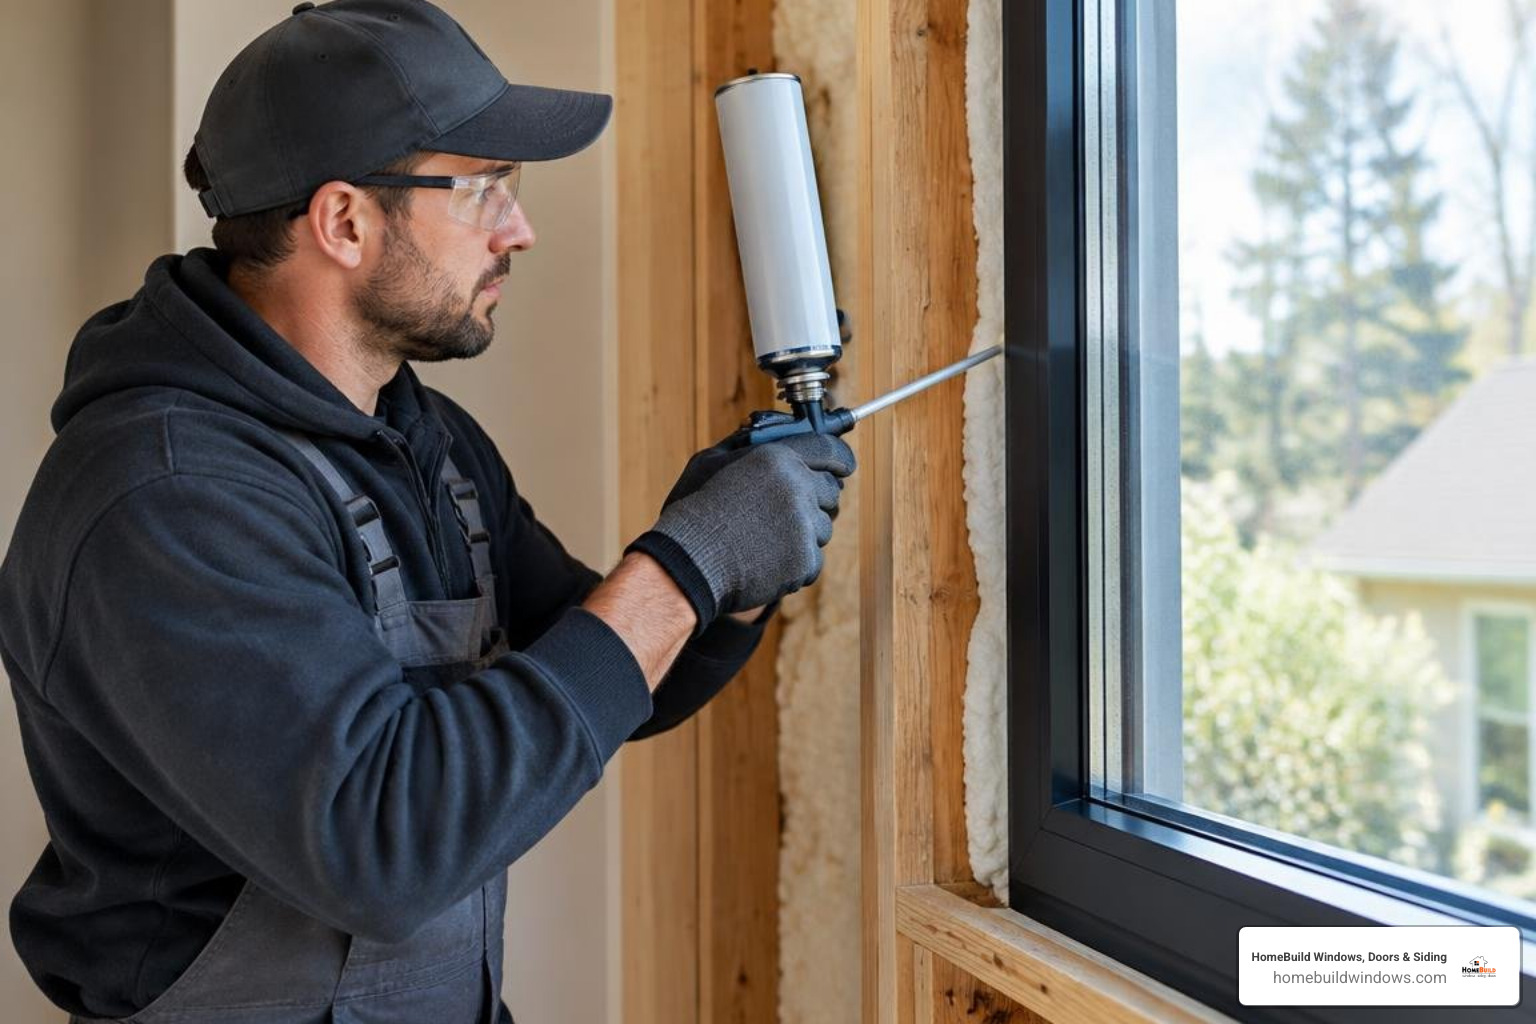
With the frame anchored, the perimeter cavity between the frame and wall framing is insulated. Professionals avoid high-pressure expanding foams, which can exert hundreds of pounds of pressure and bow the rigid aluminum jambs. Instead, our technicians use AAMA 812-tested, low-expansion polyurethane foam applied in controlled layers around the interior perimeter.
For broader insight into thermal performance and sash styles, review a guide to aluminum double hung windows to see how structural thermal breaks combine with modern glazing. On the exterior perimeter, closed-cell foam backer rods are installed into expansion joints, followed by a continuous bead of weather-rated sealant. This joint design allows the sealant to flex as the building shifts without cracking.
Operational Checks for Aluminum Window Sashes
After securing and sealing the unit, our crew performs an operational check before packing up tools:
- Sliding or operating the sash repeatedly to ensure smooth, quiet travel along the tracks.
- Adjusting roller assemblies on sliding units to achieve an even sightline across the sill.
- Inspecting weatherstripping contact along all four perimeter edges to prevent air infiltration from Chicago wind gusts.
- Checking hardware cam-locks and latches to ensure positive engagement without requiring excessive force.
- Confirming that sashes sit firmly in their tracks without rattling or loose play.
New Construction vs. Replacement Window Fitting
Window installation methods differ based on whether a home is undergoing new construction or retrofitting existing units. In new construction or full-frame tear-outs, windows feature an integrated nailing fin. The fin is bedded into a 3/8-inch bead of exterior sealant against the sheathing and fastened around the exterior perimeter. This integration allows flashing membranes to bond directly over the flange and tie seamlessly into the home’s water-resistive barrier, in line with technical installation standards for exterior wall envelopes.
In pocket replacements—common in historic Chicago brick homes—the original exterior master frame remains undisturbed if structurally sound. The old sashes, pulleys, and parting stops are removed, and a custom-sized aluminum replacement insert is positioned against the existing interior or exterior blind stop. This method preserves interior trim and vintage plaster while upgrading thermal performance and draft protection.
Frequently Asked Questions About Aluminum Window Installation
What clearance does an aluminum window need in the rough opening?
An aluminum window rough opening should generally measure 20 mm wider and 30 mm higher (roughly 3/4 inch to 1 inch overall) than the frame’s outer dimensions. This clearance provides sufficient room for leveling shims, thermal expansion, interior drywall returns, and continuous perimeter insulation.
How do professionals determine secure frame anchoring?
Technicians determine anchor spacing based on frame dimensions and wall construction. Fasteners are placed 4 to 6 inches from each corner, with intermediate anchors spaced no more than 24 inches apart. Fasteners pass through non-compressible shims and penetrate at least 1 to 1.5 inches into solid framing to resist high wind pressures.
How do professionals prevent water leaks beneath an aluminum window sill?
Installers build a sloped sill with waterproof pan flashing, upturned end dams, and integrated membrane flashings that overlap like shingles. Drainage channels and exterior weep holes are kept completely unsealed, allowing collected water to drain out and over the sub-sill rather than pooling against wall studs.
Why is professional installation important for aluminum windows?
Aluminum is a rigid material with high thermal conductivity. Proper installation requires precise shimming, low-expansion thermal insulation, correct fastener torque, and flashing integration to maintain manufacturer warranties, protect against air leaks, and prevent structural frame racking.
Conclusion
A leak-free, draft-proof aluminum window installation requires precise measurements, structural shimming, and advanced moisture management. At HomeBuild Windows, Doors & Siding, we have served homeowners across Chicago and the surrounding suburbs since 2004. We do not use subcontractors; every project is installed exclusively by our trained, in-house crews and supervised on site by our founder, Steve Mlynek, who visits every single job.
HomeBuild is an Elite Platinum Pella Certified Contractor and an Andersen Premier Certified Contractor, also installing premium products from ProVia. Our commitment to craftsmanship is recognized by the Angi Super Service Award 2025, the 2025 Nextdoor Neighborhood Faves Winner award, and a 4.9-star rating backed by more than 220 Google reviews. We back every project with a 10-year labor warranty and a complimentary VIP Protection Plan (ranging from 1 to 5 years depending on project scope), which you can explore on our warranty protection page.
If you are considering new aluminum windows for your home, our replacement window buying guide can help you compare styles and performance before you schedule a free estimate with our team today.