


Install a Patio Door Handle for a Secure, Smooth-Operating Door
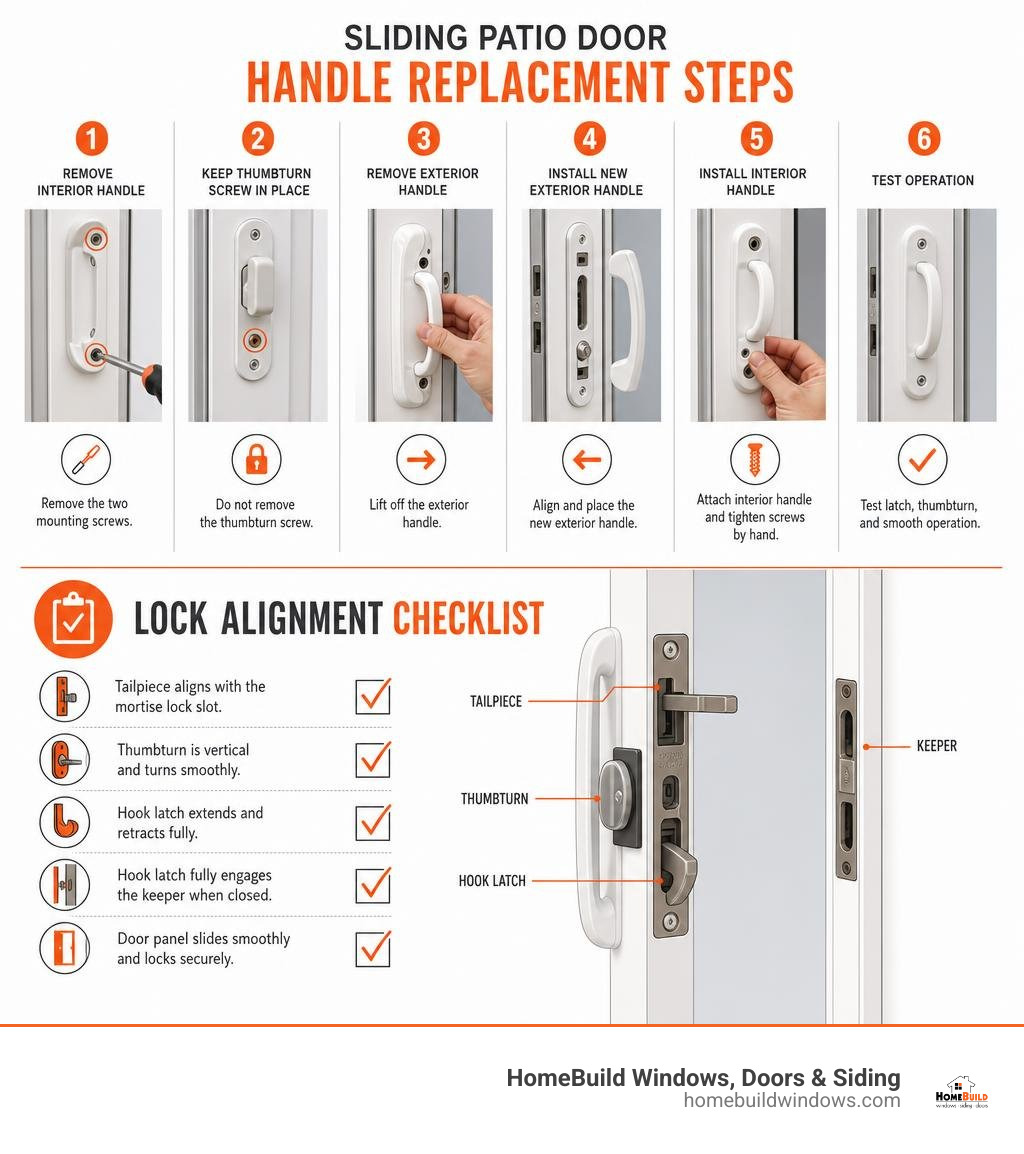
A successful patio door handle installation starts with matching the replacement set to your door’s screw spacing, panel thickness, and lock style. Remove the two handle mounting screws, keep the thumbturn screw in place so internal lock parts do not drop into the door, then fit the new interior and exterior pieces, tighten the screws by hand, and test the latch before calling the job done.
Most sliding patio door handles use existing pre-drilled holes, making replacement straightforward when the hardware is compatible. The key is alignment: the lock tailpiece must meet the mortise lock correctly, the thumbturn must sit in the right position, and the hook latch must fully engage the keeper when the panel closes.
I am Steve Mlynek, founder of HomeBuild Windows, Doors & Siding, with more than 20 years of experience helping Chicago-area homeowners improve their doors and windows. In the steps ahead, I will show you how to approach patio door handle installation carefully, avoid common lock-alignment problems, and know when professional help is the better choice.
Key terms for patio door handle installation:
Preparing Tools and Verifying Door Measurements
Before picking up a screwdriver, gathering the right tools ensures the replacement proceeds smoothly without damaging delicate finishes or stripping screw heads. Working with quality exterior components requires patience and precision. High-quality replacement handle kits made from durable zinc alloy provide corrosion resistance, which is especially important during freezing Chicagoland winters and humid Midwest summers.
Here is what you will need for the job:
- #1 and #2 Phillips head hand screwdrivers (a long-shaft screwdriver is helpful)
- Flat-head screwdriver
- Tape measure or precision ruler
- Hex keys (if installing sets with socket head set screws)
- Replacement handle kit with matching lock tailpiece and gaskets
- Personal protective equipment (safety glasses and work gloves)
When working on larger assemblies or multi-slide systems, consulting official manufacturer documentation like Assembly and Installation Instructions can help you understand how multi-panel systems interface with handle hardware.
Measuring Screw Spacing and Door Thickness
Taking accurate measurements of your existing door panel prevents the frustration of buying hardware that does not fit the factory cutouts.
- Screw Hole Spacing (Center-to-Center): Measure the distance from the center of the top mounting screw hole to the center of the bottom mounting screw hole. The two most common industry dimensions are 6-5/8 inches and 3-15/16 inches.
- Door Panel Thickness: Measure the thickness of your door stile (the vertical edge). Standard sliding patio doors generally range from 1 inch to 1-1/8 inches thick, though premium insulated wood or fiberglass units from brands like Pella, Marvin, and Andersen can measure 1-3/4 inches or more.
- Locating Post and Stile Bore: Check the interior bore diameter and confirm whether your handle uses a raised locating post to seat into the door stile cutout.
Preparing Hardware for Patio Door Handle Installation
Many modern replacement kits feature a non-handed design, meaning they work on both right-hand and left-hand opening doors. These kits often include multiple hook latch sizes (such as 3/8″, 1/2″, 5/8″, and 3/4″) to accommodate different depths of internal mortise locks.
If you discover that the mortise lock inside the door is seized or damaged by years of moisture, explore our comprehensive guide to replacing your sliding patio door handle and lock to refresh the entire locking assembly.
How to Safely Remove an Old Sliding Patio Door Handle
Removing an old handle seems simple, but rushing can result in dropped internal parts or scratched exterior paint.
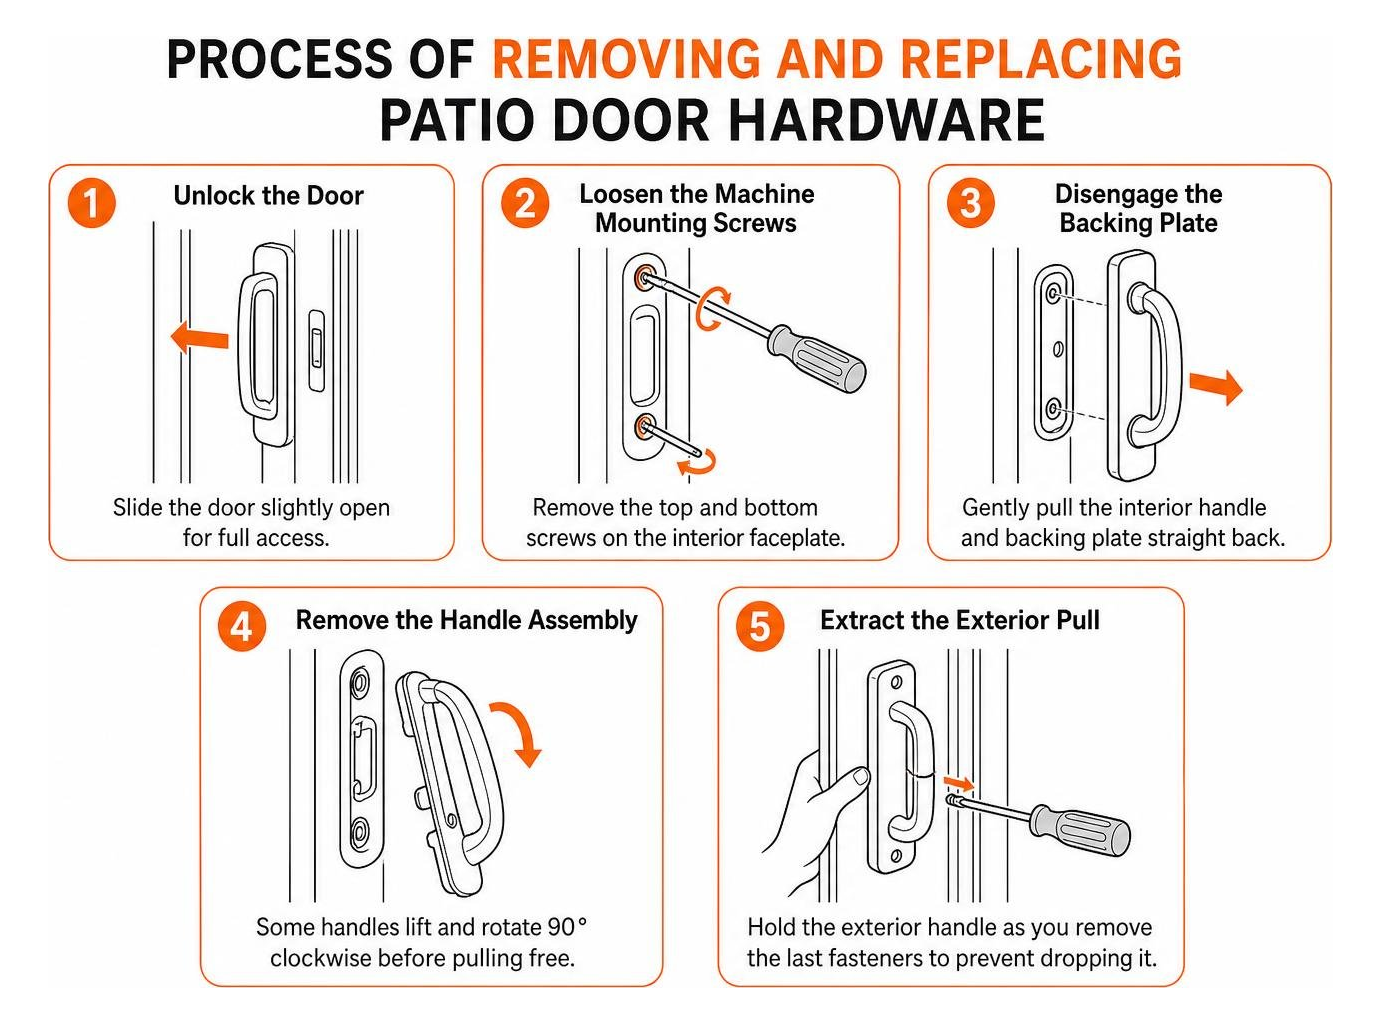
- Unlock the Door: Slide the door slightly open so you have full access to both the interior and exterior stiles.
- Loosen the Machine Mounting Screws: Use a hand screwdriver on the interior handle faceplate. Remove the top and bottom screws that clamp the interior and exterior handles together.
- Disengage the Backing Plate: Gently pull the interior handle and backing plate straight back from the door stile.
- Remove the Handle Assembly: Some handles lift and rotate 90 degrees clockwise before pulling free from the door face.
- Extract the Exterior Pull: Hold the exterior handle as you remove the last fasteners so it does not fall onto the patio or deck.
Crucial Safety Step: Securing the Thumbturn and Lock Reach-Out
The most critical caution during removal involves the thumbturn mechanism: do not remove the small center screw on the thumbturn lever while the mortise lock remains inside the door.
In many sliding patio doors, this small screw directly holds the lock reach-out tailpiece inside the mortise cylinder cavity. If you unscrew the thumbturn fastener before securing the lock body, the internal reach-out lever can fall into the bottom hollow core of the door stile. Retrieving a loose metal part from inside a sealed door panel often requires removing the entire door panel from its tracks. Keep the thumbturn connected to its mounting plate during removal.
Step-by-Step Patio Door Handle Installation Guide
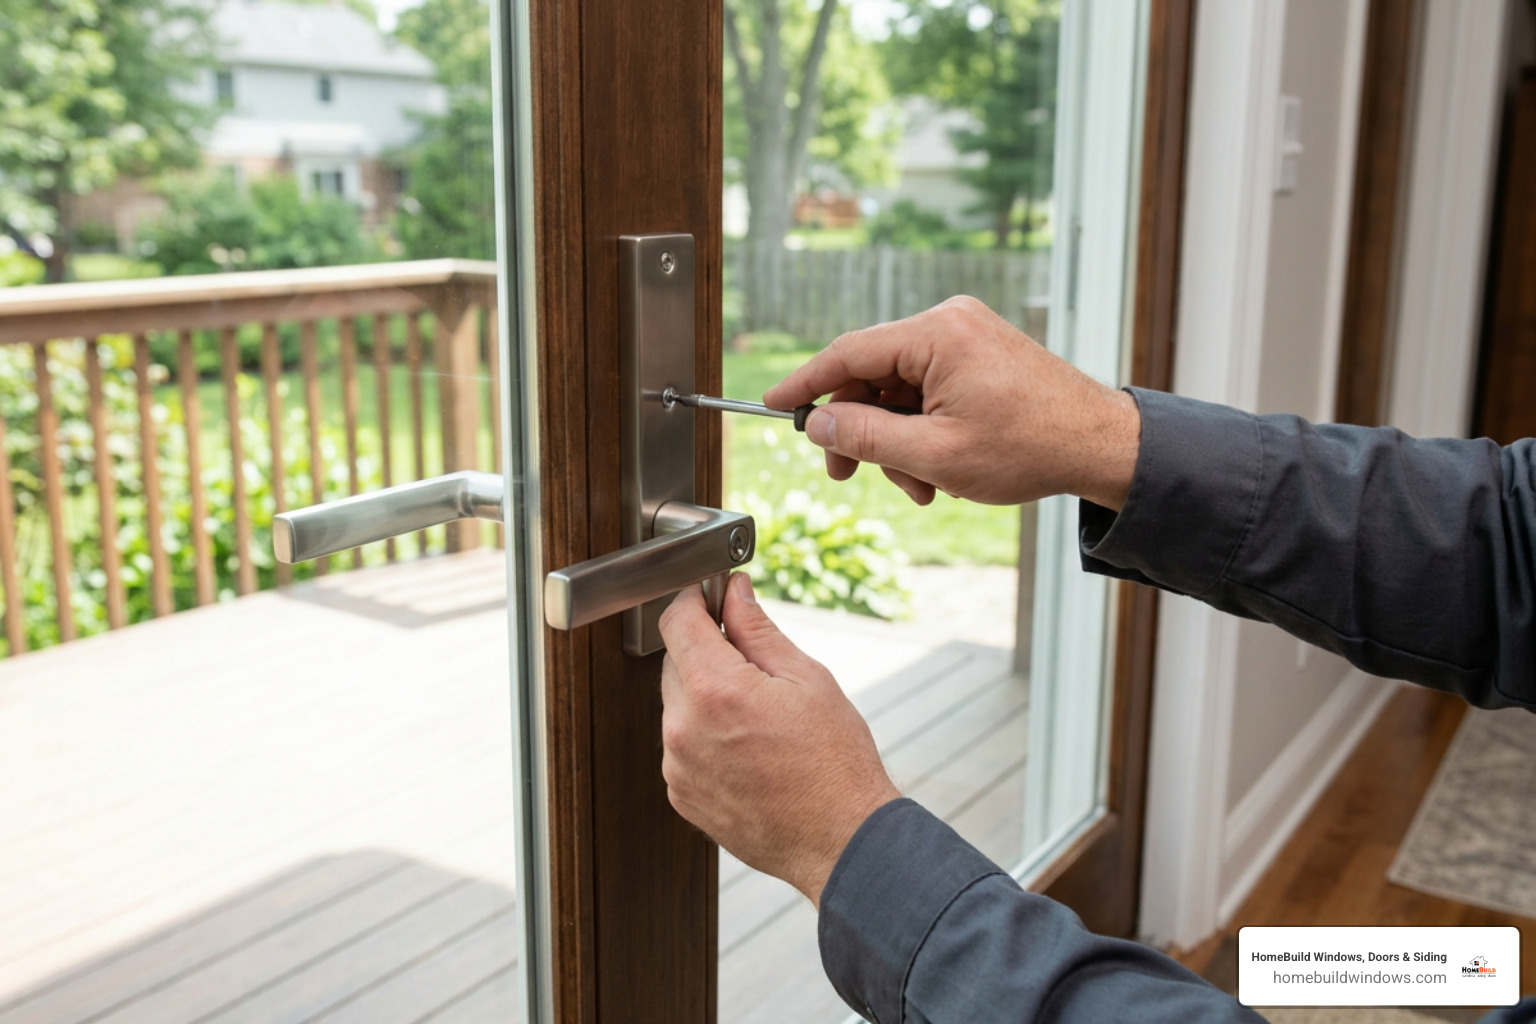
Once the old hardware is cleanly removed, installation follows a structured, reverse sequence. To ensure a tight seal against Midwest drafts, check out manufacturer-specific guidelines such as the Contemporary Handle Installation Guide when handling architectural patio door lines.
- Position Weather Gaskets: Fit the protective rubber or foam gaskets onto the mounting faces of both the interior and exterior plates.
- Insert Exterior Handle & Key Cylinder: Place the exterior handle assembly into the pre-drilled stile holes from the outside, sliding the lock cylinder tailpiece through the mortise hub.
- Engage the Interior Assembly: Align the interior handle plate so the thumbturn tailpiece slot matches the orientation of the lock mechanism.
- Thread Fasteners by Hand: Insert the machine screws (#10-32 screws are standard) through the interior plate, catching the threaded bosses on the exterior handle.
- Tighten Evenly: Tighten both screws alternately to distribute pressure evenly across the door stile. Apply approximately 15 to 30 inch-lbs of torque. Do not overtighten with a power drill, as this can crack the handle casting or crush the door profile.
- Install Screw Covers: Snap or fasten any decorative screw covers or socket head cap screws into place.
Aligning the Lock Cylinder, Tailpiece, and Gaskets
Proper lock performance relies on exact tailpiece alignment:
- Gasket Orientation: Check that all gasket punchouts match the screw holes and keyway slots. If a hole is blocked, flip the gasket over.
- Thumbturn Position: For most sliding doors, align the thumbturn vertically when the lock is in the locked position, and horizontally when unlocked.
- Anti-Slam Feature: Many modern doors incorporate an anti-slam button on the edge mechanism. If this button is not depressed, the thumbturn will feel locked or jammed. Depress the anti-slam pin manually to test smooth operation before closing the door into the frame.
Testing Lock Alignment After Patio Door Handle Installation
After tightening the mounting screws, perform a full functional check before considering the job finished:
- Slide the door closed slowly and observe how the latch hook approaches the frame-mounted keeper.
- Turn the interior thumbturn. The hook should swing freely into the keeper slot and pull the door snug against the weatherstripping.
- If the latch hits the top or bottom edge of the keeper pocket, adjust the keeper height up or down by loosening its jamb screws.
- If the door panel sits unevenly in the opening, use a screwdriver to adjust the bottom door roller screws (accessible via small holes at the base of the panel) until the door is square and plumb.
If your project involves swinging panels rather than sliding glass, our step-by-step french door replacement guide provides additional help for multi-point latching hardware.
Active Handle Sets vs. Passive Trim Sets
When updating a multi-panel patio door system, understanding the difference between active and passive hardware ensures you buy the correct set for each panel.
| Feature | Active Handle Set | Passive (Dummy) Trim Set |
|---|---|---|
| Primary Function | Operates latching, mortise lock, and key cylinder | Serves as a stationary pull handle |
| Locking Mechanism | Includes thumbturn, keyed cylinder, and tailpiece | No operational lock or thumbturn mechanism |
| Panel Type | Operating (sliding/swinging) active panels | Stationary or secondary inactive panels |
| Anti-Slam Support | Interfaces with internal anti-slam latches | Rigid attachment with blank backing plate |
| Hardware Components | Exterior pull, interior lever, mortise hook, screws | Interior/exterior dummy pulls, through-bolts |
For extensive remodeling projects where hardware changes turn into full door upgrades, review our guide on installing a complete patio door unit to ensure structural integrity and weather protection.
Frequently Asked Questions About Patio Door Handles
Why will the thumbturn not rotate or lock after installing the new handle?
If the thumbturn refuses to turn once the new handle is installed, the problem is usually caused by one of three issues:
- The Anti-Slam Mechanism is Engaged: Many doors have a safety trigger on the stile edge that prevents the lock from extending when the door is open. Press the trigger pin in by hand to see if the thumbturn rotates.
- Misaligned Tailpiece: The flat metal tailpiece connecting the thumbturn to the internal lock hub may be rotated 90 degrees out of phase or inserted at an angle.
- Door Out of Plumb: If the thumbturn rotates freely when the door is open but binds when closed, the latch hook is misaligned with the doorframe keeper. Adjust the bottom roller screws or shift the strike plate to restore smooth engagement.
Can a replacement handle set be installed on both left-hand and right-hand doors?
Yes, most aftermarket and universal patio door handle sets feature non-handed construction. You can reverse the handle orientation simply by rotating the pull assembly 180 degrees before fastening. If reversing the handle places an engraved brand logo upside down, verify whether the lever handle detaches from the backplate via a small set screw so it can be flipped independently.
Where can homeowners find part identification assistance for door hardware?
If you cannot identify your door brand or model:
- Check the Glass Corner: Most manufacturers (including Andersen, Pella, Marvin, and JELD-WEN) laser-etch their logo and production date code in the corner of the insulated glass unit.
- Use Manufacturer Series Worksheets: Brand portals offer series worksheets to help match hardware styles to 100, 200, 400, or custom series doors.
- Contact Customer Support: Dedicated hardware suppliers like SWISCO provide customer support (accessible weekdays at 888-991-1929), while Andersen support can be reached at 855-603-0692 for specific replacement parts.
Conclusion
A well-fitted patio door handle provides smooth operation, reliable security, and a tight seal against outside weather. By taking careful measurements, avoiding the thumbturn screw trap, and ensuring your latch hooks line up squarely with the jamb keeper, you can upgrade your sliding patio door quickly and effectively.
When aging hardware reveals bigger problems—such as rotted wood frames, drafty glass, sagging rollers, or warped door panels—replacing the entire door system is often the best long-term investment for your home’s comfort and curb appeal.
At HomeBuild Windows, Doors & Siding, we are proud to be a trusted, locally owned exterior remodeling contractor with over 20 years of experience serving Chicagoland and the Northwest Suburbs. As an Elite Platinum Pella® Certified Contractor and Andersen Certified Contractor, we hold an Angi Super Service Award, Nextdoor Neighborhood Faves honors, and over 200 positive Google reviews. Our fully licensed and insured team delivers expert installation, unmatched durability, and energy efficiency built to withstand tough Midwest winters.
Explore our full line of window and door replacement services in Chicago and schedule your free consultation today!