


Replace a Window With Vinyl Siding Without Removing It All
You usually do not need to remove all the vinyl siding to replace a window. For a pocket replacement, the existing window frame stays in place, so exterior siding and trim may remain largely untouched. For a full-frame replacement, unlock and remove only the siding courses and J-channel around the opening so you can inspect framing, install flashing, and secure the new window’s nail fin.
For homeowners learning how to install a replacement window with vinyl siding, the key is to protect the drainage path:
- Measure the opening and choose the right replacement method.
- Carefully unzip nearby siding with a siding removal tool instead of prying panels loose.
- Repair any rot before the new window goes in.
- Install sill flashing first, then side flashing, head flashing or drip cap, J-channel, and finally re-engage the siding.
- Leave room for vinyl siding to expand and contract, and use compatible exterior sealant only where the window system calls for it.
A sound window installation is more than a tight fit. Proper shimming, low-expansion foam, flashing, and correctly layered J-channel help stop drafts and direct rainwater back to the exterior, rather than behind the siding.
I am Steve Mlynek, founder of HomeBuild Windows, Doors & Siding, with more than 20 years of experience helping Chicago-area homeowners understand how to install a replacement window with vinyl siding while protecting exterior trim and improving energy performance. As an Elite Platinum Pella Certified Contractor and Andersen Certified Contractor, I have seen why careful preparation and water management matter before any window is secured.
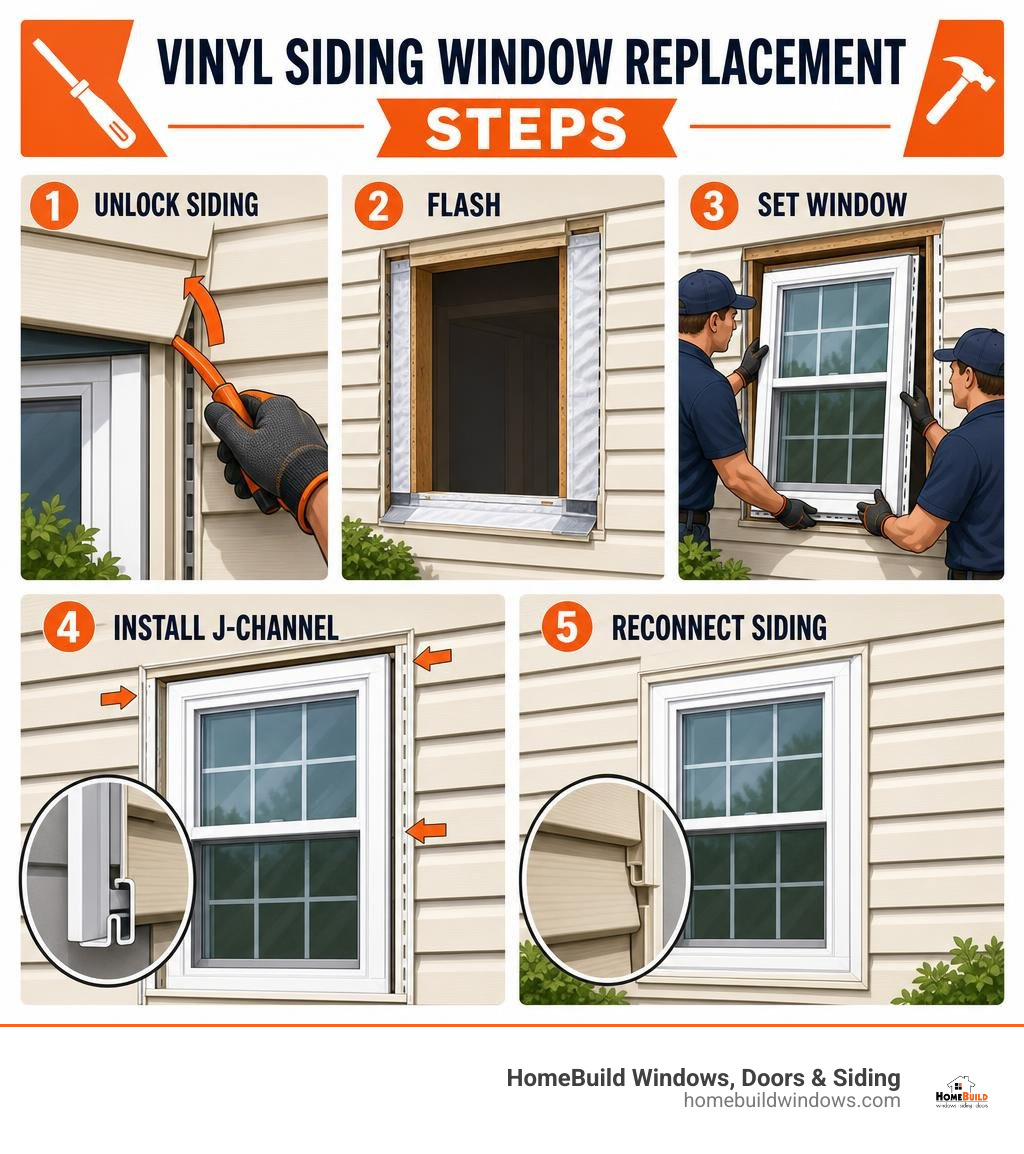
Quick look at how to install a replacement window with vinyl siding:
- how to install vinyl windows new construction
- how to replace a window and frame without losing your mind
- window replacement guide
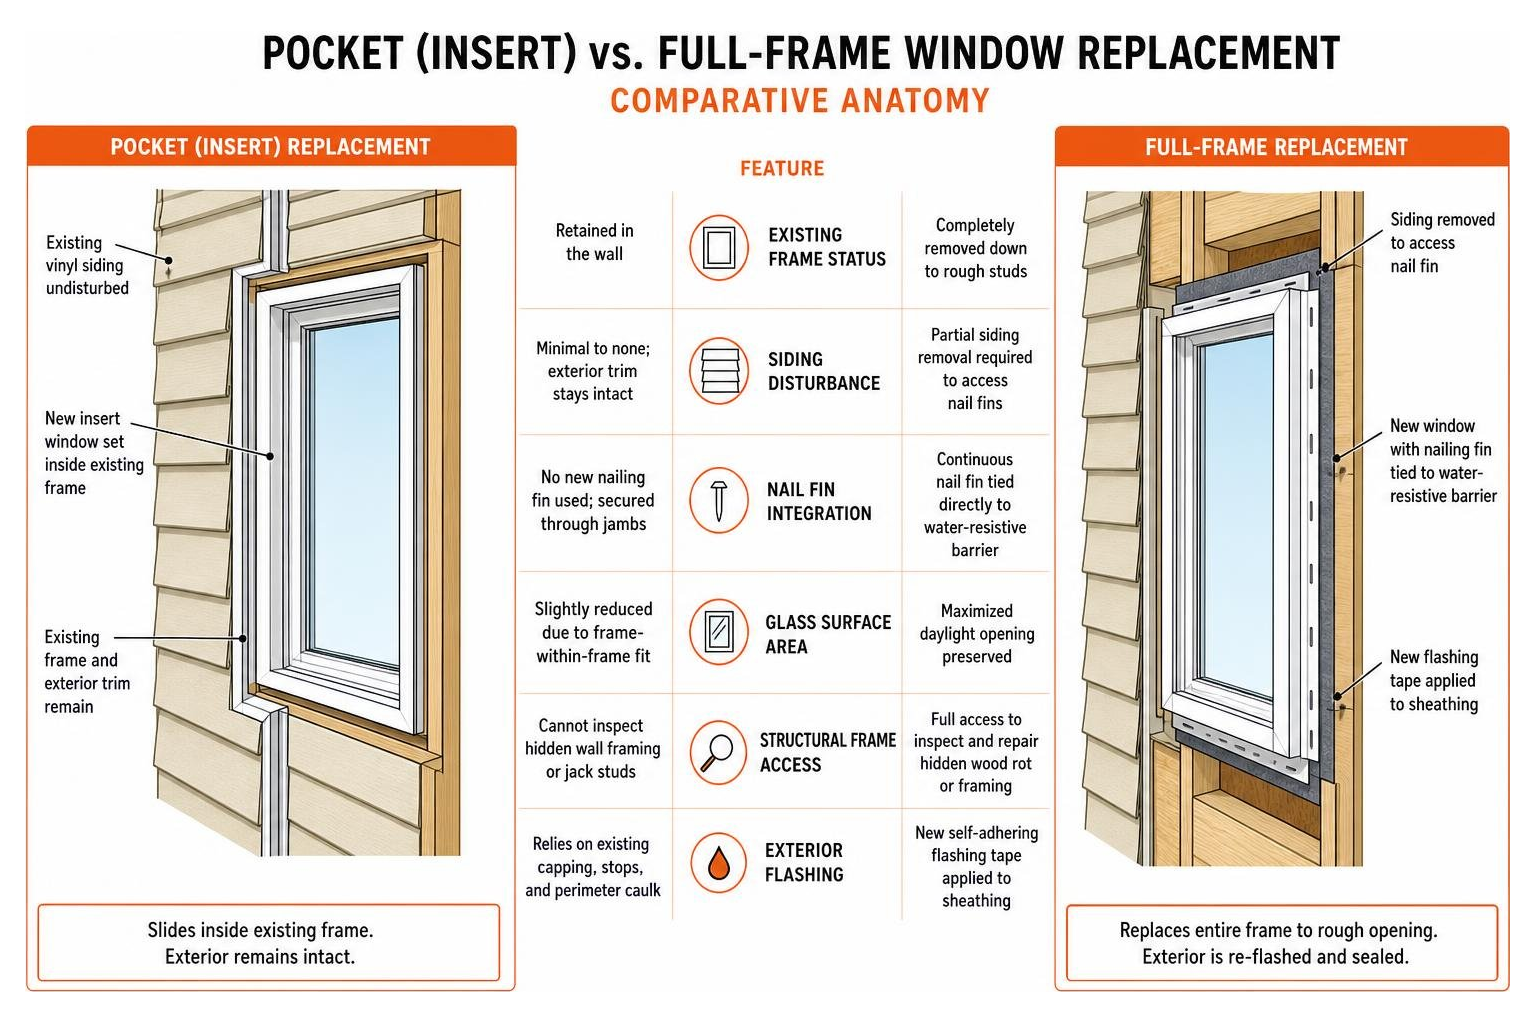
Understanding Pocket vs. Full-Frame Installation with Vinyl Siding
When upgrading older windows on a house clad in vinyl siding, choosing between a pocket insert and a full-frame replacement sets the entire scope of the job. In our local climate across Chicago and the northwest suburbs, severe winter freezes and humid summers place heavy thermal demands on building envelopes. Selecting the wrong installation style can compromise your home’s insulation and exterior siding integration.
| Feature | Pocket (Insert) Replacement | Full-Frame Replacement |
|---|---|---|
| Existing Frame Status | Retained in the wall | Completely removed down to rough studs |
| Siding Disturbance | Minimal to none; exterior trim stays intact | Partial siding removal required to access nail fins |
| Nail Fin Integration | No new nailing fin used; secured through jambs | Continuous nail fin tied directly to water-resistive barrier |
| Glass Surface Area | Slightly reduced due to frame-within-frame fit | Maximized daylight opening preserved |
| Structural Frame Access | Cannot inspect hidden wall framing or jack studs | Full access to inspect and repair hidden wood rot or framing |
| Exterior Flashing | Relies on existing capping, stops, and perimeter caulk | New self-adhering flashing tape applied to sheathing |
Before jumping into a project, many homeowners evaluate DIY window installation to avoid soaring energy bills, but understanding the mechanical differences between these two methods ensures you do not inadvertently damage your vinyl cladding.
When to Choose an Insert Pocket Installation
Pocket replacement windows (often called insert windows) are engineered to slide directly inside an existing, structurally sound window frame. This approach removes the interior parting stops, sashes, and balance mechanisms, leaving the original wooden or vinyl jambs, exterior blind stops, and exterior vinyl siding untouched.
This option works best when the surrounding frame and sill are level, square, and completely free of decay. Retrofit sizing tolerances require the new insert unit to be approximately 1/4 inch narrower and shorter than the existing inner frame to allow for proper squaring and shimming. Because the exterior cladding remains undisturbed, you preserve the original weather-resistive seals around the exterior casing without cutting or unzipping siding panels.
Full-Frame Tear-Out and Siding Removal Scope
A full-frame replacement involves removing the entire sash, jamb, sill, and exterior brickmould down to the structural rough opening framing. When homes have vinyl siding, a full tear-out means you must expose the bare wall sheathing around the perimeter to secure the new window’s integral nailing flange and install code-compliant flashing membrane.
Rather than ripping down entire siding walls, technicians use a specialized vinyl siding zip tool. This tool slides underneath the interlocking seam of the vinyl panels adjacent to the window, disengaging the bottom lock without cracking the vinyl. Once unhooked, the siding nails are gently pried out, giving you direct access to the sheathing and structural framing while preserving the siding panels for reinstallation.
Essential Tools, Materials, and Measuring Protocol
Proper installation requires specialized tools and commercial-grade sealants to create an airtight, watertight barrier. When retrofitting windows, consulting verified installation guidelines helps ensure all work complies with ASTM 2112 industry standards and manufacturer warranty parameters.
- Hand Tools: Siding zip tool, flat pry bar, 2-foot and 4-foot spirit levels, combination square, heavy-duty utility knife, stiff putty knife, and measuring tape.
- Power Tools: Cordless drill/driver with 3/16-inch, 3/8-inch, and magnetic driving bits, reciprocating saw (for stubborn fasteners during full tear-outs).
- Fasteners & Hardware: 3-inch #8 or #10 corrosion-resistant interior installation screws, 1-1/2-inch galvanized roofing nails for exterior J-channel and siding flanges, synthetic or cedar shims.
- Sealants & Insulation: ASTM C 920 Class 25 neutral-cure 100% exterior silicone, low-pressure, low-expansion polyurethane insulating foam, and closed-cell foam backer rod (1/4″ to 1/2″).
- Flashing Components: AAMA 711-approved self-adhering flashing tape (butyl or modified asphalt), aluminum drip cap flashing, and matching vinyl J-channel.
- Personal Safety Equipment: Work gloves, eye protection, and EPA RRP-compliant dust masks if working on homes built before 1978 where lead paint may be present.
Precision Sizing: How to Install a Replacement Window with Vinyl Siding Opening Clearances
Accurate measurements prevent costly mistakes during installation. Window frames are rarely perfectly square, especially in older Midwest homes that have settled over decades.
- Measure the Width: Measure the clear distance between the side jambs at three points: the top, the middle, and the bottom. Record the smallest measurement. Subtract 1/2 inch to determine your replacement frame width, allowing a 1/4-inch shim gap on each side.
- Measure the Height: Measure from the high point of the sill to the top head jamb at three points: left side, center, and right side. Record the smallest dimension. Windsor and other leading manufacturers recommend ordering the replacement frame approximately 3/8 inch smaller than this height.
- Check for Square: Measure diagonally from top-left to bottom-right, and from top-right to bottom-left. If the two diagonal dimensions differ by more than 1/4 inch, the opening is out-of-square. You will need additional shim clearance to level the new window plumb within the skewed opening.
- Mulled Units and Sizing Limits: When combining multiple windows (such as side-by-side double-hungs), mulled product combinations cannot exceed 50 sq ft if the mull length is greater than 53-1/2″, or 70 sq ft where the mull length is less than or equal to 53-1/2″. Additionally, standard residential vinyl units like Encompass by Pella are engineered for installations under 40 feet above ground level.
Critical Sealants and Fasteners
Using the right chemistry on vinyl materials is essential:
- Neutral-Cure Silicone: Always use a neutral-base exterior silicone conforming to ASTM C 920 Class 25. Standard acetic-acid-curing silicones release vinegar scents and do not adhere properly to vinyl compounds over time.
- Low-Expansion Foam: Traditional high-expansion spray foam expands with significant force and can bow vinyl jambs inward, preventing the sashes from sliding or locking. Use only low-pressure polyurethane foam designed specifically for window and door perimeters.
- Shims: Use synthetic composite or rot-resistant cedar shims. Avoid untreated softwoods that can rot if minor condensation gathers within the framing cavity.
Step-by-Step Guide: How to Install a Replacement Window with Vinyl Siding
Upgrading your home’s exterior requires careful planning. Before beginning work, review our guide on how to prepare for a window installation to protect interior furnishings and set up a safe perimeter.
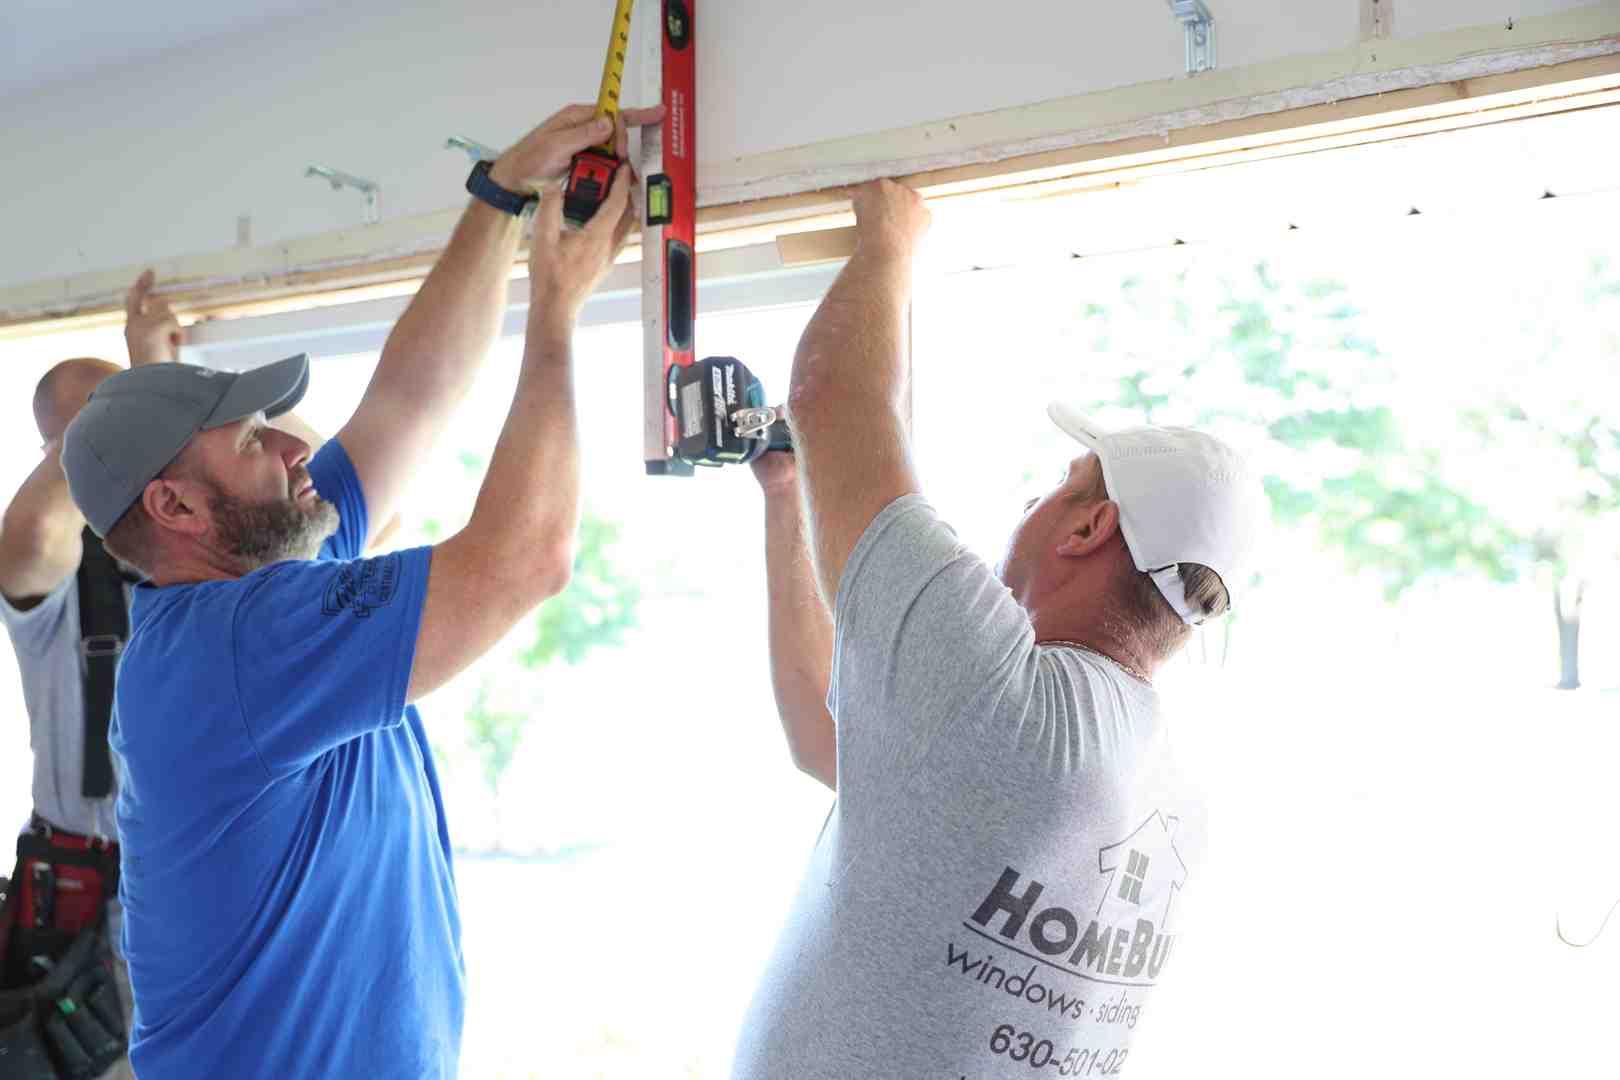
Preparing the Opening: How to Install a Replacement Window with Vinyl Siding Without Siding Damage
- Remove Interior Stops: Score the paint lines between the interior trim stops and the window frame using a utility knife. Carefully pry the interior stops loose with a stiff putty knife to avoid splitting the wood, setting them aside for reinstallation.
- Extract Sashes and Balances: Remove the lower sash, cut the balance cords or detach spiral balance springs, remove the parting stop bead from the frame head and jambs, and take out the upper sash.
- Prep the Siding Perimeter: If performing a full-frame install, use your siding removal zip tool to unzip the vinyl panel directly above the window and the panels flanking both sides. Carefully withdraw the nails holding the siding panels adjacent to the window frame. This exposes the old nail fin or exterior casing without cutting into your home’s siding panels, as outlined in our 7-step window replacement breakdown.
- Clean the Frame Substrate: Scrape away all old caulking, paint flakes, and debris from the sill and blind stops until you reach clean, bare wood or vinyl framing.
Addressing Rotted Sills and Damaged Framing
Midwest freeze-thaw cycles frequently cause hidden water intrusion around neglected windows. Before setting a new unit, thoroughly inspect the rough sill, king studs, and jack studs.
- Soft Wood Inspection: Probe the sill and bottom corners with an awl or flathead screwdriver. If the wood feels spongy, the damaged material must be repaired before continuing.
- Minor Surface Decay: Treat superficial rot with a liquid wood hardener followed by structural epoxy filler, sanding it flat to restore a continuous bearing surface.
- Severe Structural Damage: Cut out decayed portions of the sub-sill or framing studs using an oscillating multi-tool. Sister new framing lumber to the existing studs and install a new rot-proof PVC or preservative-treated wood sill plate. Ensure the repaired rough sill is level and properly supported underneath.
Proper Layering Order for Flashing, J-Channel, and Weatherproofing
Water management relies on the shingle-lap principle: upper layers must always overlap lower layers so water cascades down and away from the building. For comprehensive exterior renovations, homeowners often review our guide on how to install home siding alongside window updates.
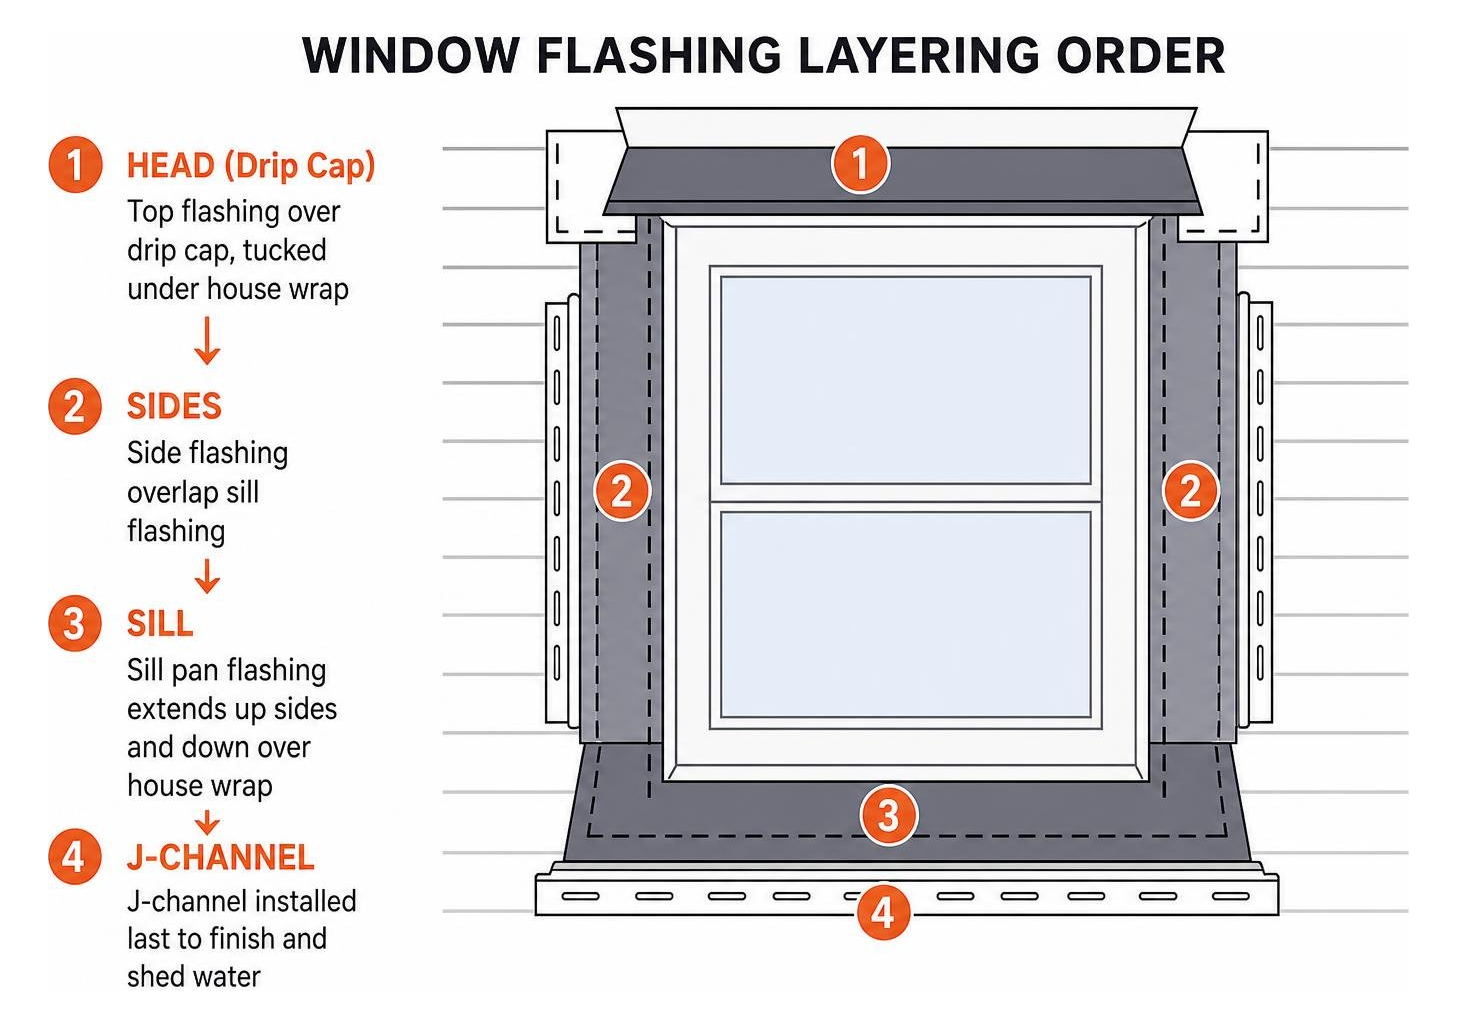
- Sill Pan Flashing: Apply self-adhering flashing tape across the rough sill, extending at least 6 inches up each jack stud and folded down over the house wrap below the window opening.
- Side Flashing: After securing the window’s nail fins (for full-frame installs), apply vertical strips of flashing tape over the side fins, overlapping the bottom sill flashing.
- Head Flashing & Metal Drip Cap: Install an aluminum drip cap over the top window flange. Apply top flashing tape over the drip cap’s vertical leg, tucked beneath the upper layer of the building’s weather-resistive barrier.
- J-Channel Fabrication: Cut the bottom J-channel piece flush with the window width. Cut side J-channels 2 inches longer than the window height, notching the bottom ends to create drainage drain tabs that fold beneath the bottom channel. Cut the top J-channel with 1-inch overhangs on each side, slicing miter tabs that bend downward into the side channels to shed water away from the upper corners.
- Fastening J-Channel: Nail the J-channel loosely every 8 to 12 inches using galvanized roofing nails. Do not drive nail heads flush against the vinyl—leave a 1/32-inch gap so the vinyl can expand and contract as outdoor temperatures change.
Setting, Shimming, and Securing the New Window
Follow this verified installation process for a clean fit, referencing standard DIY vinyl replacement steps where applicable:
- Dry Fit the Unit: Set the new window into the opening to confirm uniform clearances on all sides.
- Apply Bedding Caulk: For pocket installations, apply a continuous 3/8-inch bead of ASTM C 920 neutral-cure silicone against the inside face of the exterior blind stops and along the sill stool.
- Position and Level: Set the replacement window bottom-first onto the sill, then tilt the top into place until it rests firmly against the exterior stops. Place a level across the sill, head, and side jambs.
- Insert Shims: Place composite shims underneath the frame corners and behind each pre-drilled side jamb installation hole. Adjust shims until the unit is level, plumb, and square. Measure corner-to-corner diagonally to verify squareness.
- Fasten the Frame: Drive corrosion-resistant installation screws through the shims into the side framing jambs. Never over-tighten, as this will bow the vinyl frame outward. Check sash operation and latch alignment after driving each fastener.
- Insulate the Cavity: From the interior, insert a low-pressure expanding foam applicator tip into the perimeter gap. Apply a continuous 1-inch bead of low-expansion foam around the entire frame. Avoid overfilling the gap, as expanding foam can distort the jambs.
- Seal and Re-engage Siding: On the exterior, install closed-cell backer rod in any gaps exceeding 1/4 inch between the frame and siding/J-channel, then apply a smooth, continuous bead of neutral-cure silicone. Finally, use your zip tool to snap the vinyl siding courses back into their interlocking tracks, pressing upward until you hear the lock click into place.
Frequently Asked Questions About Installing Windows with Vinyl Siding
Do you have to remove all vinyl siding to replace a window?
No, you do not need to strip the entire wall of siding. For pocket insert replacements, the siding is not touched at all because the new unit installs from the interior into the existing frame.
For full-frame replacements requiring nail-fin access, you only need to unhook the siding panels immediately adjacent to the window perimeter using a siding zip tool. Once the window is flashed and nailed, those same vinyl panels snap back into place.
How do you properly install J-channel to ensure a watertight seal?
Proper J-channel installation requires precise overlapping and drainage tabs:
- Cut the top J-channel 2 inches longer than the window width, cutting a 1-inch drainage tab at both ends.
- Fold these tabs down into the vertical side J-channels so any water running off the header drains safely into the side channels.
- Never caulk the bottom J-channel to the window frame; leaving this seam unsealed allows any incidental moisture that enters the siding assembly to escape freely.
- Leave 1/4-inch expansion gaps between J-channel intersections to prevent buckling during summer heat waves.
What should you do if the replacement window size differs from the rough opening?
If the new replacement window is smaller than the opening, use structural framing lumber or cellular PVC jamb extensions to reduce the rough opening dimensions.
Secure the extension material directly to the framing studs, apply flashing tape over the new wood, and use exterior aluminum coil stock or cellular PVC trim boards to bridge the gap cleanly to the existing siding J-channel.
If the window is larger than the rough opening, structural reframing of the king studs, jack studs, and header is required.
Complete Your Exterior Remodel with Professional Care
Properly replacing windows in a vinyl-sided home requires a balance of thermal insulation, flashing integration, and careful handling of siding materials. When exterior components are installed with precision, your home gains significant protection against severe seasonal weather, drafts, and moisture intrusion while improving long-term curb appeal.
At HomeBuild Windows, Doors & Siding, we have spent more than 20 years helping homeowners across Chicago, Arlington Heights, Schaumburg, Glenview, and the surrounding northwest suburbs upgrade their home envelopes. As an Elite Platinum Pella® Certified Contractor, Andersen Certified Contractor, Angi Super Service Award winner, and Nextdoor Neighborhood Fave backed by over 200 positive Google reviews, our fully licensed and insured team delivers exceptional craftsmanship on every window, entry door, siding, and roofing installation.
Explore our comprehensive Replacement Window Buying Guide to learn more about energy-efficient window designs and professional installation techniques, or reach out to our team to schedule a consultation for your home.