


A Reliable Installation of Patio Door Starts With Water Control
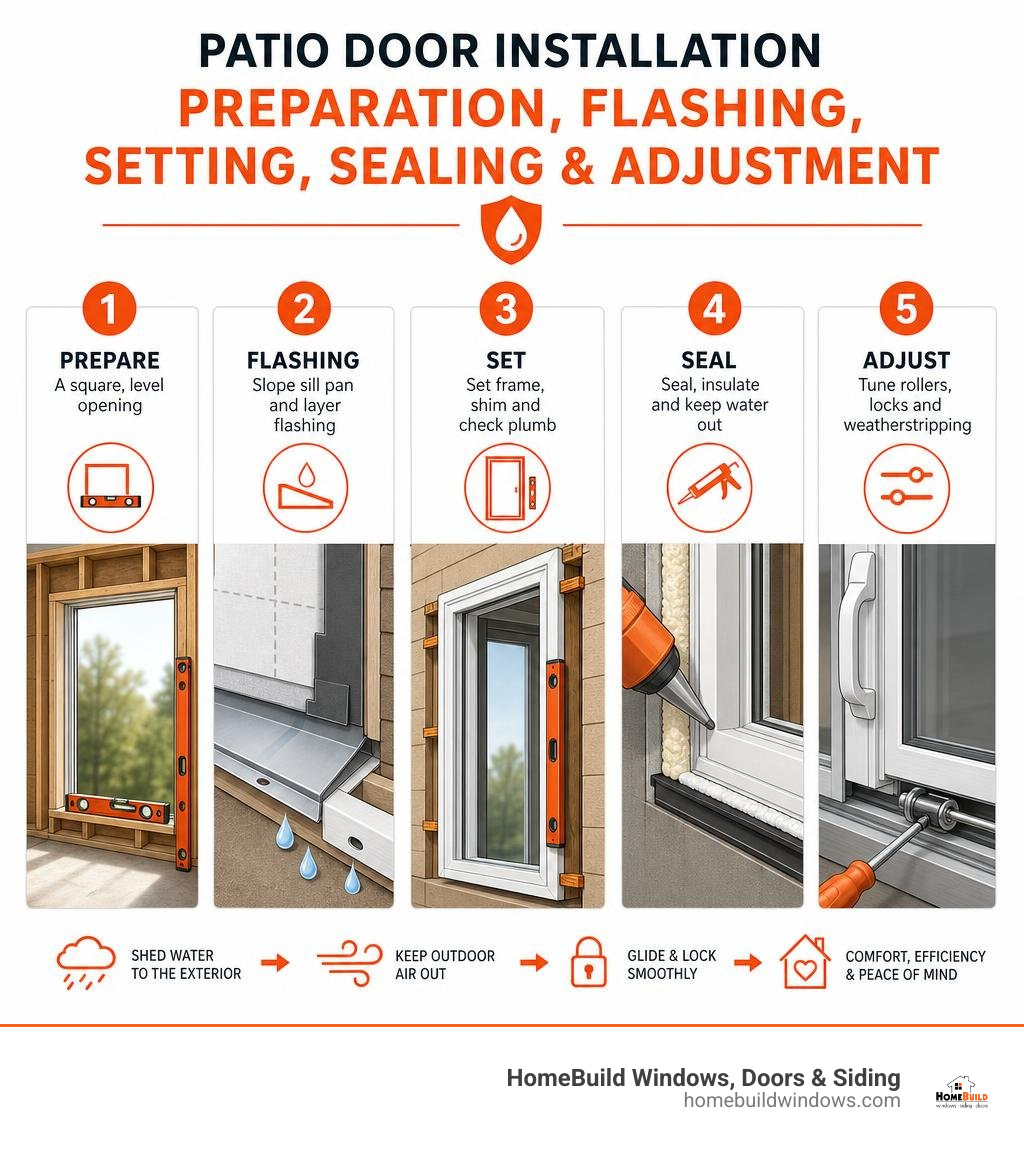
A successful installation of patio door follows a simple order: prepare a square, level opening; install a sloped sill pan and flashing; set and shim the frame without bowing it; fasten it to the structure; then seal, insulate, and adjust the sliding panel.
For homeowners, the key is not simply getting the door into the wall. A patio door must shed water to the exterior, keep outdoor air out, and glide and lock smoothly. The five methods in this guide cover new construction, masonry, pocket replacement, flush-flange retrofit, and concrete-slab installations.
The details vary by door frame and wall type, but these essentials do not:
- Verify the rough opening is sized, level, plumb, and square.
- Build a sill pan with a clear drainage path and keep weep holes open.
- Use non-compressible shims and manufacturer-approved fasteners.
- Apply flashing in shingle-style layers so water flows outward.
- Use low-expansion window-and-door foam, then tune rollers, locks, and weatherstripping.
I am Steve Mlynek, founder of HomeBuild Windows, Doors & Siding, with more than 20 years of experience leading window and door replacement projects throughout Chicago and the northwest suburbs. Our licensed and insured team brings the same focus on precise installation of patio door systems, energy efficiency, and durable weather protection to every home.
Installation of patio door word list:
- replacing a door with a sliding door
- replacing a window with a patio door
- sliding screen door assembly
Essential Preparation and Rough Opening Verification
Before unboxing any architectural glass assembly or removing an existing unit, you must inspect the structural framing and rough opening. In Midwest climates like Chicagoland, exterior walls undergo significant thermal movement between freezing winters and humid summers. Starting with a compromised subfloor or out-of-square framing guarantees drafty rooms, water leaks, and operational binding.
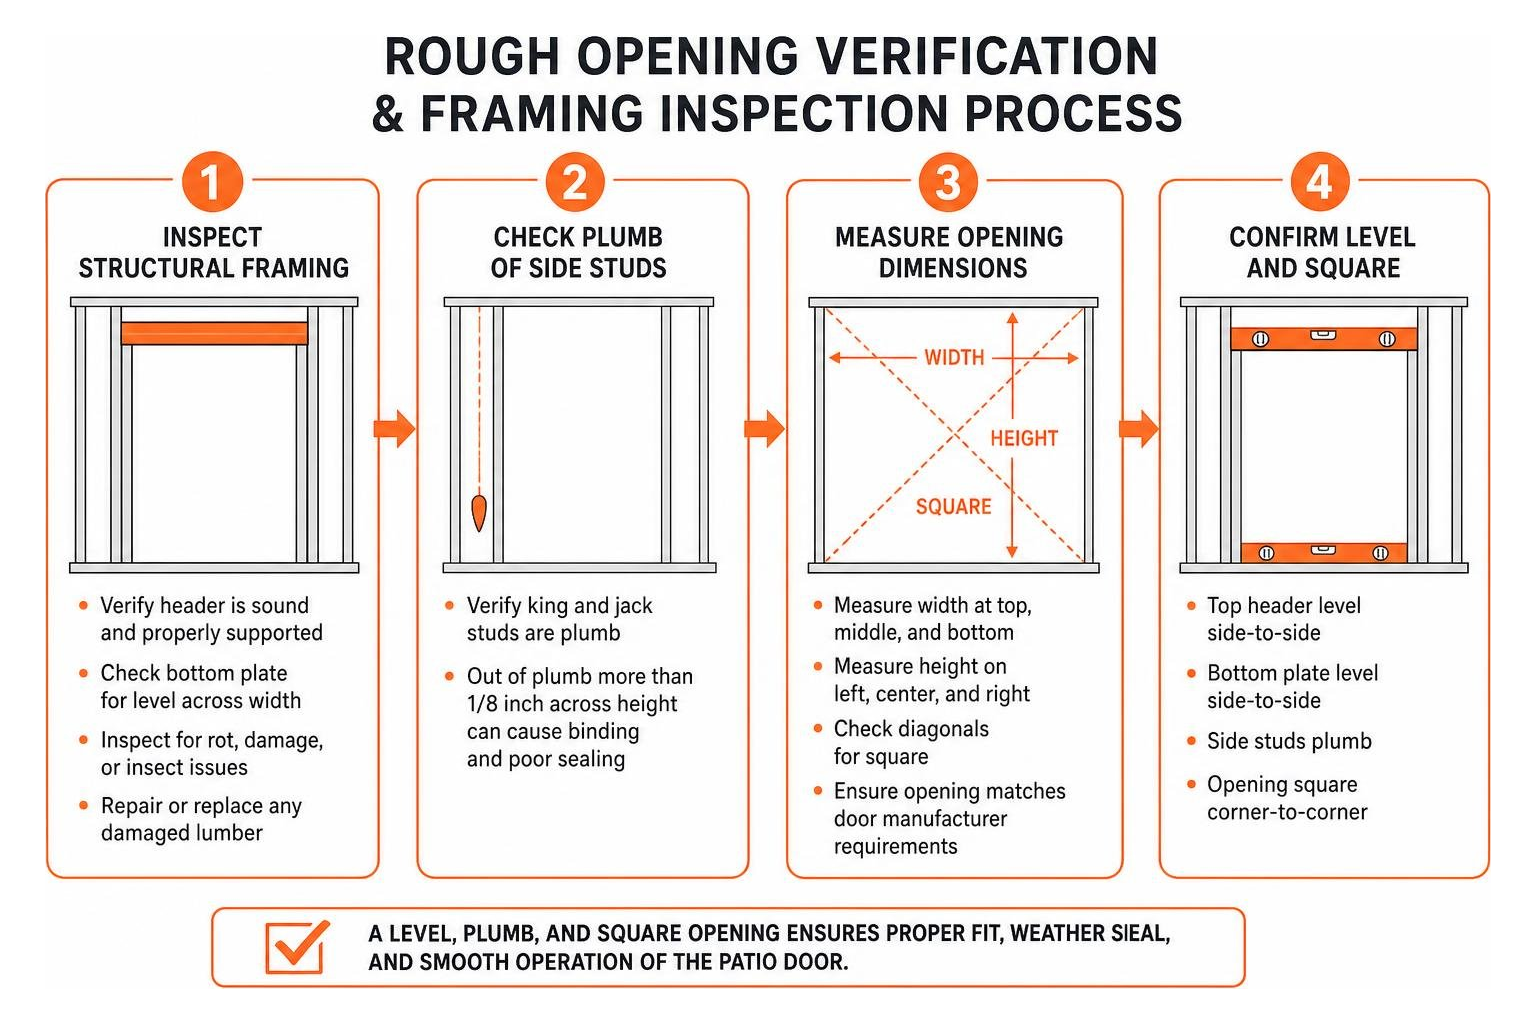
First, inspect the structural header above the door. In new construction or structural renovations, ensure the roof load is fully applied before final leveling to prevent header deflection from pinching the door frame later. Check the bottom subfloor plate for level across its full width and inspect the wood for moisture damage, dry rot, or insect infestation. Any rotted lumber must be cut back and replaced with sound, pressure-treated framing lumber.
Verify that the side king and jack studs are plumb. If a rough opening leans out of plumb by more than 1/8 inch across its height, it will prevent the sliding sash from making full, airtight contact with the weatherstripping.
Measuring and Squaring the Opening for Installation of Patio Door
Precision measurement prevents major headaches on installation day. The rough opening should generally measure 1/2 inch to 3/4 inch wider and 1/2 inch taller than the total frame dimensions of the door unit (or up to 1 inch clearance depending on the manufacturer’s sill pan profile).
To verify squareness, measure the opening diagonally from corner to corner (top left to bottom right, and top right to bottom left). According to standard industry engineering guidelines found in the Assembled Patio Door Installation Guide, the difference between the two diagonal measurements must not exceed 1/8 inch (with an absolute maximum tolerance of 1/4 inch across large multi-panel assemblies). Also check for corner-to-corner wall plane twist; the opening must not be twisted out of plane by more than 1/8 inch.
Always use high-impact composite shims rather than standard cedar or pine wood shims for exterior door sills and jambs. Wood shims can absorb incidental moisture, rot, and compress under the substantial dead load of double- or triple-pane insulated glass units, causing the frame to sag out of level over time.
Tools and Materials Required
Proper installation requires specialized tools and commercial-grade sealants to ensure a high-performance building envelope interface:
- Measuring & Layout: 48-inch and 78-inch spirit levels, laser level, tape measure, combination square.
- Fastening & Power Tools: Heavy-duty cordless drill/driver, masonry hammer drill (for concrete/brick), 1/8-inch and 3/8-inch drill bits, #2 Phillips and flathead screwdrivers.
- Waterproofing & Air Sealing: Self-adhering flashing membrane (minimum 4-inch to 6-inch width), rigid or pre-formed sloped sill pan, commercial-grade polymer exterior sealant, low-expansion closed-cell polyurethane foam (minimum R-5 per inch rating), heavy-duty J-roller.
- Hardware & Shims: High-impact composite shims, corrosion-resistant #8 and #10 exterior framing screws (minimum 1-1/4 inch wood penetration), 2-1/2 to 3-inch structural screws for strike plates, masonry anchors (such as Tapcons) for slab/block applications.
- Safety Gear: Safety glasses, heavy-duty work gloves, steel-toed boots, and suction-cup glass lifters for maneuvering heavy panels safely.
5 Proven Methods for the Installation of Patio Door Systems
Different architectural wall substrates and construction types require specific framing techniques, fastening schedules, and flashing details.
| Method | Wall Substrate | Frame Profile | Primary Attachment | Best Used For |
|---|---|---|---|---|
| Method 1: Nail Fin | Wood stud with sheathing | Integrated exterior nail fin | Screws through fin into framing | New construction or full tear-outs down to sheathing |
| Method 2: Block & Box | Concrete block or solid masonry | Box frame without exterior fin | Fasteners through jamb/clips into masonry/wood buck | Masonry openings, brick veneer, and structural block |
| Method 3: Pocket Replacement | Existing intact aluminum/wood frame | Insert frame with flush flange | Anchors through frame into structural jambs | Preserving exterior siding/stucco during retrofit |
| Method 4: Flush Flange | Stucco, brick veneer, or lap siding | Wide exterior flush flange | Fastened through jamb, sealed against exterior cladding | Retrofit replacements in siding and stucco exteriors |
| Method 5: Concrete Slab | Ground-level concrete foundation | Box frame or modified fin | Tapcon masonry screws into cured concrete | Walkout basements and single-story slab foundations |
Method 1: New Construction Nail Fin Installation
Nail fin installation is the gold standard for new builds or complete remodels where the exterior wall sheathing is fully exposed. This approach integrates the door directly into the home’s weather-resistant barrier (WRB).
When completing a new construction sliding patio door installation, cut the house wrap at the head of the opening at two 45-degree angles to create a temporary flap, folding it upward and taping it out of the way. Cut the WRB back by 1-1/2 inches along the side jambs to allow the flashing membrane direct, continuous adhesion to the structural sheathing.
Bed the bottom sill in a rigid, sloped sill pan. Apply a continuous 3/8-inch bead of high-performance exterior sealant around the interior side of the top and side nailing fins (leaving the bottom fin unsealed so trapped moisture can escape). Tilt the door into the opening, plumb the hinge/lock side, and tack the top corners with 2-inch exterior screws through the pre-punched nailing fin holes. Once verified square, complete the fastening schedule every 8 to 12 inches around the perimeter.
Method 2: Block and Box Frame Installation for Masonry
Masonry construction—common in older brick homes and modern multi-family builds—requires a block frame (a smooth, finless frame profile). When installing into concrete block or structural brick, you can anchor directly into the masonry using corrosion-resistant masonry fasteners or install a treated structural wood buck inside the rough opening.
Line the masonry rough opening with liquid-applied flashing or a compatible vapor-permeable membrane. If using a wood buck, secure pressure-treated 2x lumber to the masonry using countersunk concrete screws, ensuring the buck is plumb and level. Position composite shims behind the factory pre-punched installation holes in the box frame jambs. Drive structural screws through the frame and shims into the masonry or wood buck, taking care not to over-torque the fasteners, which can bow the frame.
Method 3: Pocket Replacement Installation of Patio Door into Existing Frames
When exterior siding, stone veneer, or interior finishes cannot be disturbed, a pocket replacement provides a non-invasive upgrade. In our complete guide to replacing patio doors, we highlight how pocket installations preserve the structural perimeter frame while upgrading the active sash, glass, and thermal performance.
Carefully remove the old operating panels, stationary fixed glass, and interior stop moldings without disturbing the original master frame. Inspect the existing sill and framing for rot or water damage. Thoroughly clean the old aluminum or wood frame track down to bare substrate. Apply continuous sealant beds across the existing sill track and insert the new replacement insert frame. Anchor through the side jambs into the underlying structural wall framing, then seal the perimeter gaps with exterior elastomeric sealant and color-matched trim capping.
Method 4: Flush Flange Retrofit for Stucco and Siding
Flush flange patio doors (also known as stucco flange doors) are engineered specifically for retrofit applications over stucco, fiber cement, or masonry walls. They feature an integrated, wide exterior trim fin that overlaps the exterior wall material, creating a clean visual transition without requiring siding demolition.
This method works exceptionally well when completing a patio French door installation or wide sliding unit into an existing stucco wall. Cut away the old aluminum frame flush with the exterior stucco edge using an oscillating multi-tool. Apply a heavy 3/8-inch bead of exterior-grade sealant to the back of the flush flange where it will contact the siding or stucco. Slide the unit into place, shim the jambs plumb from the interior, and secure the frame by driving structural screws through the jamb walls into the studs. The exterior flange acts as an integrated trim stop that prevents wind-driven rain penetration.
Method 5: Concrete Slab Foundation Installation
Installing a patio door directly onto a concrete slab subfloor—such as in walkout basements or modern slab-on-grade homes—requires special waterproofing techniques to prevent moisture wicking from the foundation.
Because concrete is porous and uneven, apply a liquid-applied flashing membrane across the slab opening, extending it at least 6 inches up each side stud. If your door unit came equipped with a bottom nailing fin, use a sharp utility knife to score and remove the sill fin flush with the frame.
Apply two generous 1/4-inch beads of structural polyurethane sealant spaced 2 inches apart along the concrete sill, leaving 1-inch intentional drainage gaps aligned with the frame’s weep channels. Set the door unit down into the sealant bed. Fasten the jambs using 3/16-inch or 1/4-inch concrete screw anchors pre-drilled at least 1-1/4 inches into the concrete, keeping fasteners at least 2-1/2 inches away from any slab edge to prevent concrete blowout.
Critical Flashing, Sill Pan, and Air-Sealing Steps
Moisture management makes or breaks any door installation. Window and door openings represent the most vulnerable transitions in the building envelope. Negative indoor air pressure during Midwest windstorms can draw water inward through microscopic seams unless a continuous drainage plane is established.
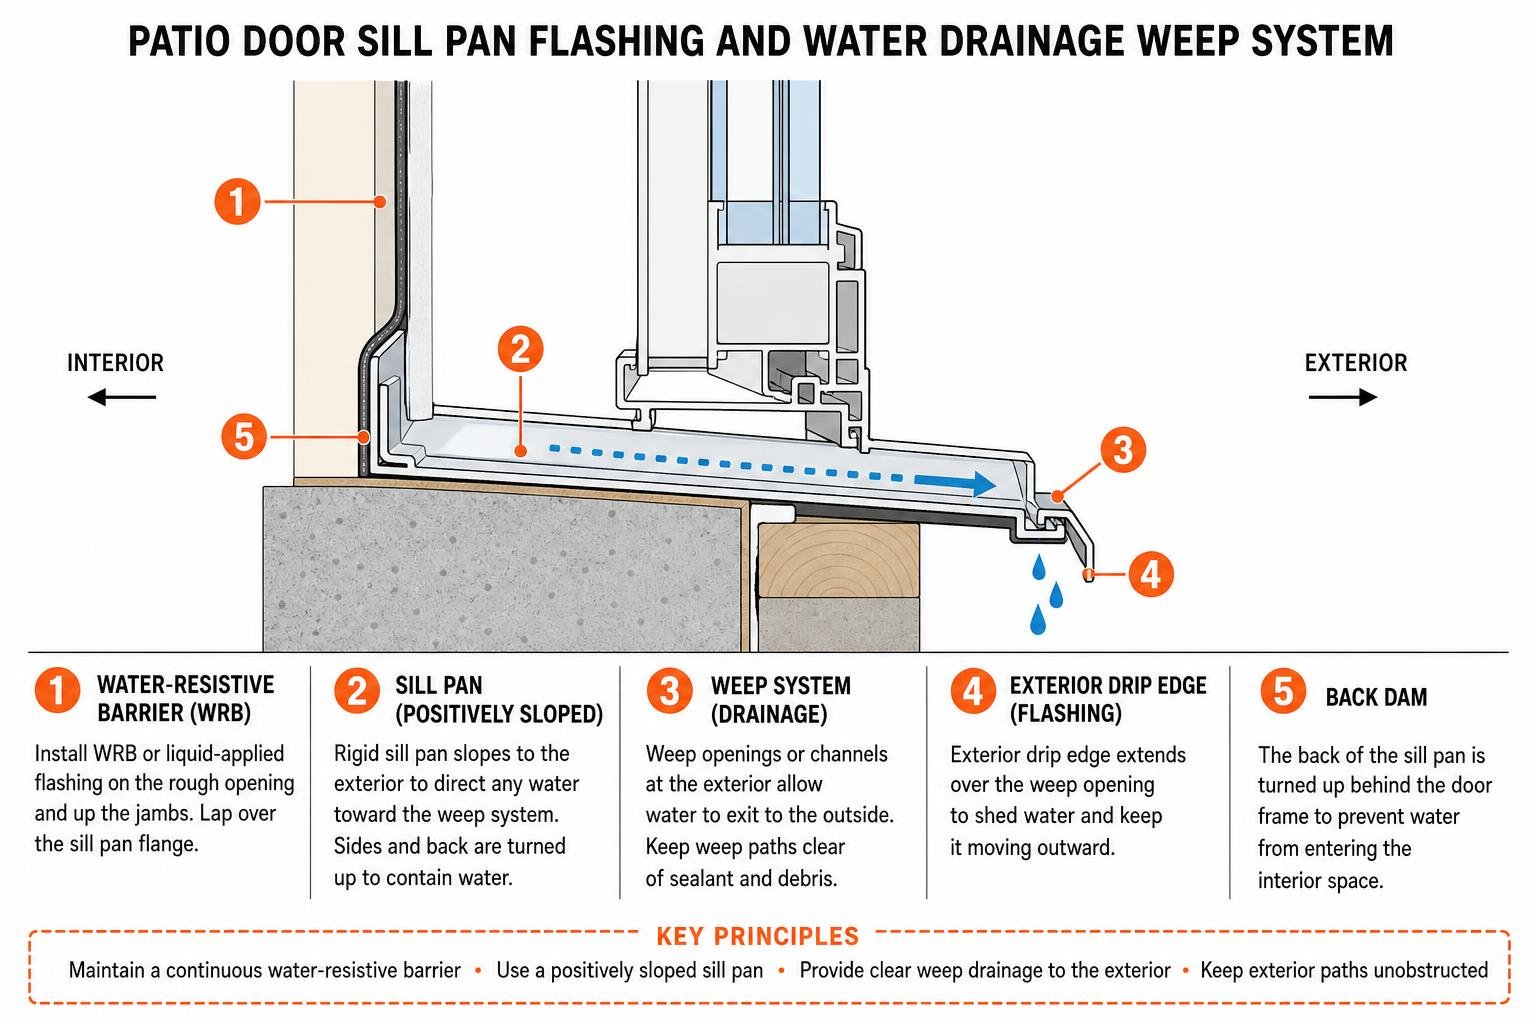
Following manufacturer specifications such as the Loewen SLIDING PATIO DOOR INSTALLATION GUIDE, proper weather-barrier integration requires specific layering sequences that rely on gravity and water-shedding shiplap principles.
Sill Pan Drainage and Flashing Integration
A rigid, positively sloped sill pan is mandatory under every exterior door. The sill pan must feature:
- A minimum 1/2-inch interior upturned back dam to prevent interior water spills.
- A 2-inch exterior downturn leg that overlaps the exterior weather barrier or foundation wall.
- Integrated 6-inch upturned end dams at both side jambs.
When securing the sill pan, apply continuous sealant beds along the subfloor, but leave a 2-inch void in the exterior sealant bead approximately 2 inches from each end. This creates a dedicated weep path that allows incidental water to drain freely to the outside.
After setting the frame, apply 6-inch self-adhering flashing tape over the side jamb nailing fins, extending at least 1 inch above the top frame header. Firmly roll all self-adhering membranes with a heavy J-roller to eliminate air bubbles and ensure chemical adhesion. Install a rigid metal drip cap across the top head jamb embedded in two 3/8-inch beads of sealant, fold the upper weather-resistive barrier flap down over the drip cap, and seal the diagonal cuts with flashing tape.
Low-Expansion Foam Insulation and Perimeter Weatherproofing
Once the door frame is mechanically secured and verified square, you must seal the perimeter gap between the door frame and the rough opening studs.
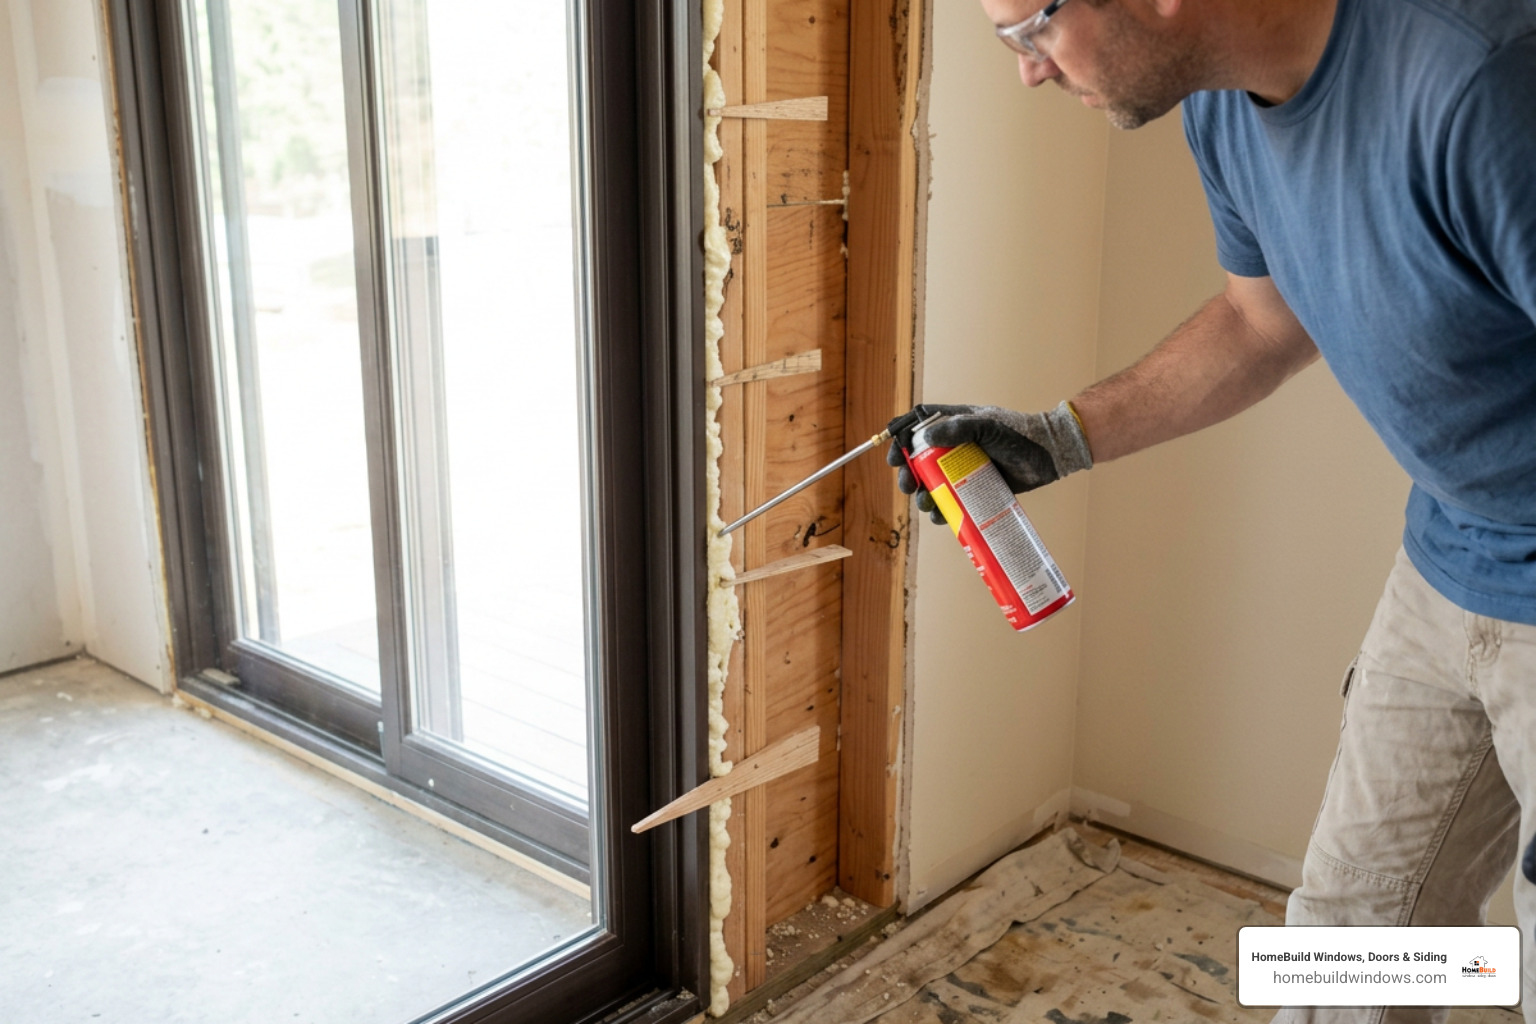
Always use low-expansion, closed-cell polyurethane foam specifically formulated for windows and doors (meeting an R-5 thermal rating per inch). Never use high-expanding standard construction foam. High-expanding foams exert tremendous pressure as they cure, which can bow vinyl, wood, and aluminum jambs inward, pinching the operating panel and causing locking failure.
Apply the low-expansion foam from the interior in a steady, continuous pass, filling approximately 50% to 60% of the cavity depth to allow for natural expansion without overflow. Keep shims recessed 3/8 inch from the frame edge so the foam creates an uninterrupted thermal barrier around the entire perimeter.
Operating Panel Alignment and Hardware Tuning
A perfectly level frame means nothing if the active sliding panel binds against the track or rattles against the weatherstripping.
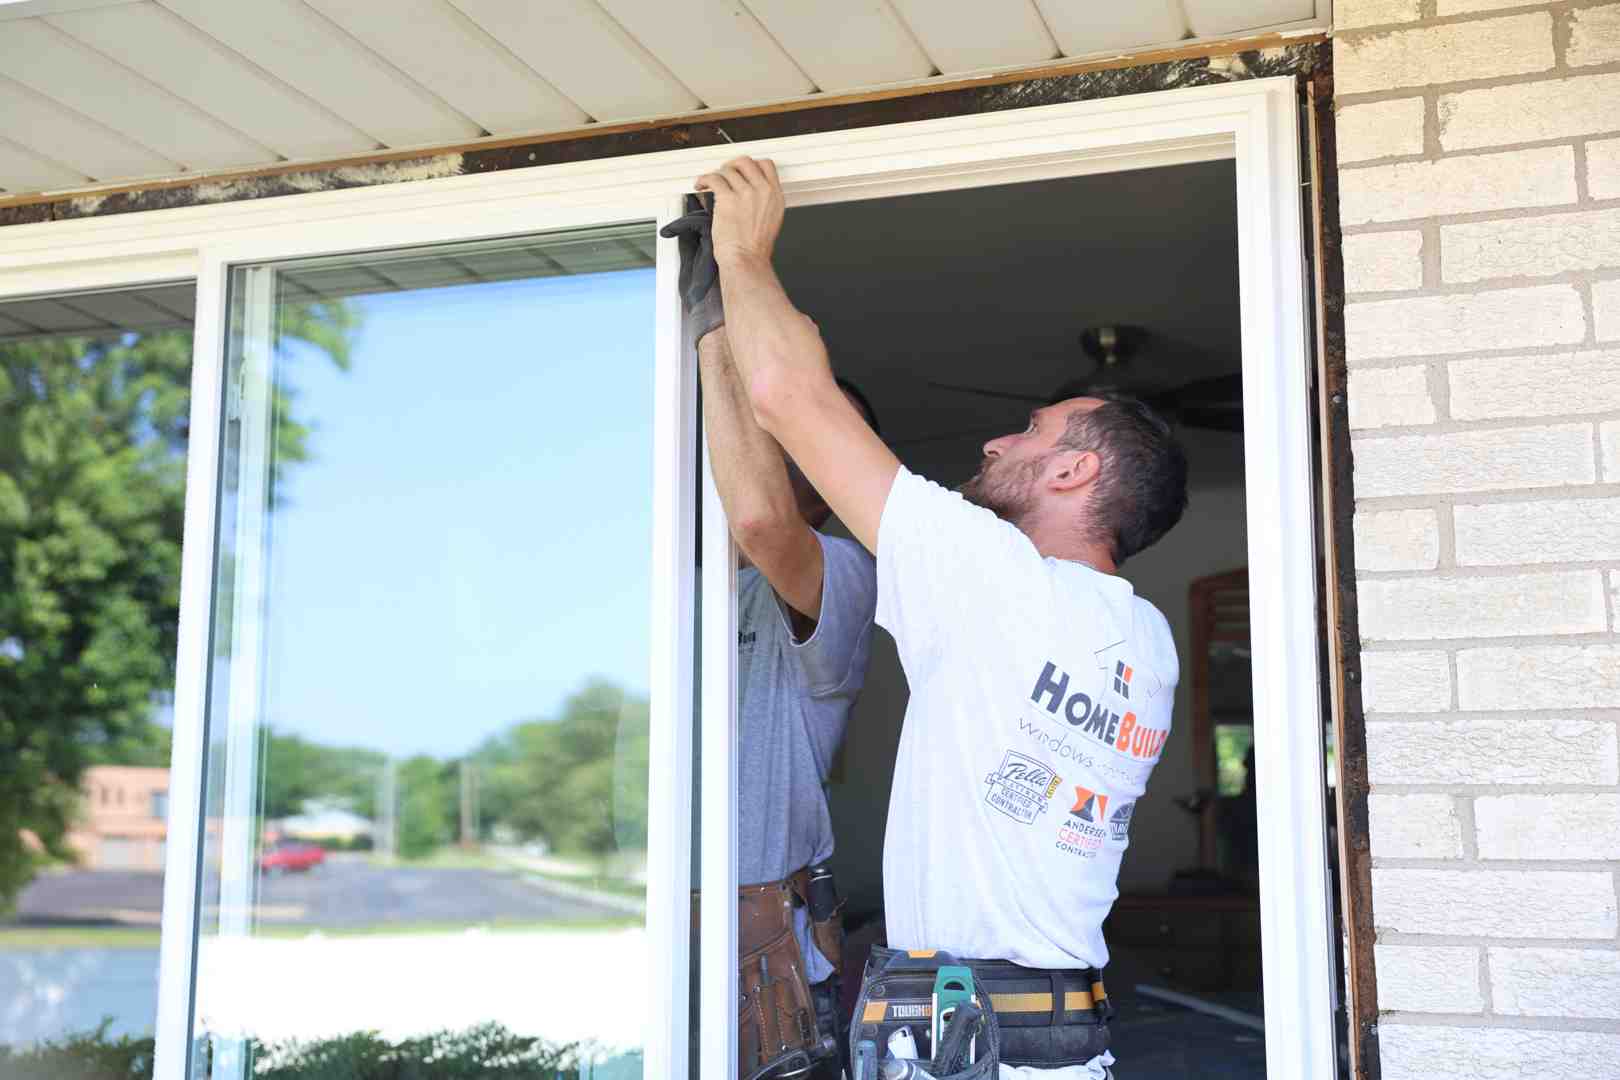
Roller Height Adjustment and Track Alignment
Modern sliding patio doors feature internal tandem roller assemblies located at the lower corners of the operating panel. These rollers control both the height of the door above the bottom sill track and the panel’s plumb alignment against the side lock jamb.
- Locate Adjustment Ports: Locate the lower adjustment access holes on the bottom interior or exterior side edges of the active panel (often covered by small plastic plugs).
- Relieve Panel Weight: Have an assistant use a pry bar or suction lifter to take the heavy glass load off the roller before turning the screw. This prevents stripping the internal adjustment gears.
- Adjust Height and Level: Insert a #2 Phillips or flathead screwdriver into the adjustment port. Turn the screw clockwise to raise the door panel or counterclockwise to lower it (providing roughly 3/8-inch total adjustment travel).
- Check Jamb Clearance: Adjust both bottom rollers until the door maintains an even 1/4-inch clearance above the sill track and sits perfectly flush against the side jamb weatherstripping from top to bottom.
- Verify Anti-Lift Blocks: Ensure the upper anti-lift security blocks in the head jamb are adjusted downward so intruders cannot pry the active panel upward and off its track.
Strike Plate Reinforcement and Security Locks
Home security centers on the lock keeper and strike plate. Factory shipping screws are often only 1/2 inch to 1 inch long, securing the plate merely to the thin door jamb.
To provide genuine forced-entry resistance, replace the standard factory screws with heavy-duty #10 x 2-1/2-inch or 3-inch corrosion-resistant structural screws. Drive these screws directly through the shims behind the strike plate into the underlying 2×4 or 2×6 wall framing studs. Test the mortise latch operation; the locking hook should engage the keeper smoothly without requiring excessive handle force. For added protection and peace of mind, consider installing a secondary foot-bolt lock along the bottom rail. If you prefer experienced professionals to manage structural anchoring, it is easy to find patio door installers who handle security tuning with precision.
Frequently Asked Questions About Patio Door Installation
What size should a rough opening be compared to the patio door frame?
A standard sliding patio door rough opening should measure 1/2 inch to 3/4 inch larger than the door frame’s total width and height (or up to 1 inch for mulled systems or units requiring specialized sloped sill pans). Diagonal corner-to-corner measurements of the rough opening must match within 1/8 inch to ensure the opening is square before placing the unit.
Why is high-expanding foam prohibited around patio door frames?
Standard or high-expanding insulation foam exerts significant hydraulic pressure as it cures. This expansion pressure bows vinyl, fiberglass, and wood jambs inward toward the glass. Bowed jambs pinch the operating panel, drag along the weatherstripping, cause premature roller failure, and prevent mortise lock latches from engaging the strike plate. Always use low-pressure, low-expansion polyurethane foam certified for window and door installation.
How do you fix a sliding patio door that sticks or drags along the bottom track?
A sticking patio door is usually caused by misadjusted rollers, debris in the track, or frame settling. First, clean the sill track with a vacuum and mild soapy water, then lubricate the track with dry silicone spray (avoid oil-based lubricants like WD-40, which attract dirt). Next, locate the roller adjustment screws at the lower corners of the door and turn them clockwise with a screwdriver to lift the door panel slightly higher off the bottom sill track until it glides freely.
Conclusion
A well-executed patio door installation protects your home from seasonal Midwest elements, boosts energy efficiency, and provides effortless indoor-outdoor living. By carefully preparing the rough opening, building a sloped sill pan, properly layering flashing membranes, and fine-tuning operating hardware, you ensure decades of reliable performance.
At HomeBuild Windows, Doors & Siding, we take pride in delivering exterior remodeling solutions built on craftsmanship and attention to detail. As an Elite Platinum Pella® Certified Contractor and Andersen Certified Contractor, our work has earned the Angi Super Service Award, Nextdoor Neighborhood Faves recognition, and over 200 five-star Google reviews from satisfied homeowners.
Whether you are seeking expert patio door replacement in Northwest Suburbs communities or complete window and door replacement in Chicago, our licensed and insured professionals are here to help. Contact us today to schedule your free consultation and transform your home with premium patio doors installed to perfection.