


Why Proper Replacement Window Installation Can Make or Break Your Energy Bills
Replacement window installation done right can cut your heating and cooling costs by 7% to 15% — but done wrong, it can leave you with drafts, water damage, and a voided warranty.
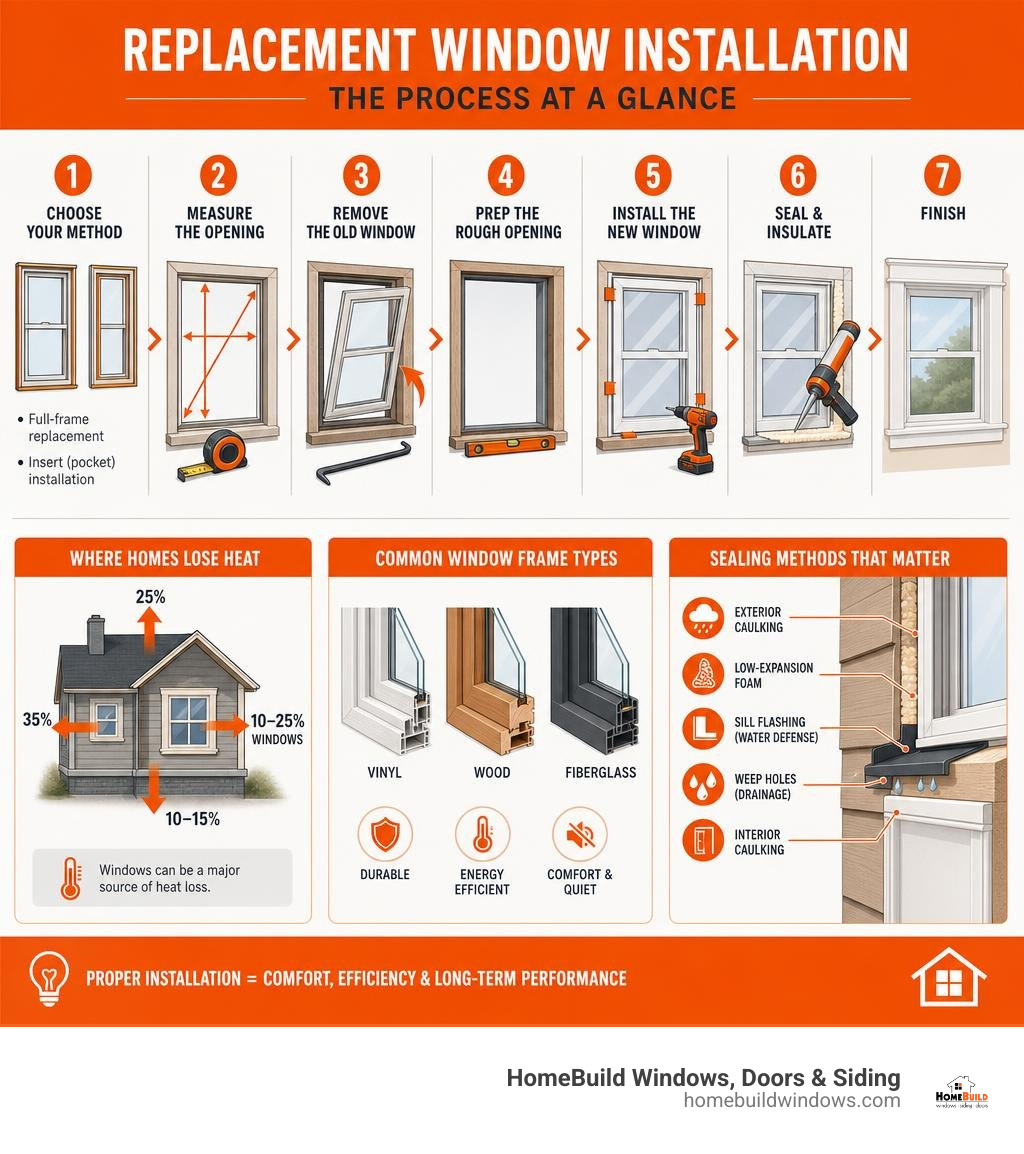
Here’s a quick overview of what the process involves:
| Step | What It Involves |
|---|---|
| 1. Choose your method | Full-frame replacement or pocket/insert installation |
| 2. Measure the opening | Width, height, and diagonal squareness |
| 3. Remove the old window | Sashes, stops, sash weights, and old sealant |
| 4. Prep the rough opening | Clean, level, and apply flashing/sill pan |
| 5. Install the new window | Shim, level, square, and fasten |
| 6. Seal and insulate | Low-expansion foam, caulk, and weep holes |
| 7. Finish | Interior/exterior trim and final caulking |
Most Chicago-area homes lose significant heat through old, single-pane, or poorly sealed windows — especially during harsh Midwest winters. Modern energy-efficient windows with a U-value of 0.3 or lower can dramatically improve home comfort. But even the best window performs poorly if it’s installed incorrectly.
This guide walks you through every step — from measuring and removing your old window to shimming, sealing, and finishing the new one — so you can do the job right the first time.
I’m Steve Mlynek, CEO and founder of HomeBuild Windows, Doors & Siding, with over 20 years of hands-on experience overseeing hundreds of replacement window installations across Chicago and the surrounding suburbs. In the sections ahead, I’ll share the same techniques and warnings our certified installation crews use on every project.
Easy replacement window installation word list:
Full-Frame vs. Pocket Insert: Choosing Your Installation Method
Before we pick up a hammer, we must first decide which type of installation matches the condition of your home. Choosing the wrong method is one of the most common missteps we see homeowners make, and it can lead to unnecessary labor or a system that fails prematurely.
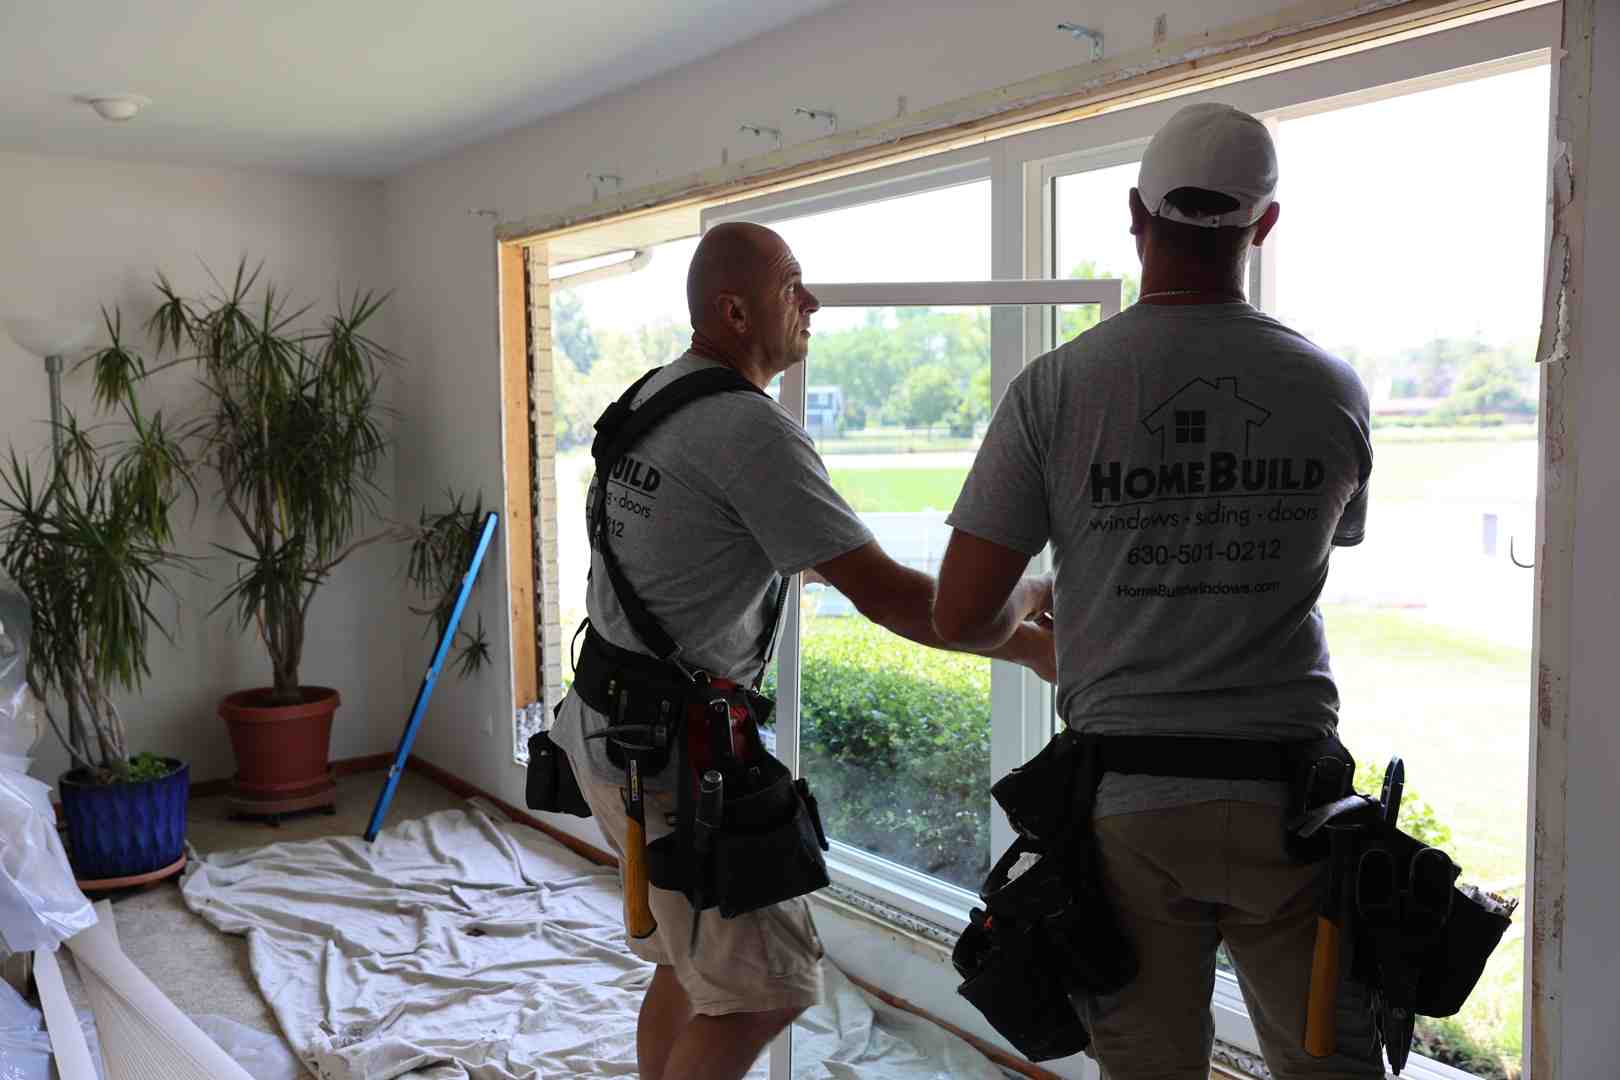
Evaluating Frame Integrity and Trim Preservation
When deciding between a full-frame replacement and a pocket (or insert) installation, the first thing we look at is the existing window frame.
- Pocket / Insert Installation: If your existing wood or aluminum frame is structurally sound, plumb, square, and free of decay, a pocket installation is the most efficient choice. In this method, we remove only the old window sashes and parting stops, leaving the original frame, sill, interior trim, and exterior casing completely intact. The new window unit is inserted directly into the existing pocket. This preserves the historical interior trim and avoids disturbing your exterior siding.
- Full-Frame Installation: If the existing frame exhibits structural rot, water damage, or is significantly out of square, we must perform a full-frame installation. This requires a complete tear-out of the old window sashes, frame, sill, and exterior brickmould or trim, exposing the rough opening’s structural studs. We also recommend this method if you want to change the size or style of the window, or if you want to maximize your glass viewing area.
Assessing DIY Skills, Tools, and Time Commitments
Replacing a window is a highly rewarding project, but it is physically demanding and requires precise carpentry skills. If you are asking yourself can you actually install your own windows, you need to realistically assess your skill level, tools, and available time.
A pocket window installation can typically be completed in about 1 hour per window by an experienced DIYer. However, a full-frame window replacement is significantly more complex and requires at least 4 to 6 hours per window on the ground level—and even more for windows on upper floors. If you are working on upper levels, safety staging and fall protection are absolute necessities.
To tackle this project successfully, you will need the following tools and materials:
- Safety glasses and heavy-duty work gloves
- Tape measure and a reliable 2-foot or 4-foot level
- Power drill/driver with bits (including a 3/32-inch drill bit)
- Caulk gun and high-quality exterior-grade neutral-cure silicone sealant
- Pry bar, utility knife, hammer, and chisel
- Waterproof composite shims (avoid wood shims as they can rot over time)
- Self-adhering flashing tape or a flexible sill pan
- Low-expansion polyurethane foam sealant designed specifically for windows and doors
Preparing for Your Replacement Window Installation
The key to a flawless replacement window installation lies in the preparation. Any rushing during this phase will inevitably show up later as a drafty frame, sticking sashes, or water leaks.

Accurate Measurements for a Successful Replacement Window Installation
We cannot emphasize this enough: do not remove your old windows until your new replacement windows have arrived and you have physically verified their dimensions.
To order the perfect size pocket insert, we must measure the existing window opening. Follow these steps to ensure accuracy:
- Measure the Width: Measure the distance between the inside of the jambs at three points: the bottom, the middle, and the top. Record the smallest of these three measurements.
- Measure the Height: Measure the distance from the high point of the sill (closest to the interior) to the top head jamb at three points: the left side, the middle, and the right side. Record the smallest of these three measurements.
- Check for Squareness: Measure diagonally from the top-left corner to the bottom-right corner, and then from the top-right corner to the bottom-left corner. If these two diagonal measurements are within 1/8 inch of each other, the opening is square.
Once you have these measurements, the replacement window should be ordered approximately 1/4 inch less in width and height than the existing window opening. This 1/4-inch clearance provides a 1/8-inch gap on all sides, allowing us to shim, level, and insulate the unit properly. For a deeper dive into measuring rough openings, read our guide on mastering window installation a step by step guide on how to measure a rough opening for a window.
Before your order arrives, we recommend preparing your home by clearing a 3-foot workspace around the interior of each window, removing all blinds, curtains, and window treatments, and laying down drop cloths to protect your floors. For more tips, check out our guide on how to prepare for a window installation.
Safely Removing the Old Window and Handling Lead Paint
If your home was constructed prior to 1978, there is a high probability that the window frames and sashes contain lead-based paint. Disturbing this paint during demolition can release hazardous dust. You must follow strict EPA guidelines, which include sealing off the workspace with plastic sheeting, wearing a certified respirator, and using wet-sanding techniques to minimize dust.
To remove an old double-hung wood window from the interior:
- Score the Paint: Use a sharp utility knife to score the paint lines where the interior stops meet the window frame. This prevents the wood from splintering when you pry it free.
- Remove Interior Stops: Carefully pry away the interior stops using a small pry bar. Set them aside if you plan to reuse them.
- Remove the Bottom Sash: Cut the sash cords or detach the balance chains on the bottom sash, and lift the sash out of the frame.
- Remove the Parting Stop: Use a pry bar or pliers to pull out the wood parting stops at the top and sides of the frame.
- Remove the Top Sash: Lower the top sash, cut its sash cords, and remove it.
- Handle Sash Weights: If your home has old cast-iron sash weights suspended inside the wall cavities, cut the ropes and let the weights drop to the bottom of the cavity. We will seal and insulate these empty weight chambers later to eliminate drafts.
For specific details on removing sashes from different window types without damaging the main frame, you can consult the Replacement Window Installation Guide Non-Impact & Impact Resistant Windows without Nailing Fin .
Step-by-Step Guide to the Physical Installation
Now that the opening is bare and clean, we are ready to install the new energy-efficient window.
Preparing the Rough Opening and Sill Flashing
We must treat the window sill as the most critical element of the entire assembly because water naturally drains downward. Any structural decay or debris left on the sill will compromise the weather tightness of your new window.
- Clean and Repair: Thoroughly scrape away old sealant, dirt, and loose wood fibers. Inspect the wood sill for rot. If there is minor damage, repair it with wood epoxy; if the rot is extensive, the sill must be replaced before proceeding.
- Level the Sill: Place your level across the sill plate. If the sill is sloped or uneven, you must correct it using thin, waterproof shims or a leveling plate.
- Apply Flashing Tape / Sill Pan: Apply a high-quality self-adhering flashing tape (at least 6 inches wide) across the sill. Ensure the tape extends up the vertical side jambs by at least 6 inches to create a continuous waterproof barrier. Alternatively, install a molded plastic sill pan to direct any incidental moisture safely to the exterior.
Step-by-Step Guide to Replacement Window Installation
With the opening prepped, we can begin the physical installation. For a simplified summary of this process, you can refer to how to replace windows in 7 easy steps.
(Note: Refer to the diagram below for a visual representation of this sequence.)
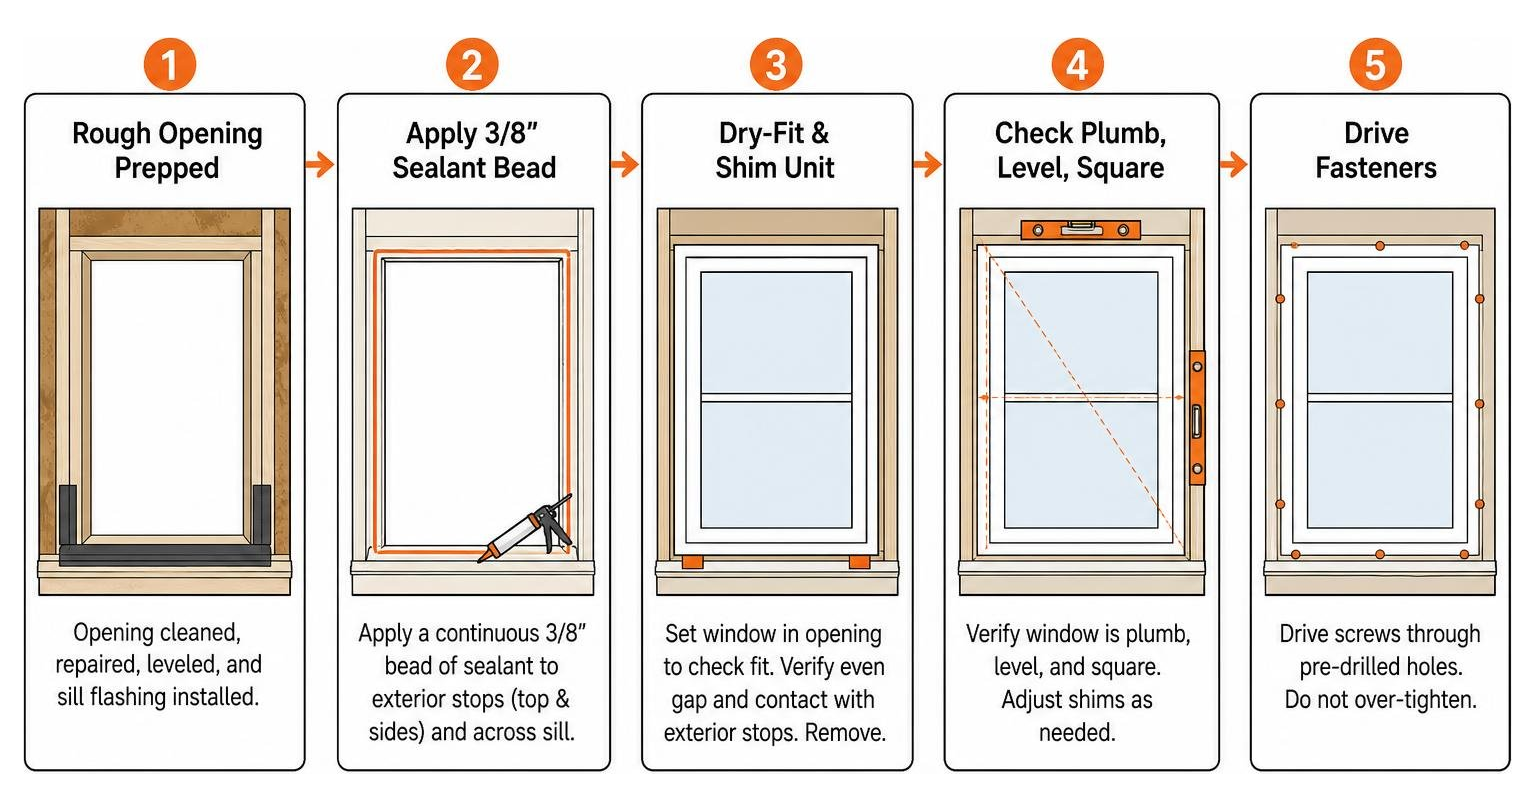
- Dry-Fit the Window: Lift the new window unit and place it into the opening to check the fit. Verify that there is an even 1/8-inch gap around the perimeter and that the window sits flat against the exterior blind stops. Remove the window.
- Apply Sealant: Apply a continuous 3/8-inch heavy bead of high-quality, neutral-cure silicone sealant to the inside face of the exterior blind stops at the top and sides, and across the interior sill.
- Place the Window: From the interior, gently set the bottom of the window frame onto the sill, then pivot the top into place. Press the window firmly against the sealant-coated exterior stops.
- Shim and Align: Insert waterproof composite shims at the side jambs near the pre-drilled installation holes. Place shims at the top and bottom to ensure the window remains perfectly centered.
- Verify Plumb, Level, and Square:
- Plumb: Check that the side jambs are perfectly vertical.
- Level: Check that the head and sill are perfectly horizontal.
- Square: Measure diagonally from corner to corner. If the diagonal measurements are within 1/8 inch of each other, the frame is square.
- Fasten the Window: Unlock and open the window sashes to access the installation holes in the side jambs. (For double-hung units, you may need to slide the plastic balance covers out of the way to expose these holes, as detailed in the Replacement Window Installation Guide ). Drive the manufacturer-provided #8 stainless steel installation screws through the shims and side jambs into the structural framing. Never drive screws through the window sill, as this will puncture the water-management system and guarantee future leaks.
Sealing, Insulating, and Finishing the Installation
Once the window is securely anchored, we must establish a continuous air and water barrier around the frame.
- Insulate the Cavity: Fill the empty sash weight pockets and the narrow gap around the window perimeter. We highly recommend using a low-expansion polyurethane spray foam designed specifically for windows and doors. Apply a continuous bead from the interior, filling the cavity about 50% to 75% deep; the foam will expand to fill the remaining space. Do not overpack the cavity with fiberglass batt insulation, as compressed fiberglass loses its insulating value and can absorb moisture.
- Install the Sill Adapter: If you are installing a flat-bottomed vinyl window onto a sloped wood sill, measure and cut the provided sill adapter to fit the exterior gap. Drill two 3/32-inch weep holes at the bottom of the adapter to allow water to drain, and gently tap it into place using a hammer and a scrap block of wood for protection.
- Apply Exterior Sealant: Apply a high-quality exterior-grade silicone caulk around the entire outer perimeter where the new window frame meets the old wood trim. Make sure you do not cover the window’s engineered weep holes, which must remain open to allow water to escape.
- Reinstall Interior Trim: Replace the interior stops we removed earlier, nailing them back into place, and apply a paintable latex caulk to seal the joints.
Common Mistakes and Safety Warnings to Keep in Mind
Even experienced DIYers can run into trouble if they overlook the fine details of window geometry and water management. If you want to avoid a headache, read our guide on how to replace a window and frame without losing your mind.
Over-tightening Fasteners and Bowing the Frame
One of the most frequent mistakes is driving the installation screws too tightly without proper shimming behind them. This pulls the side jambs outward, causing them to bow.
If the jambs are bowed, the window sashes will bind, making the window incredibly difficult to open, close, or lock. Always place a solid composite shim directly behind every installation screw hole before fastening, and check the operation of the sashes repeatedly as you tighten the screws.
Blocking Weep Holes and Improper Flashing
Vinyl windows are engineered with internal chambers and exterior weep holes designed to collect water that bypasses the sashes and drain it safely outside.
If you apply caulk over these weep holes or install the exterior trim flush against them, water will pool inside the vinyl frame. Eventually, this water will back up and overflow into your interior walls, leading to mold growth, rotted framing, and expensive structural damage. Always inspect the bottom of your window frame and keep those drainage paths clear.
Conclusion
A successful replacement window installation is one of the best upgrades you can make for your home’s energy efficiency, curb appeal, and overall comfort. While a pocket installation is achievable for a dedicated DIYer with the right tools, a full-frame replacement requires advanced carpentry skills and a significant time commitment.
If you find yourself facing complex structural rot, working on upper levels, or simply wanting the peace of mind that comes with a flawless installation, we are here to help.
At HomeBuild Windows, Doors & Siding, we have served homeowners across Chicago and the North-West Suburbs—including Barrington, IL, Crystal Lake, IL, Des Plaines, IL, and Schaumburg, IL—for over 20 years. As an Elite Platinum Pella® Certified Contractor and an Andersen Certified Contractor, our owner-supervised installations ensure that every window is perfectly plumb, square, and sealed to withstand the toughest Chicago winters.
Ready to upgrade your home’s comfort and eliminate drafty windows? Contact HomeBuild Windows, Doors & Siding today to schedule your free consultation.