




Get a Patio Door Screen That Slides, Seals, and Latches Properly
A successful patio door screen installation starts with the right size screen, a clean track, and careful roller adjustment. Set the top of the screen into the upper track first, lift the bottom rollers onto the sill track, then adjust both roller screws until the screen sits square, glides smoothly, and leaves an even gap at the top and bottom.
Before tightening the latch hardware, close the screen and align the strike plate with the latch hook. Finish by adding the bug sweep or seal flush against the meeting edge, so insects stay out without creating drag. Use a dry silicone or PTFE spray lubricant on a clean track; oil-based products collect dirt and can make the screen stick. For a broader look at how screens fit into a complete door system, the sliding screen door overview explains common frame and mesh configurations.
I’m Steve Mlynek, founder of HomeBuild Windows, Doors & Siding, with more than 20 years of experience helping Chicago-area homeowners with patio door screen installation, door replacement, and proper hardware alignment. In the sections ahead, I’ll walk through the measurements, adjustments, and maintenance details that help a patio screen work well through changing Midwest seasons.
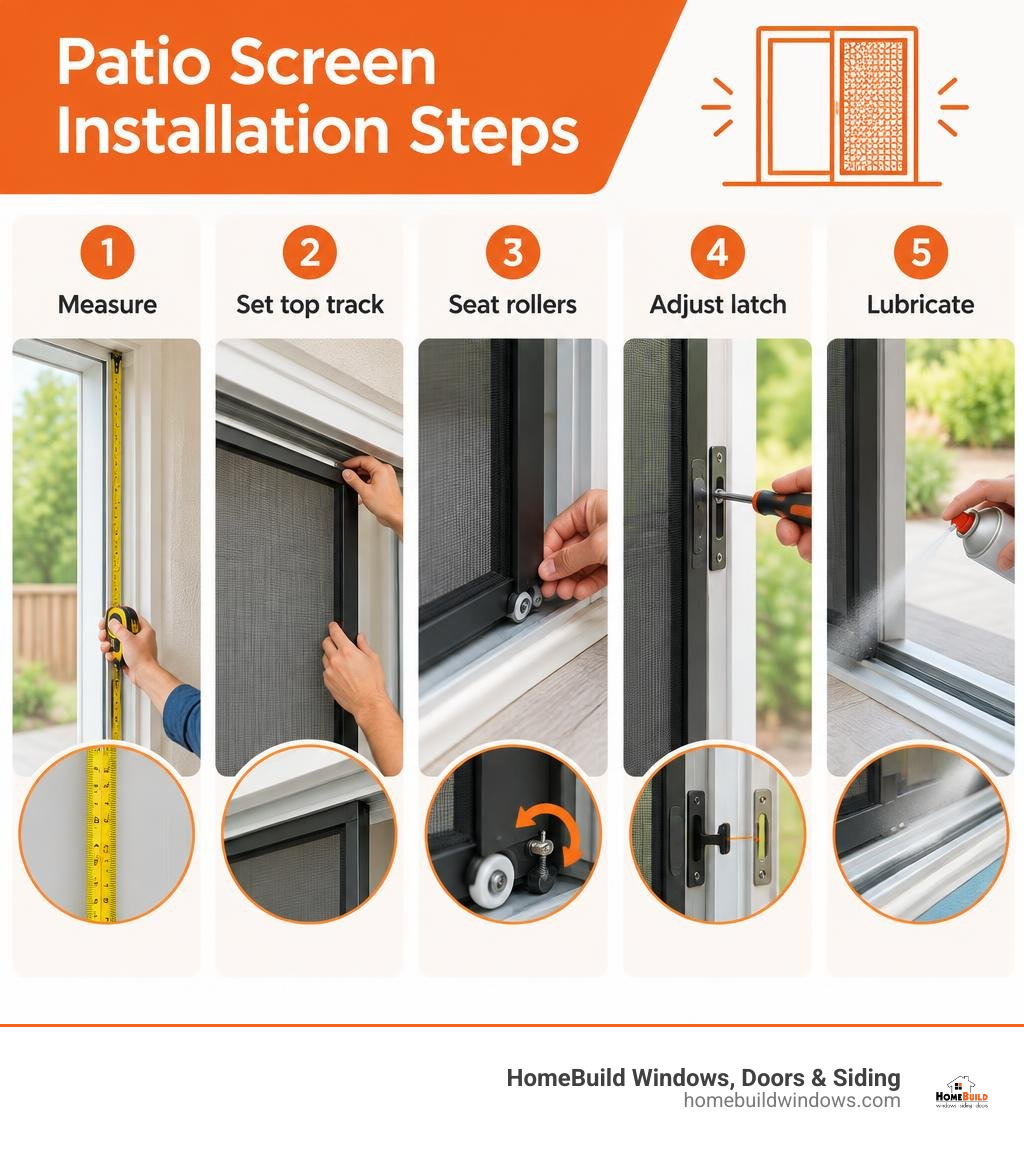
Patio door screen installation terms at a glance:
Essential Tools and Measuring for Patio Door Screen Installation
Before beginning your installation, having the right equipment ready ensures the project goes smoothly without damaging delicate frame extrusions or scratching door paint.
Here is what you will need:
- Phillips head screwdriver: For roller height and latch strike plate adjustments.
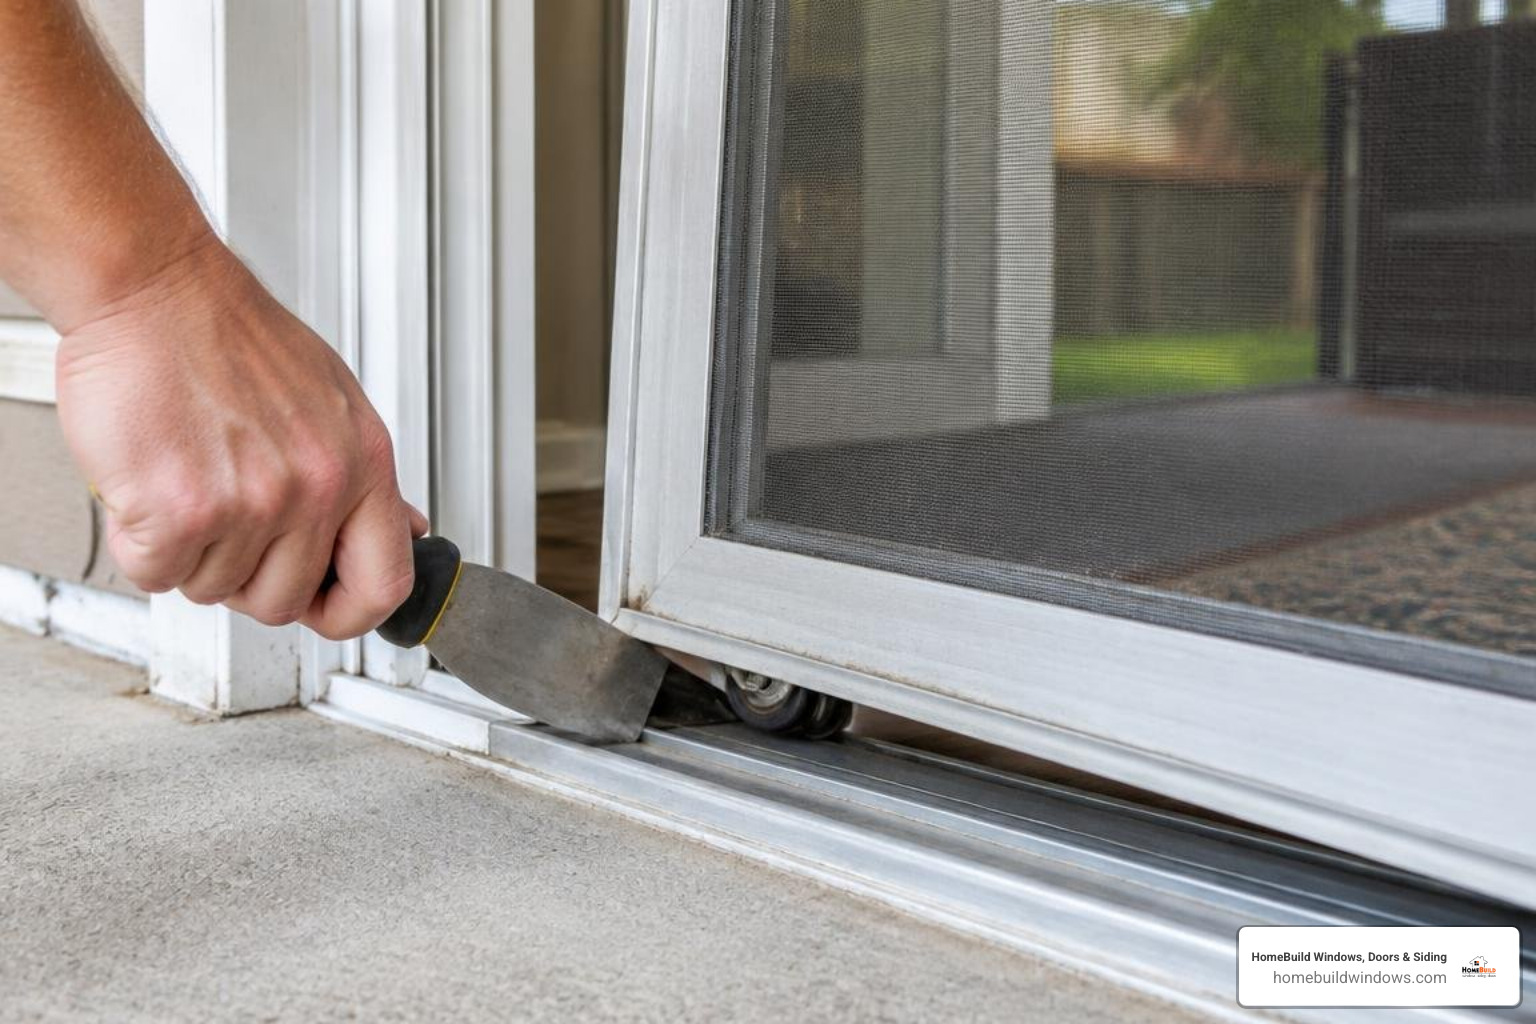
- Putty knife or thin pry bar: Essential for depressing bottom spring-loaded rollers into the bottom track without tearing seals.
- Tape measure: For verifying opening width and height across multiple points.
- Sheet-metal snips or heavy-duty scissors: For trimming bug strips and vinyl weather sweep profiles.
- Safety glasses: To protect your eyes while working with tensioned springs and metal fasteners.
- Torpedo level: To confirm that your door jambs and screen frame sit perfectly plumb.
Selecting the right replacement screen size prevents unwanted gaps along the jambs. Standard sliding screen sizes correspond closely with conventional door openings, as detailed below:
| Screen Frame Size (W x H) | Common Door Opening (Nominal) | Height Fit Range | Typical Application |
|---|---|---|---|
| 30″ x 80″ | 5′ 0″ Wide x 6′ 8″ High | 77-5/8″ to 80″ | Standard 2-panel 5-foot patio doors |
| 36″ x 80″ | 6′ 0″ Wide x 6′ 8″ High | 77-5/8″ to 80″ | Standard 2-panel 6-foot patio doors |
| 48″ x 80″ | 8′ 0″ Wide x 6′ 8″ High | 77-5/8″ to 80″ | Large 2-panel or 3-panel 8-foot patio doors |
| Adjustable Custom Models | Various | 77-1/2″ to 81-1/2″ | Openings with deep sill tracks or top expanders |
Frame Sizing Standards and Accurate Measurement Steps
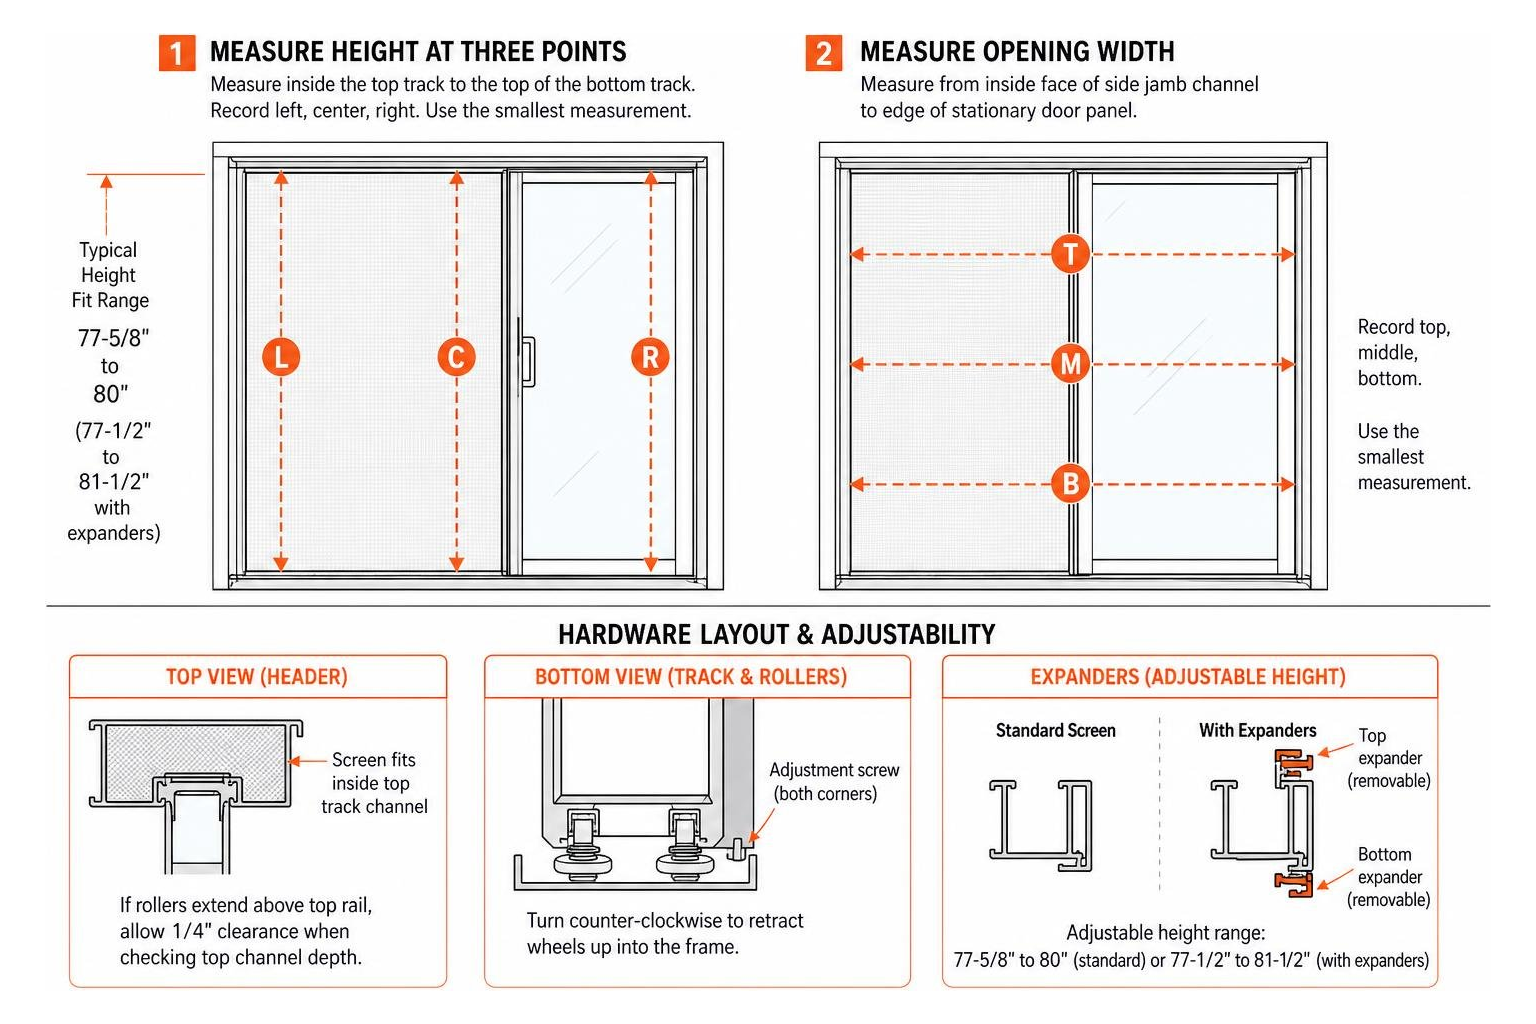
Most patio screen doors measure between 78 and 80 inches in height, with standard widths running from 30.5 inches up to 48.5 inches. Because door frames can settle over time, never take a single measurement and assume the opening is square.
- Measure the Height at Three Points: Place your tape measure inside the screen track channel at the top header and measure down to the top of the bottom screen track rail. Measure on the far left, the center, and the far right. Use the smallest measurement to ensure your replacement screen will fit inside the frame pocket.
- Measure the Opening Width: Measure horizontally from the inside face of the side jamb channel to the edge of the stationary glass door panel where the screen will interlock. Record top, middle, and bottom widths.
- Account for Rollers and Expanders: Standard screens feature built-in height adjustability, typically spanning from 77-5/8 inches up to 80 inches (or 77-1/2 inches to 81-1/2 inches on models equipped with removable top and bottom expanders). If your rollers extend above the top rail profile, factor in an extra 1/4-inch clearance when checking top channel depths.
Removing the Existing Screen and Prepping the Track
To remove an old or damaged screen, start by locating the adjustment screws on the lower corners of the screen frame.
Turn these screws counter-clockwise to retract the wheels fully up into the frame assembly. Once the wheels are retracted, insert a flexible putty knife under one of the bottom wheels, lift upward, and pry the bottom of the screen inward away from the lower track. Carefully pull the entire screen downward out of the top channel pocket.
With the old unit out of the way, inspect the sill and top channels:
- Vacuum out all dirt, dead leaves, insect debris, and pet hair from the sill track.
- Clean the aluminum tracks with mild soap, water, and a soft cloth to eliminate ground-in grime.
- Check the track rail for bends, dings, or corrosion that could impede roller movement.
- Inspect the overall frame squareness with a torpedo level before proceeding with your new installation.
How to Mount and Adjust Sliding Screen Doors
Proper alignment keeps your screen moving effortlessly with the touch of a finger while maintaining an airtight bug perimeter. If you are completing a comprehensive exterior remodel alongside a complete sliding patio door installation, fitting the screen is usually the final step after the main glass panels are square and sealed.
Step-by-Step Patio Door Screen Installation Workflow
Follow this proven sequence to mount your sliding screen into the frame pocket without bending the aluminum frame or scratching the sill:
- Orient the Screen: Ensure the interior handle faces inside the home and the latch mechanism points toward the side jamb where the strike plate will mount.
- Engage the Top Track: Lift the entire screen frame and push the top edge firmly into the deep top track channel (or screen pocket) located at the exterior head of the patio door frame. Push upward until the internal spring tension compresses.
- Seat the Bottom Rollers: While holding the top of the screen securely in the upper channel, swing the bottom of the frame over the lower sill track. Use your putty knife or a flat-blade tool to compress each lower spring-loaded roller upward into the bottom frame rail.
- Drop onto the Rail: Guide the grooved wheels directly over the raised sill track rail, then release the putty knife so the wheels pop down and straddle the metal guide. For additional tips on step-by-step assembly, our sliding screen installation guide offers practical pointers for standard sliding configurations.
Roller and Expander Adjustments for Smooth Gliding
Once the door sits on the track, it needs fine-tuning to prevent binding and ensure an even seal along the side jamb.
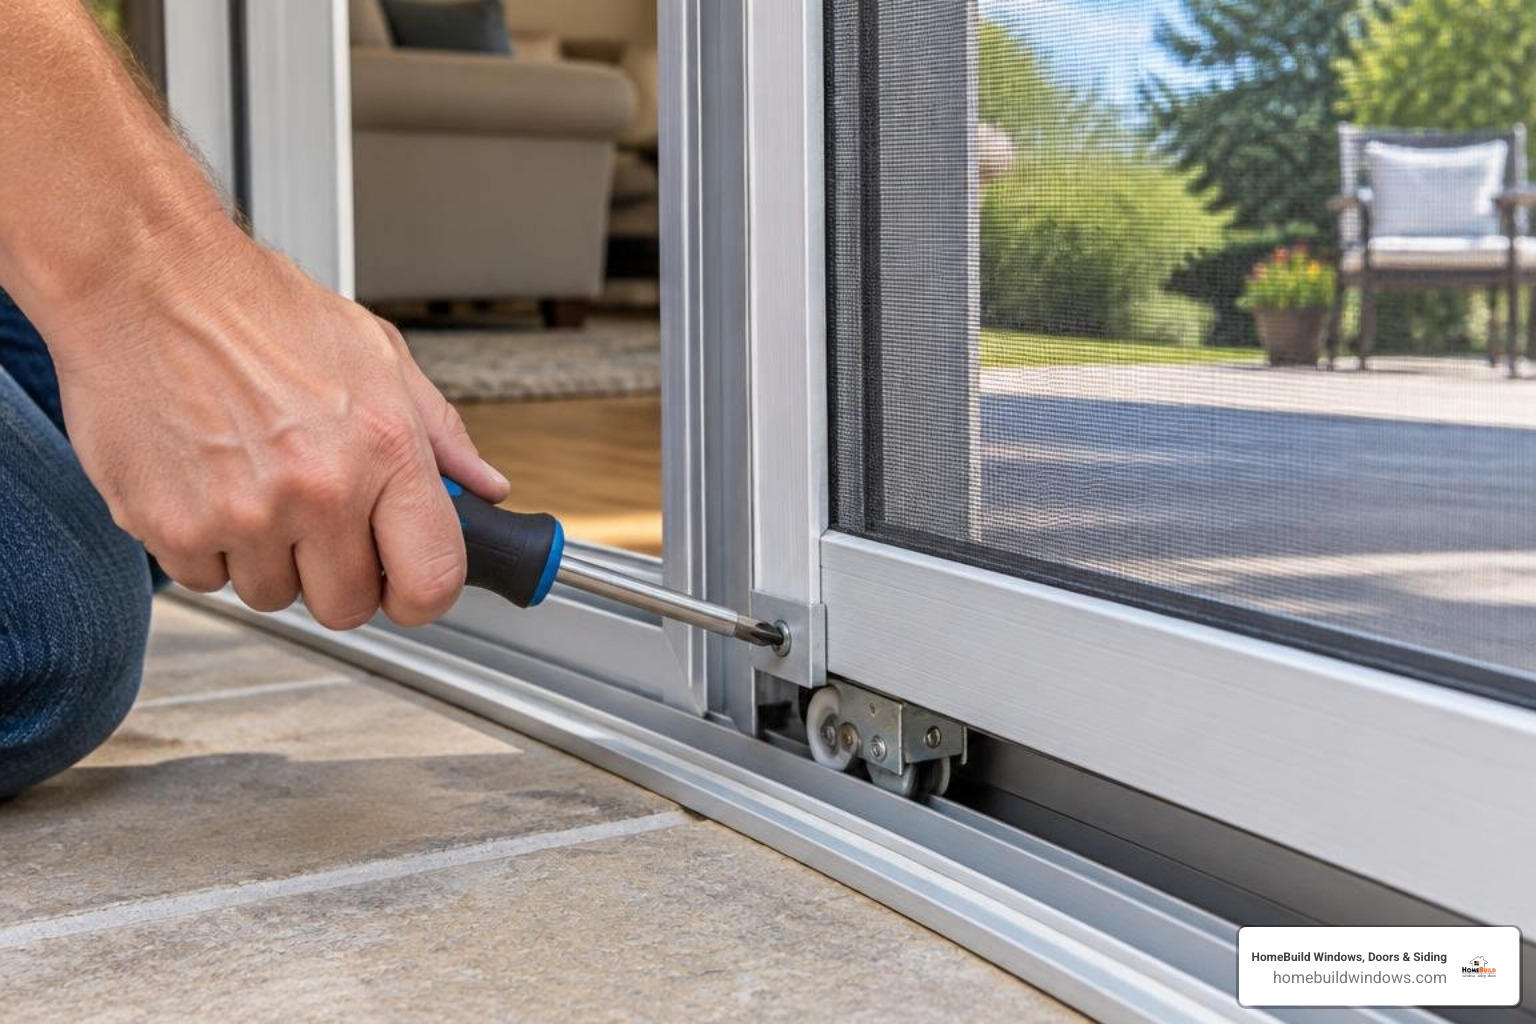
- Height Adjustment Screws: Locate the Phillips-head screws on the bottom edge or lower side faces of the screen. Turning the screw clockwise raises the roller (lifting that corner of the screen), while turning it counter-clockwise lowers the roller.
- Equalizing the Reveal: Slide the screen within an inch of the closed side jamb. Observe the vertical gap (the reveal). If the top of the screen hits the jamb before the bottom, raise the front bottom roller or lower the rear roller until the vertical gap is parallel from top to bottom.
- Top and Bottom Expanders: Some models include adjustable metal top expander hoods and bottom expander channels. Loosen the expander locking screws, gently extend the expander using a flat screwdriver as a lever until the guides fully engage the top sill pocket without binding, and retighten the fasteners. Never force or over-tighten screws, which can strip aluminum threads.
Latch Alignment and Bug Sweep Installation
A screen door must latch securely to avoid blowing open during breezy summer afternoons. When working on hardware, our guide to replacing your sliding patio door handle and lock provides additional detail on matching strike plates with locking levers.
- Position the Strike Plate: Close the screen completely against the jamb. Move the screen handle lever to the uppermost unlatched position. Mark the jamb where the latch hook extends.
- Mount the Strike: Position the strike plate on the jamb so the latch hook drops smoothly into the strike pocket when pressed down. Drill 3/32-inch pilot holes and secure the strike using the provided sheet metal screws. Add manufacturer shims behind the strike plate if the screen frame sits too far from the jamb for the latch to catch.
- Fit the Vinyl Bug Sweep: The flexible vinyl bug sweep seals the gap between the trailing edge of the sliding screen and the stationary glass door panel. Slide the sweep into the designated channel on the back edge of the screen frame.
- Trim to Length: Standard sweeps feature dedicated tear-off grooves. Tear or snip the excess width so the sweep gently brushes the stationary glass panel without dragging or bowing when the door moves.
Installing Retractable Screens and Alternative Systems
For homeowners who prefer clear, unobstructed views when the patio door is closed, retractable screens provide a clean, modern aesthetic. These units house a pleated or rolled mesh system inside a vertical aluminum cassette mounted directly to the door jamb or mullion.
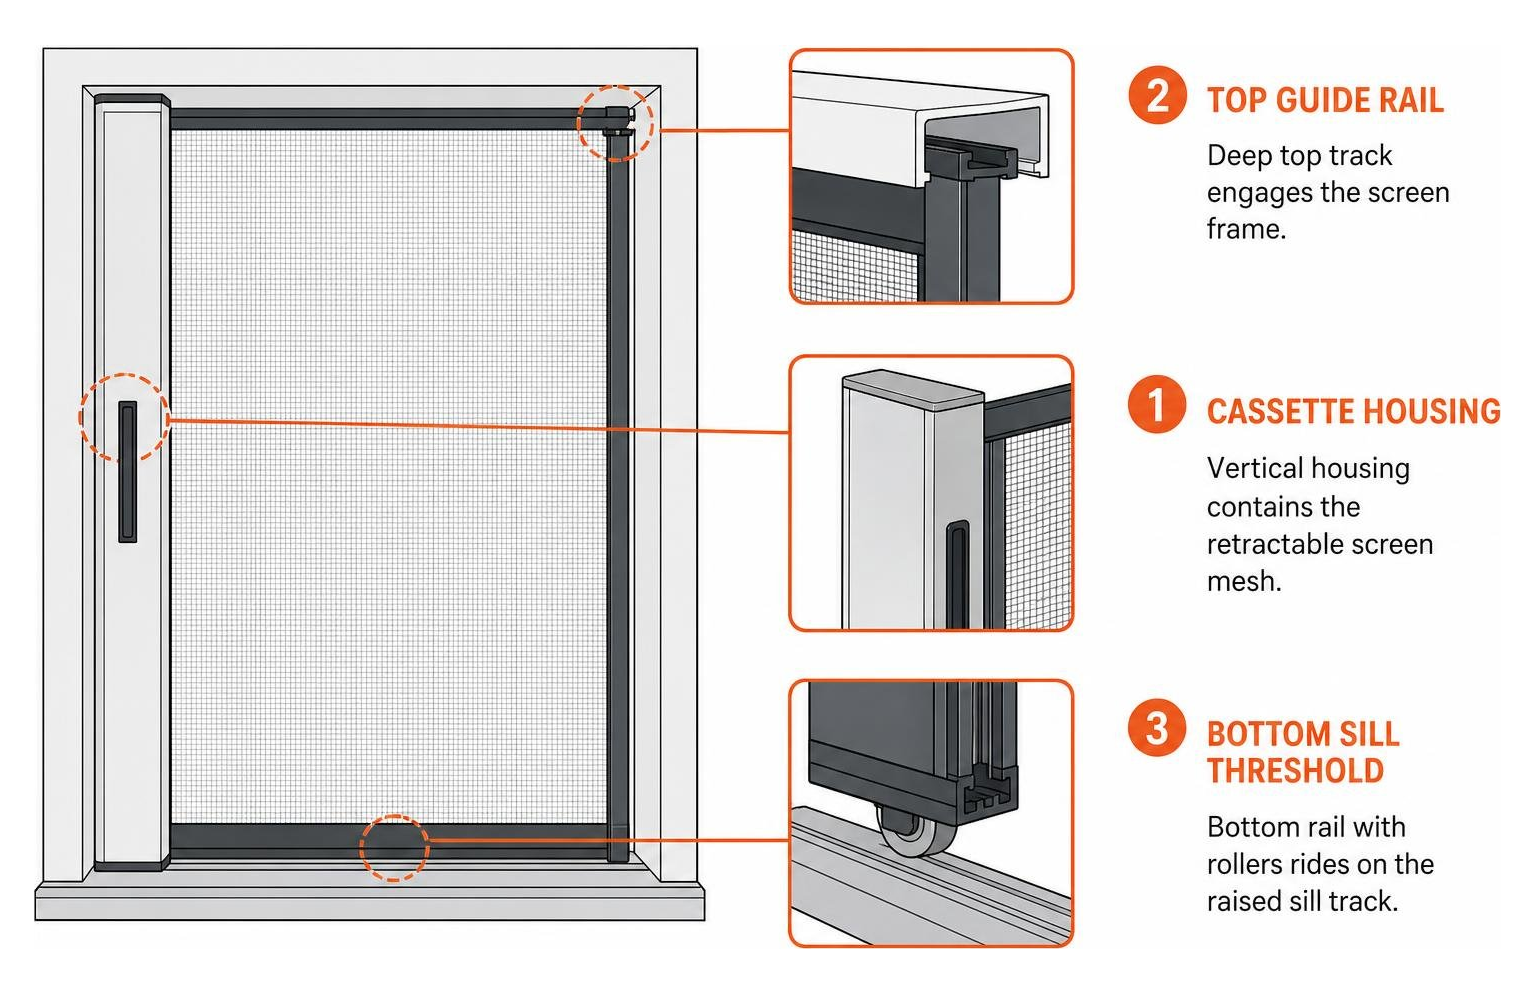
Retractable Patio Door Screen Installation on French and Sliding Doors
Retractable units work exceptionally well on sliding patio doors, center-hinged swing doors, and double French door openings. They can be mounted via surface mounting on the exterior trim/mullion or recess mounting inside the door frame pocket.
- Cassette Positioning: For sliding patio doors, mount the screen cassette vertically on the exterior side of the stationary glass panel mullion. Ensure a 1- to 2-inch clearance from the glass to avoid fastener interference. High-bond double-sided acrylic foam tape can supplement mechanical fasteners when drilling into narrow mullions.
- Guide Rails: Fasten the top guide rail horizontally into the top head jamb. Ensure the rail is level and parallel to the threshold.
- Bottom Sill Adapter and Shims: Most patio doors have sloped exterior sills designed for water drainage. Install angled sill shims (plastic, nylon, or composite) under the bottom guide rail to establish a flat, level mounting plane. This keeps the lower sliding glides from binding.
- Tension and Catch Alignment: Once the guide rails and cassette snap together, verify the magnetic catch or mechanical latch on the side profile. Test retraction speed and adjust the internal spring tension per manufacturer guidelines so the mesh glides smoothly without slamming.
Troubleshooting Common Issues and Screen Maintenance
Even a well-fitted screen door can encounter issues over years of active family use. Addressing minor mechanical snags early preserves your door investment and keeps your home comfortable.
| Issue | Likely Cause | Solution |
|---|---|---|
| Screen Derails Frequently | Rollers set too low; top expander loose; debris in sill track | Vacuum track; turn bottom roller screws clockwise to raise door height; extend top expander into upper track |
| Door Hard to Slide / Squeaks | Dirt buildup; worn roller bearings; improper grease | Clean track thoroughly; replace flat-spotted nylon wheels with steel ball-bearing rollers; apply dry silicone spray |
| Screen Frame is Racked / Uneven | Frame out of square; uneven roller heights | Re-adjust left and right roller screws independently to square screen with jamb; inspect frame corners for loose stakes |
| Bugs Entering Around Edges | Bug sweep torn, missing, or trimmed too short | Replace vinyl bug strip; ensure sweep overlaps stationary glass panel by at least 1/4 inch |
| Torn or Punctured Mesh | Pet claws, accidental impacts, or storm debris | Rescreen frame with heavy-duty pet-resistant polyester mesh or durable aluminum wire screen |
Proper Track Lubrication and Seasonal Care
Keeping your screen tracks clean and properly lubricated makes a significant difference in how effortlessly the screen glides.
- Use Dry Spray Lubricants Only: Apply a high-grade dry silicone or PTFE spray lubricant along the entire length of the sill rail.
- Avoid Oil-Based Products: Never use heavy oils, motor grease, or traditional solvent sprays like standard WD-40 on sliding screen tracks. Petroleum-based lubricants attract dirt, sand, and pet hair, forming an abrasive paste that grinds down nylon wheels and causes rollers to seize.
- Winter Storage & Cleaning: Before winter arrives in Northern Illinois, remove lightweight screen doors and store them flat in a dry garage or basement. Freezing snow and ice buildup can warp lightweight aluminum frames and degrade mesh fibers. Wash the mesh with warm soapy water and a soft nylon brush before re-installing in the spring.
Frequently Asked Questions About Patio Door Screens
How do I adjust a screen door that keeps falling off its track?
A screen door generally falls off its track when the overall frame height is adjusted too short, allowing the bottom rollers to pop out of the sill channel when pulled.
To fix this, locate the roller adjustment screws at the bottom corners of the door and turn them clockwise to raise the roller assembly, increasing upward tension against the upper channel. If your screen is equipped with a top expander, loosen its retaining screws and extend the top hood slightly higher into the top track, then tighten the screws. Ensure the sill track is free of gravel or debris that could bump the wheels off the guide rail.
What is the best lubricant to use on sliding screen tracks?
The best lubricant for sliding screen tracks is a specialized dry silicone spray or a dry PTFE (Teflon) lubricant.
These formulations leave behind a slick, non-tacky protective film that reduces friction between metal rails and roller bearings without collecting airborne dust, pollen, and debris. Clean the track with a vacuum and damp cloth before applying a light, even coat along the raised rail.
Can I install a patio door screen without removing the main glass door?
Yes, you do not need to remove the main glass patio door to install, remove, or adjust a sliding screen door. Sliding screens operate on an independent outer track channel built into the exterior frame of your patio door system.
As long as the sliding glass panel is closed and latched, you have full access to the exterior sill and head pocket to install the screen safely from the outside.
Conclusion
A properly fitted patio door screen delivers fresh breezes, smooth operation, and reliable insect protection throughout the warmer months. By measuring your opening accurately, setting the top track before seating the bottom rollers, balancing the vertical reveal, and applying dry lubricants, you can keep your screen sliding like new for years to come.
When you want to upgrade your home’s energy efficiency, comfort, and curb appeal, HomeBuild Windows, Doors & Siding is here to help. We are a trusted, locally owned exterior remodeling contractor with over 20 years of experience serving Chicago and the surrounding northwest suburbs—including Arlington Heights, Glenview, Palatine, Schaumburg, and Des Plaines.
Every project we take on is owner-supervised to guarantee unmatched craftsmanship, whether you need high-performance patio doors, premium window upgrades, custom siding, or durable residential roofing designed to handle tough Midwest winters. Backed by over 200 positive Google reviews, our certified, licensed, and insured team delivers top-tier materials and precision installation tailored to your home.
Contact our team today for a free consultation and explore how our expert window and door replacement in Chicago can transform your home.


