



How to Hang a Storm Door for Better Weather Protection
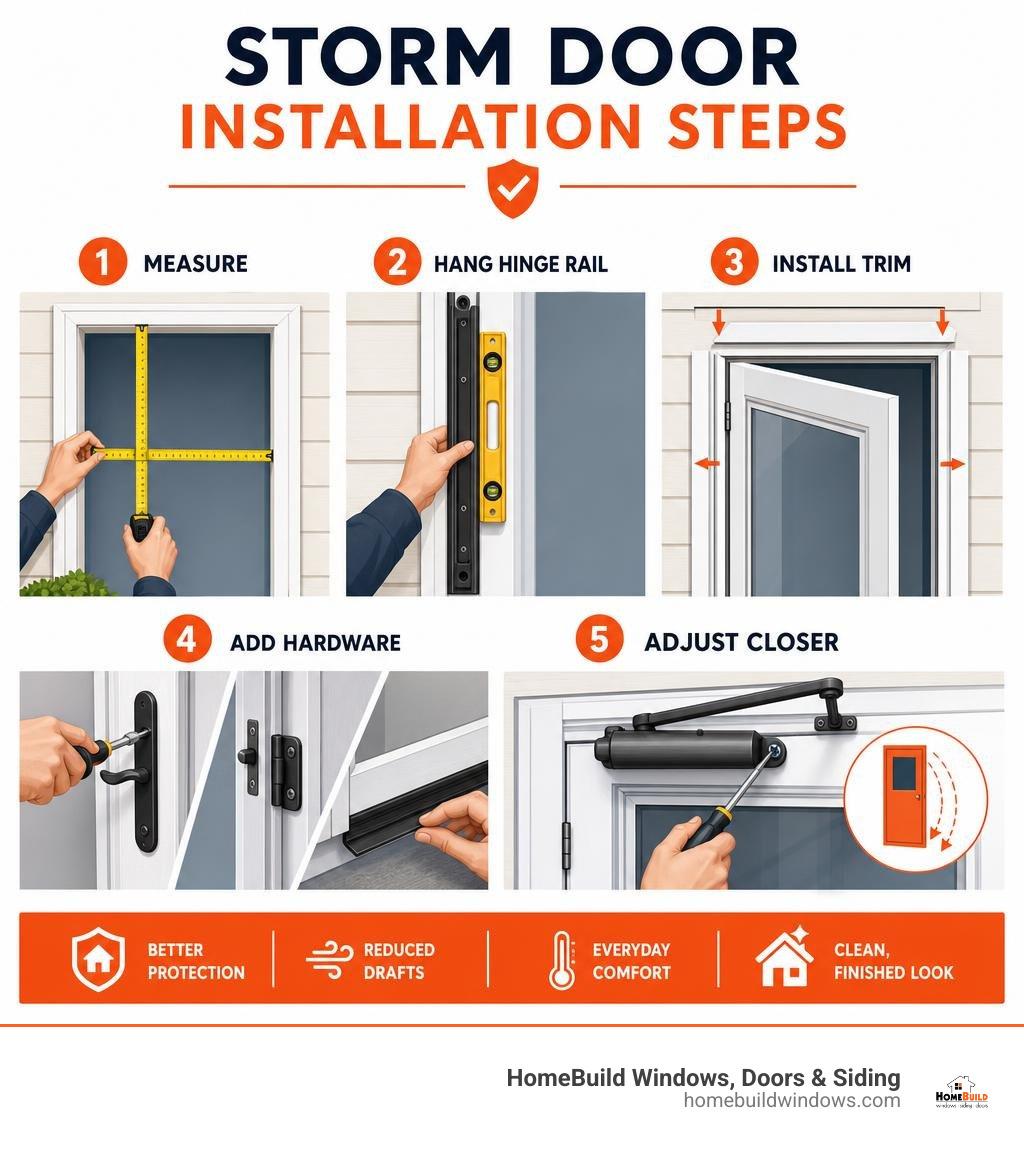
How to hang a storm door starts with measuring the opening, choosing the correct hinge side, and mounting the hinge rail level on solid exterior trim. Then, hang the door, add the drip cap and latch rail, install the handle and bottom sweep, and adjust the closer so the door shuts smoothly without slamming.
A properly installed storm door helps protect your entry door from Chicago-area rain, wind, snow, and sun. It can also reduce drafts, improve everyday comfort, and add a clean finished look to your entryway. While many standard installations take a few hours with basic tools, accurate measurements and square, solid brickmold make the difference between a smooth-operating door and one that binds or leaks.
I am Steve Mlynek, founder of HomeBuild Windows, Doors & Siding, with more than 20 years of experience in exterior door and window replacement. As an Elite Platinum Pella® Certified Contractor and Andersen Certified Contractor, I have seen how to hang a storm door correctly for long-term durability, weather protection, and reliable operation.
How to hang a storm door vocab explained:
Measuring, Handing, and Door Frame Preparation
Before unboxing hardware or holding a drill, accurate setup is essential. Standard storm door installations take roughly 2 to 4 hours for a DIYer, but adequate frame preparation prevents common missteps like binding hinges or air leaks.
Required Tools and Equipment Checklist
To complete this job efficiently, gather these essential hand and power tools before beginning:
- Tape measure
- Torpedo level or 4-foot level
- Cordless drill with 1/8-inch and 3/32-inch drill bits
- Screwdriver set (Phillips and flathead)
- Hacksaw or metal-cutting shears (for trimming rails if required)
- Metal file (to smooth cut rail edges)
- Wooden or composite shims
- High-quality exterior-grade elastomeric or silicone sealant
- Safety glasses and work gloves
How to Measure Door Frames and Determine Handing
Accurate doorway measurements ensure your storm door fits tight against exterior brickmold without sagging. Standard opening sizes typically range from 30, 32, 34, to 36 inches wide by 80 to 81 inches high.
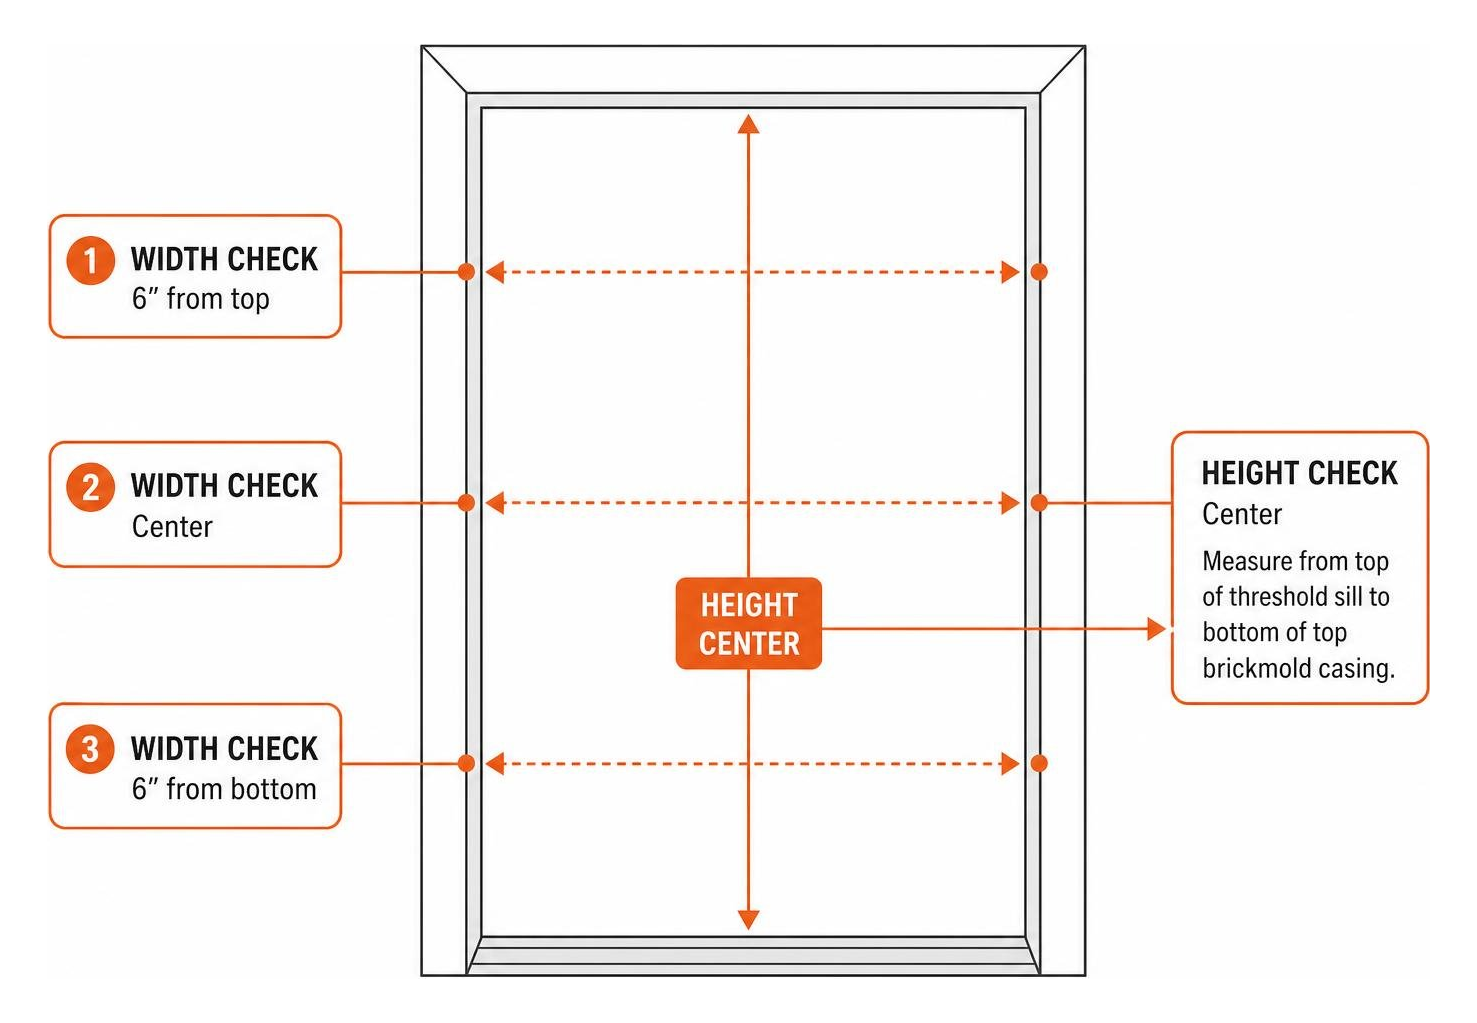
- Width Measurement: Measure the opening width inside the brickmold casing at three points: 6 inches from the top, across the center, and 6 inches from the bottom. Record the narrowest measurement.
- Height Measurement: Measure from the top edge of the exterior threshold sill up to the bottom face of the top brickmold casing on both sides and in the middle. Record the shortest measurement.
- Mounting Depth & Clearance: Verify that your exterior trim board has at least 1 inch of clear depth and a front width face of 3/4 inch. Ensure you have at least 2.5 inches of clearance depth between the primary entry door handle and where the storm door glass will sit to avoid handle interference.
Determining door handing is equally critical. To establish handedness, stand outside your home facing the main front door:
- If the handle on your primary entry door is on the left, your main door hinges are on the right (right-handed swing).
- In most homes throughout Chicago and the northwest suburbs, we recommend matching the storm door hinge placement to the primary entry door hinge placement. This prevents homeowners from getting trapped between two swinging doors when walking inside with groceries.
For more details on protecting your entry door against Midwest winter weather, read our detailed guide on Chicagoland Storm Door Replacement Keep The Drafts Out And The Light In.
Removing the Old Storm Door and Inspecting Trim
If you are replacing an existing unit, follow this orderly teardown process:
- Disconnect the upper and lower pneumatic door closer arms by pulling the holding pins from the bracket arms.
- Unscrew the hinge Z-bar rail from the exterior brickmold while a helper supports the weight of the old door.
- Remove the top drip cap and opposite latch rail.
- Scrape away old caulk, sealant residue, dirt, and loose paint from the exterior door frame casing using a putty knife.
Inspect the wood brickmold thoroughly. In Chicagoland, moisture from snow accumulation around door sills can lead to hidden rot behind the lower casing. Probe soft spots with a screwdriver. Any rotten wood trim must be repaired or replaced before hanging a new storm door; driving mounting screws into decayed wood will cause the heavy door to pull away from the jamb over time. Finally, check diagonal measurements from top-left to bottom-right and top-right to bottom-left to verify frame squareness (ideally within 1/8 inch variance).
Step-by-Step Guide: How to Hang a Storm Door

When learning how to hang a storm door, installing the hinge rail plumb is the single most important step. A plumb hinge rail ensures even weight distribution across all hinges and prevents the door frame from racking or binding.
Universal-Hinged vs Standard Models Before Learning How to Hang a Storm Door
Storm doors generally come in standard pre-hung assemblies (configured specifically for left-hand or right-hand swing) or universal-hinged configurations. Universal models can be adapted to swing either direction during initial assembly.
| Feature | Standard Pre-Hung Models | Universal-Hinged Models |
|---|---|---|
| Hinge Configuration | Pre-attached to left or right rail at factory | Reversible hinges attached on-site to desired side |
| Installation Speed | Faster initial hanging; fewer frame assembly steps | Requires minor assembly on sawhorses first |
| Adaptability | Fixed orientation once purchased | Adaptable if entry door layout changes |
| Fit Tolerance | Precision fit for standard square openings | Built-in rail extenders to accommodate slight size shifts |
Manufacturers like Pella and Andersen provide pre-assembled components that make hanging your storm door faster and more intuitive. For additional installation tips, review our step-by-step summary on How To Hang A Storm Door In 5 Easy Steps.
Detailed Steps on How to Hang a Storm Door
Follow this detailed breakdown when positioning and mounting your new storm door:
- Attach the Hinge Rail to the Door: Lay the storm door flat on sawhorses. Position the hinge Z-bar rail against the hinge edge of the door, allowing the top of the rail to extend roughly 1/8 inch beyond the upper edge of the door panel. Pre-drill pilot holes using a 1/8-inch drill bit and secure the rail to the door edge with the provided manufacturer screws.
- Drive the Top Placeholder Screw: Stand at your exterior entryway. Measure 5/16 inch from the interior trim edge at the top of the hinge-side brickmold and drive a single mounting screw into the wood, leaving roughly 1/8 inch of the screw head exposed.
- Hang the Door Panel: With a helper, lift the storm door into position. Hook the top keyhole or locator notch of the hinge rail onto the exposed placeholder screw. This holds the heavy door panel in place while you level the frame.
- Plumb and Secure the Hinge Rail: Place a torpedo level against the vertical hinge Z-bar. Ensure the rail is straight and vertically plumb. Pre-drill remaining pilot holes through the hinge rail mounting slots into the solid wood trim and drive the remaining mounting screws tight. Avoid over-tightening, as excessive torque can flex aluminum rails and cause hinge binding.
- Install the Top Drip Cap: Place the horizontal drip cap rail above the top edge of the storm door panel. Maintain a uniform 1/8-inch gap between the bottom lip of the drip cap and the top edge of the door. Secure the drip cap with mounting screws into the header trim board. Apply a continuous bead of exterior hybrid polymer sealant along the top edge of the drip cap where it meets the house trim to prevent water from running down behind the unit.
- Mount the Latch-Side Rail: Close the storm door panel into the opening. Slip 3/16-inch spacer pads (often provided with the hardware kit) between the latch side of the door panel and the latch Z-bar rail to ensure an even operating gap. Hold the latch rail flush against the top drip cap, verify plumbness, pre-drill pilot holes, and secure the rail to the side brickmold casing.
If you want to read official manufacturer guidelines, consult the Andersen Installation Guide or the LARSON INSTALL YOUR LARSON EASYHANG ® STORM DOOR LIKE A manual.
Installing Handles, Bottom Sweeps, and Door Closers
Once the outer Z-bar frame is securely fastened and the door panel swings smoothly, you can mount operating hardware, install weatherstripping, and dial in tension controls.
Mounting Hardware and Expander Sweep
Most modern storm doors include paper drilling templates to align handle locksets accurately without guessing drill positions.
- Drill Handle Holes: Tape the manufacturer’s drill template onto the interior face of the storm door panel at the height indicated in your owner manual. Pre-drill hardware holes carefully through the door panel using appropriate drill bit sizes as instructed by the manufacturer.
- Install Lockset and Latch Plate: Assemble the exterior escutcheon plate, door handle lever, interior latch handle, and internal lock cylinder. Insert key hardware and test latch engagement against the striker plate mounted on the side Z-bar rail.
- Attach the Bottom Expander Sweep: Slide the flexible rubber weather fins into the aluminum bottom expander channel. Use a small pair of pliers to crimp the aluminum channel ends shut so the rubber fin cannot slide out during daily use. Lubricating the channel with mild soapy water makes sliding thick rubber sweeps into place much easier.
- Set Expander Height: Position the expander channel over the bottom edge of the storm door panel. Close the door and lower the expander until the rubber fins touch the doorway threshold sill gently. The sweep should form an airtight seal against cold air without dragging heavily across flat masonry. Pre-drill 3/32-inch pilot holes from the interior side of the expander into the door panel (wrap tape around your drill bit as a depth gauge to avoid drilling through the exterior face) and tighten mounting screws.
Installing and Adjusting the Door Closer Mechanism
The pneumatic door closer prevents wind from whipping the storm door open and ensures the door latches closed automatically. Heavy full-view glass storm doors usually feature both a top and bottom closer mechanism.
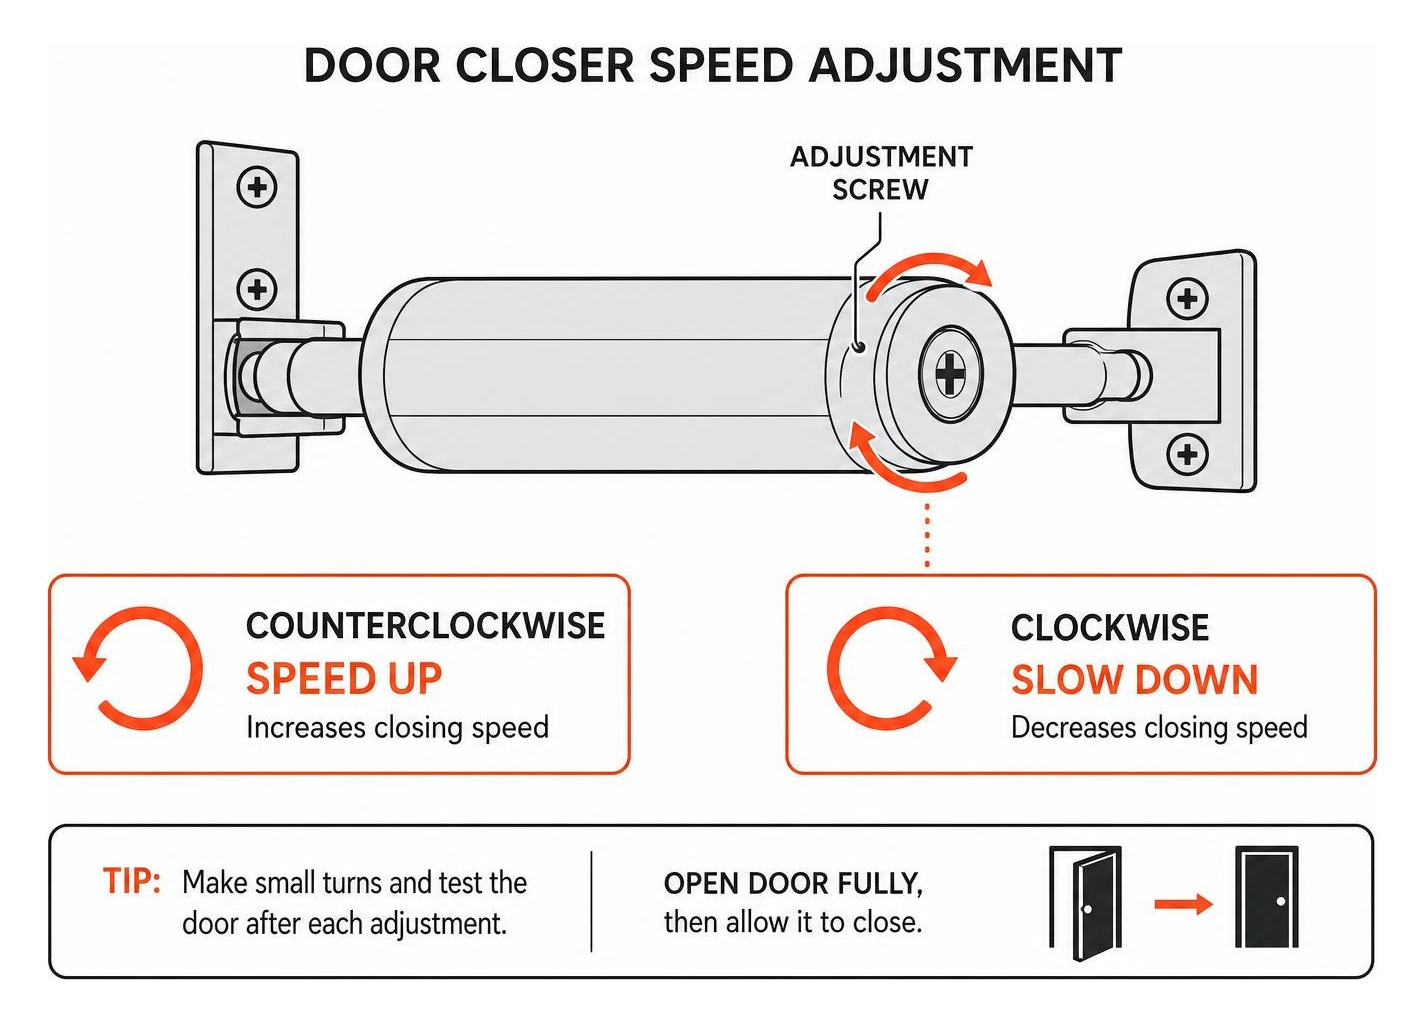
- Mount Jamb Bracket: Secure the jamb mounting bracket to the door frame casing on the hinge side. Position top closer brackets roughly 1/4 inch away from the frame edge according to product guidelines.
- Attach Closer Tube: Connect the pneumatic closer cylinder rod to the jamb bracket using the metal holding pin. Attach the opposite end of the closer cylinder to the door panel bracket.
- Set Closing Speed: Open the storm door fully and let it close under pneumatic pressure. If the door slams shut or fails to latch completely, turn the adjustment screw located on the end of the pneumatic closer cylinder:
- Turn the screw clockwise to slow down the closing speed.
- Turn the screw counterclockwise to increase the closing speed.
Ideal closer adjustment allows the storm door to close smoothly and latch securely within 3 to 5 seconds. If you install seasonal screen inserts during warmer months, slight adjustments to this speed screw will account for lighter panel weights.
For home improvement tips on selecting durable entryway components, explore our article on Dont Swing It Alone The Guide To Professional Storm Door Hanging.
Troubleshooting Common Storm Door Installation Issues
Even experienced DIYers encounter installation obstacles when dealing with older suburban homes or irregular brickmold openings. Here is how to correct common storm door problems quickly.
Fixing Frame Binding and Clearance Gaps
- Door Hits Bottom Corner First: If the bottom handle-side corner of your storm door catches the frame before the top corner touches, the brickmold face is likely out of plane or twisted. Place thin wood or composite shims behind the lower hinge rail screw locations to tilt the top of the door outward, or slightly loosen hinge screws to relieve flex.
- Hinges Binding: Excessive torque on mounting screws can warp aluminum Z-bar channels, causing internal hinge leaves to pinch. Back off mounting screws 1/4 turn along the hinge rail until the door swings freely without friction.
- Door Frame Too Wide: If your inside trim opening measures 1/4 inch to 1/2 inch wider than standard door specs, use Z-bar extenders or shim behind the vertical Z-bars with treated wood strips before driving long mounting screws.
- Threshold Drag: When main door sills sit back on flat concrete steps, bottom sweeps can drag and double over. Install an aluminum sill adapter profile to raise the contact point while leaving clearance for door travel.
Resolving Latch Alignment and Closing Speed Problems
- Latch Misses Striker Plate: If the latch bolt hits above or below the striker plate hole, loosen the striker plate mounting screws, slide the plate vertically until the bolt aligns smoothly, and re-tighten.
- Door Bounces Back Without Latching: This occurs when pneumatic closer pressure is too weak during the final 2 inches of travel. Adjust the closer arm bracket or loosen the speed screw slightly so the door gains enough momentum to depress the latch spring.
- Air Pocket Drafts: Check side Z-bar pile weatherstripping. If weatherstrip fibers do not contact the door face evenly, adjust side Z-bars slightly inward or apply fresh silicone caulking behind exterior Z-bar flanges.
For additional resources, check out Lowe’s guide on How to Install a Storm Door | Lowe’s or review alternative installation methodologies in How to Install a Storm Door (2-3 Hours, Any Skill Level) .
Frequently Asked Questions About Storm Door Installation
How long does it take to hang a storm door?
For a homeowner with beginner-to-intermediate DIY skills, hanging a storm door typically takes between 2 to 4 hours. Using factory pre-assembled systems like Pella® Express Install or LARSON EasyHang® can reduce installation time down to roughly 1 to 2 hours because mounting rails do not require custom field cutting.
Should a storm door hinge on the same side as the main door?
Yes, in almost all residential installations, your storm door should hinge on the same side as your main exterior entry door. Hinging both doors on the same side allows you to open both doors in one fluid motion without stepping awkwardly between two swinging door panels. The only exception occurs when shallow trim space (under 2.5 inches of depth) causes entry door handles to collide with storm door glass panels.
What should I do if my opening is slightly too large for a standard door?
If your opening width is up to 1/2 inch larger than standard off-the-shelf door dimensions, use aluminum Z-bar extenders (which attach directly to the outer edges of the mounting rails) or install composite shims behind the vertical Z-bars. If the frame opening is more than 5/8 inch larger than standard sizes, a custom-sized storm door unit will be required to ensure proper thermal sealing.
Why Professional Installation Matters for Chicago Homeowners
While hanging a basic storm door can be a manageable weekend project, ensuring long-term weatherproofing against northern Illinois winter conditions requires precision. Out-of-square openings, hidden wood rot, and improper Z-bar sealing can lead to trapped moisture, drafts, and premature hardware failure.
At HomeBuild Windows, Doors & Siding, we have provided trusted exterior door replacement, window installation, siding replacement, and residential roofing services for homeowners in Chicago and surrounding communities—including Palatine, Schaumburg, Park Ridge, Glenview, Arlington Heights, and Naperville—for more than 20 years.
As an Elite Platinum Pella® Certified Contractor and Andersen Certified Contractor recognized with the Angi Super Service Award and Nextdoor Neighborhood Faves, our fully licensed and insured team delivers exceptional craftsmanship, superior insulation, and outstanding curb appeal on every installation.
If you prefer to have your entry system fitted by experienced local installers, contact our team to schedule a free estimate for your home today.

