Evaluating Your Roof: Assessment and Skylight Styles
Replacing a skylight typically involves removing the old unit, inspecting the roof deck, installing a properly flashed new skylight, and finishing the interior trim. Homeowners should plan for replacement when the unit is 10 to 15 years old, shows condensation between panes, or has visible water stains below the opening. A functioning skylight brings natural daylight and warmth into your home, but an aging unit quickly turns into a liability against severe Midwest weather. Chicago homes endure intense weather swings, ranging from freezing winter blizzards and ice dams to humid summer storms and strong lakefront winds. These environmental pressures test every seal and joint on your roof. Over time, recurring expansion and contraction cause aging skylight materials to fail, creating hidden moisture problems that can impact your attic and living space.
Signs That Replacing a Skylight Is Necessary
Knowing when your unit has reached the end of its useful life prevents structural moisture issues. Skylights typically function reliably for 10 to 15 years before performance begins to decline. Key indicators that you need a replacement include:
- Condensation Between Panes: Moisture trapped inside the insulated glass unit (IGU) signals a broken perimeter seal, which permanently degrades energy performance.
- Water Stains and Drywall Damage: Yellow or brown discoloration on the ceiling drywall directly below the roof opening indicates water intrusion past the exterior flashing.
- Glass Fractures: A sudden impact or severe hail strike compromises safety glazing; assessing a cracked skylight quickly is essential to protect your home’s interior.
- Drafts and Comfort Issues: Cold air dropping into your living space during winter points to deteriorated frame gaskets or degraded thermal barriers.
- Rotting Interior Wood: Soft, dark, or peeling wood jambs indicate sustained, undetected leaks around the roof penetration.
Deciding Between Minor Repairs and Unit Replacement
Not every issue demands an immediate total tear-out. In cases where the skylight glass and sash remain structurally intact and under a decade old, localized issues like loose metal flashing or minor caulking gaps can often be resolved with targeted service. Addressing these issues through professional roof leak repair can restore water shedding without replacing the entire frame.
However, if the skylight is past 15 years of age, shows internal seal failure, or has structural frame decay, repair attempts only delay the inevitable. Upgrading to a new, high-efficiency unit restores peace of mind and preserves indoor comfort.
| Assessment Factor | Minor Repair Candidate | Full Replacement Required |
|---|---|---|
| Unit Age | Under 10 years old | 10 to 15+ years old |
| Glass Condition | Intact, clear IGU seal | Cracked, shattered, or foggy interior panes |
| Flashing & Seals | Minor sealant gap, loose fastener | Corroded, bent, or improperly layered flashing |
| Frame Integrity | Solid frame, no dry rot | Warped frame, mold growth, rotted wood jambs |
| Energy Performance | Minor drafts near trim | Significant heat loss, cold downdrafts, ice formation |
Curb-Mounted vs. Deck-Mounted Skylights
Selecting the correct installation style is critical for structural compatibility with your roof slope and roofing system.
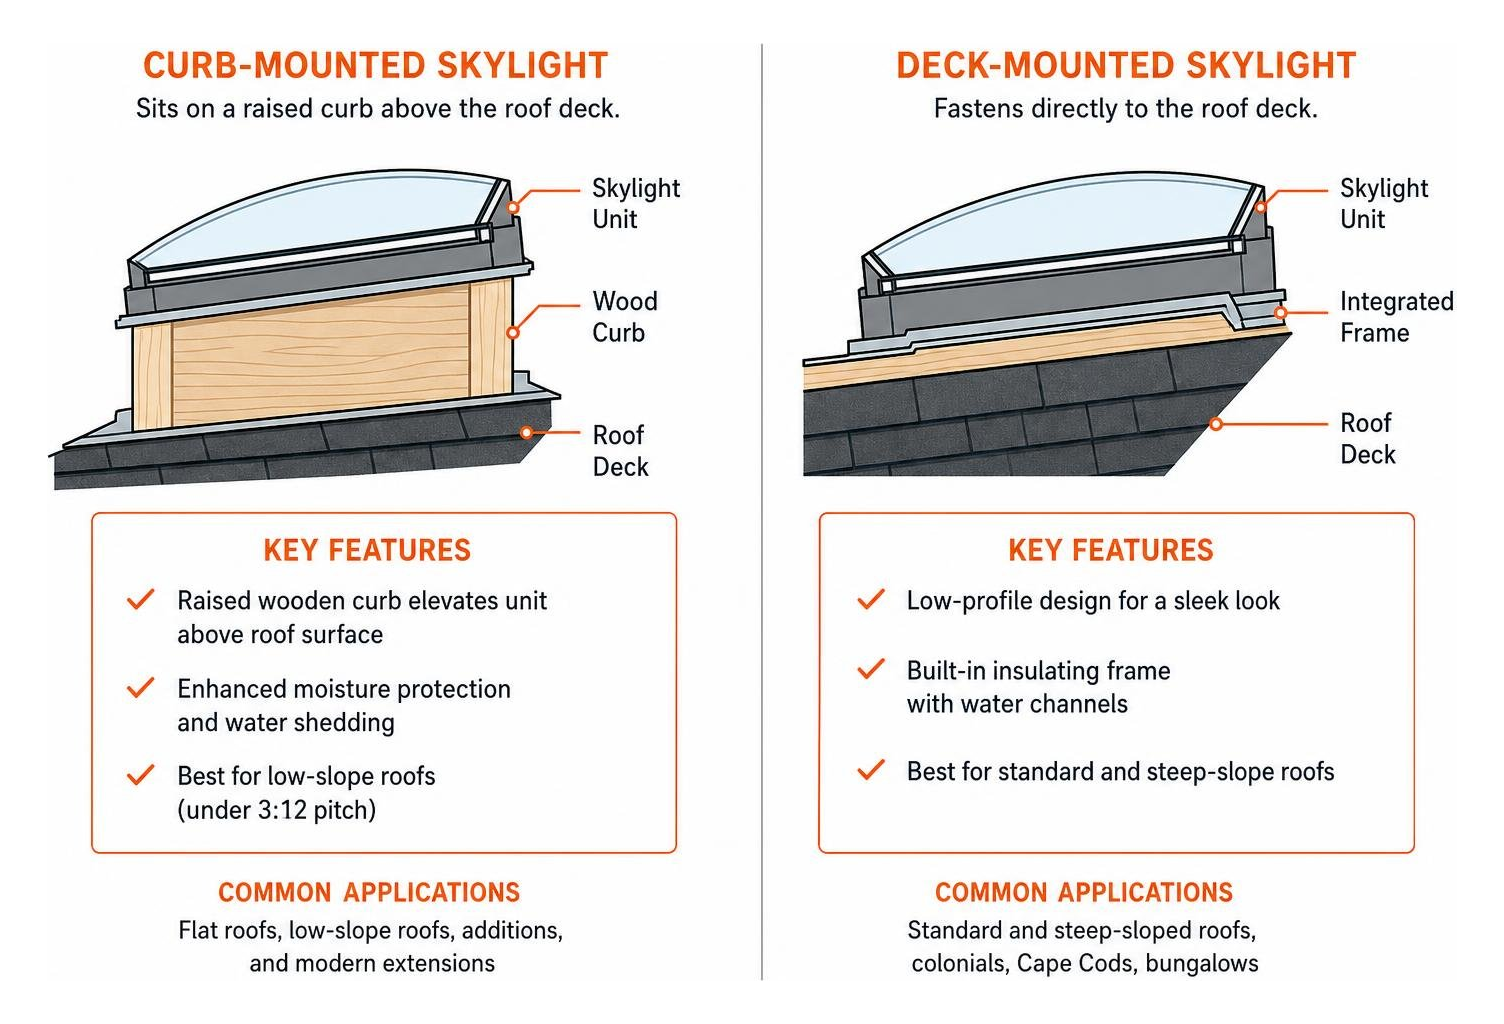
- Curb-Mounted Skylights: The skylight sits over a raised wooden box (the curb) built directly onto the roof deck, fitting much like a shoe box lid. This design elevates the unit above the roof surface, providing bulk moisture protection and shedding water efficiently on shallow pitches (under 3:12). Curb-mounted styles are common on Chicago flat-roof extensions, modern additions, and low-slope roofs.
- Deck-Mounted Skylights: The skylight frame fastens directly to the roof deck sheathing for a sleeker, low-profile architectural look. Deck-mounted units feature built-in insulating frames and integrated water channels, making them ideal for standard and steep-sloped roofs such as classic Chicagoland colonials, Cape Cods, and high-pitch bungalows.
Detailed technical guidelines from building science resources such as Existing Skylights Repaired or Replaced and Fully Flashed show that maintaining continuous air and water barriers across either mount style is vital for building envelope performance.
Essential Preparation, Tools, and Safety Precautions
Proper preparation ensures a smooth installation while protecting both the roof structure and the home below. Skylight projects involve working at heights on steep pitches, requiring rigorous safety measures and the right specialized tools.
Key Safety Protocols When Replacing a Skylight
Working on sloped residential roofs requires strict adherence to safety standards:
- Always use an OSHA-compliant fall-protection system, including a full-body harness, shock-absorbing lanyard, roof bracket staging, and a secured ridge anchor.
- Set up ladder stabilizers on solid, level ground and extend the ladder at least three feet above the roof eave.
- Avoid roof work during high winds, rain, or when morning frost makes asphalt shingles slippery.
- Maintain a clear drop zone below the exterior workspace to protect landscaping, walkways, and entryways.
Required Tools and Replacement Materials
Professional installers use dedicated tools and premium building products to guarantee a weather-tight fit:
- Demolition & Fastening: Flat pry bars, utility knives with hook blades, cordless impact drivers, and pneumatic framing/roofing nailers.
- Fasteners: Corrosion-resistant, galvanized ring-shank roofing nails and structural wood screws.
- Waterproofing & Flashing: Self-adhering modified bitumen ice-and-water membrane, engineered aluminum sill flashing, individual step flashing pieces, counter flashing, and head saddle flashing.
- Interior Materials: Pre-finished jamb extensions, premium insulating foam sealant, low-expansion window/door foam, and matching interior trim casing.
Step-by-Step Guide to Replacing a Skylight
Understanding the replacement process helps homeowners appreciate the craftsmanship required to build a permanent, weather-resistant barrier on their roof. A professional skylight replacement involves careful removal of the old unit, inspection and preparation of the roof deck, precise positioning of the new skylight, and layered waterproofing with membrane and flashing. Each stage must be completed in the correct order to protect the home from Chicago’s freeze-thaw cycles, lake-effect moisture, and wind-driven rain.
Removing the Old Unit and Prepping the Roof Deck
Before any new skylight can be installed, the existing unit and surrounding roofing materials must be removed without damaging the roof structure. The process begins with carefully lifting and removing two to three courses of shingles around the sides and top of the existing skylight opening. A flat pry bar helps preserve surrounding shingles without tearing the fiberglass mat. Next, the old step flashing, base flashing, and header metal are stripped away to expose the raw roof sheathing. The old window assembly is then detached by backing out structural screws or prying up perimeter mounting brackets, and carefully hoisted out. Finally, the exposed roof decking, rafters, and headers are thoroughly inspected for moisture staining, mildew, or wood rot. Any compromised structural lumber must be replaced before the new unit is installed.
Positioning and Securing the New Skylight
Once the opening is clean and structurally sound, the new skylight is positioned for a precise fit. The center lines of both the rough roof opening and the new skylight frame are marked to ensure accurate alignment. Diagonal measurements across the frame are checked to confirm the unit sits square without racking. The skylight is then secured using manufacturer-specified galvanized fasteners driven through the mounting flange into structural roof rafters. If you want to optimize your home’s thermal comfort and reduce seasonal heating and cooling loads, selecting an energy-efficient skylight with advanced Low-E coatings and argon gas fill makes a significant difference.
Waterproofing with Membrane and Step Flashing
Waterproofing is the most critical stage of the entire installation. Water must shed over overlapping layers from the roof peak down to the eaves.
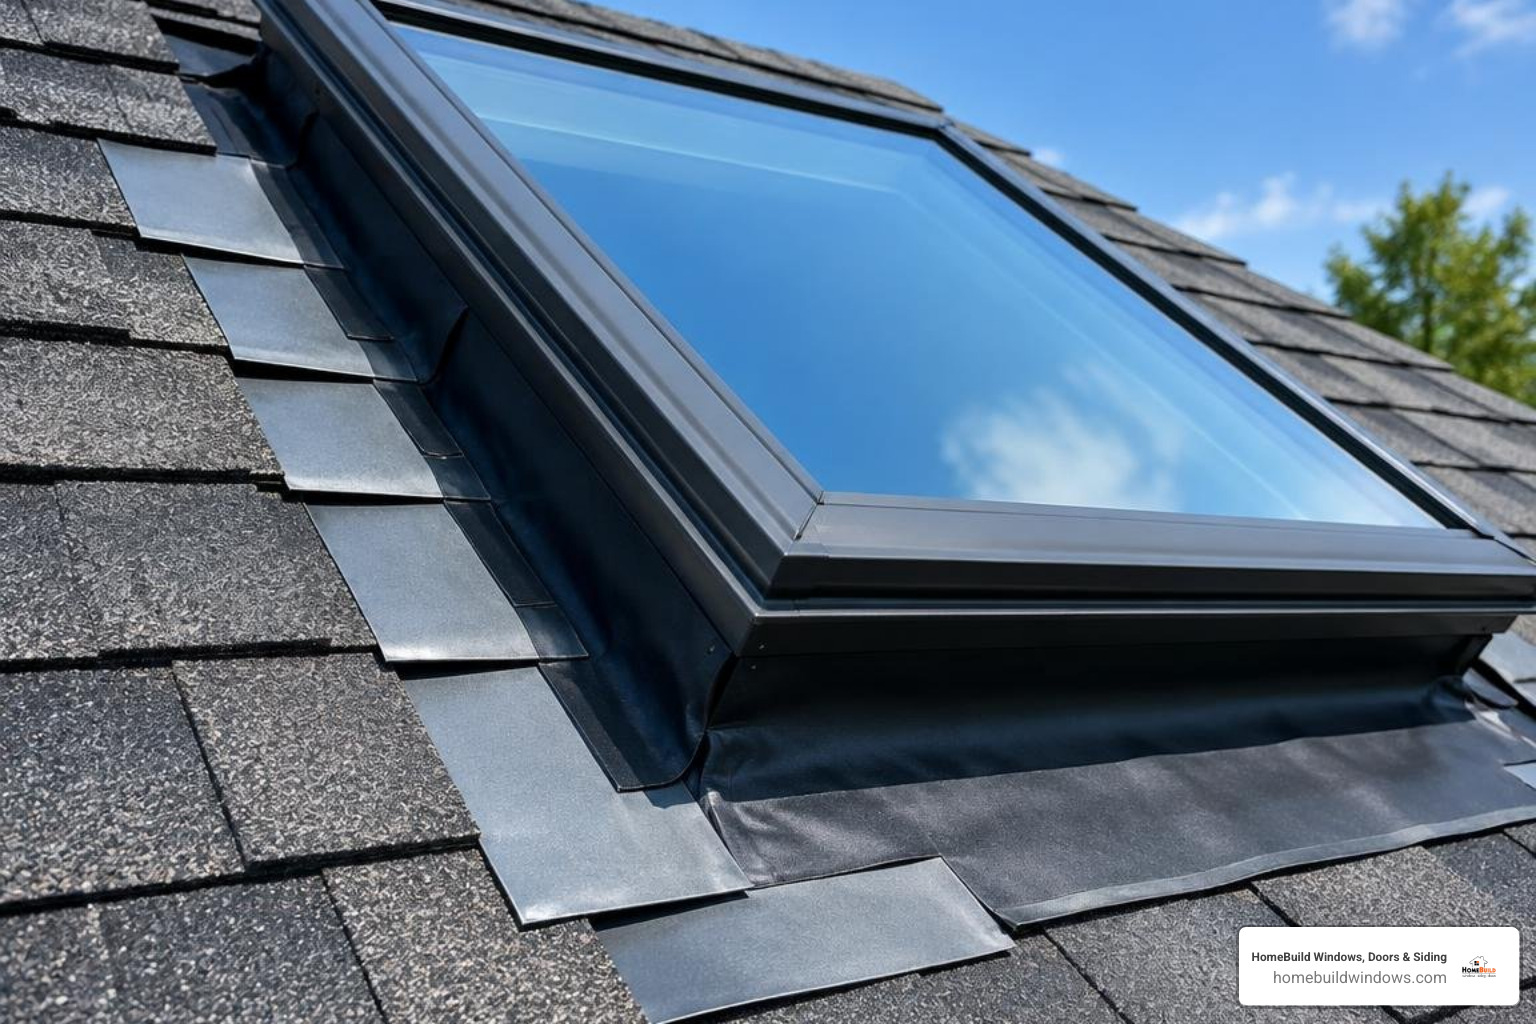
- Self-Adhering Membrane: A self-sealing ice-and-water membrane is applied along the bottom sill first, extending at least six inches past each side. The membrane is wrapped up the sides of the skylight frame to create a continuous water seal.
- Sill Flashing: The bottom sill flashing piece is secured so it rests over the shingles directly below the skylight.
- Step Flashing Interweaving: Individual L-shaped aluminum step flashing pieces are woven with each alternating course of roofing shingles up both sides. Each step flashing piece overlaps the one below it, shedding runoff away from the frame.
- Head Flashing Integration: Top saddle head flashing is installed across the top of the unit, tucked under the upper shingle courses and roof underlayment to channel water safely around the sides.
Reinstalling Shingles and Interior Trim Finishing
After the waterproofing layers are in place, replacement asphalt shingles are carefully worked back into the existing roof field and nailed securely above the exposure line to prevent blow-offs in heavy winds. From inside the home, low-expansion foam sealant is applied into the perimeter expansion gap between the skylight frame and rough framing to stop air infiltration. Custom jamb extensions are installed to accommodate ceiling depth, all internal seams are caulked, and new interior casing trim is nailed in place for a clean finish. Because every step must be sequenced correctly to maintain the roof’s water-shedding ability, professional installation is essential for long-term performance and warranty protection.
Professional Installation vs. DIY: Ensuring Performance and Longevity
While replacing a skylight can sound like a weekend DIY project, roofing penetrations require specialized craftsmanship. Improperly integrated step flashing, unsealed fastener heads, or damaged underlayment can lead to slow, hidden roof leaks that rot rafters and ruin insulation long before water stains appear on the ceiling.
Hiring an experienced contractor protects your home with full manufacturer warranty coverage, structural code compliance, and dedicated workmanship guarantees. From historic Chicago bungalows and vintage split-levels to custom North Shore colonials, professional installation ensures your home stays watertight and energy-efficient for decades.
Frequently Asked Questions About Skylight Replacement
How long does a standard skylight replacement take?
A direct, same-size skylight replacement typically takes 2 to 4 hours per unit under favorable weather conditions. Projects that require framing repairs, curb rebuilding, or interior drywall work may take additional time.
Can I replace a skylight without replacing the entire roof?
Yes. An experienced contractor can replace an individual skylight by carefully unweaving the perimeter shingles, installing new ice-and-water protection and engineered flashing kits, and seamlessly re-integrating the existing shingles without disturbing the rest of the roof system.
How do modern replacement skylights improve energy efficiency?
Modern skylights feature advanced dual-pane insulated glass with argon gas fills and Low-E thermal coatings. These coatings reflect interior radiant heat back inside during freezing Chicago winters while blocking unwanted solar heat gain and UV rays during hot summer months, reducing HVAC strain and lowering energy bills.
Transform Your Home with HomeBuild
Upgrading your home’s skylights brings clean natural light, better temperature regulation, and dependable leak protection to your living space. At HomeBuild Windows, Doors & Siding, we treat every roof penetration with precision and care. Locally owned and operated since 2004, our team brings over two decades of dedicated exterior remodeling experience to Chicago and the surrounding suburbs.
Every project is personally owner-supervised by Steve Mlynek to ensure exceptional craftsmanship, proper flashing integration, and a clean workspace. As an Elite Platinum Pella Certified Contractor and Andersen Certified Contractor—recognized as an Angi Super Service Award winner and 2025 Nextdoor Neighborhood Faves winner with a 4.9-star rating from over 200 Google reviews—we are committed to protecting your home with top-tier products and meticulous installation.
Whether you need a dedicated skylight replacement or comprehensive roofing solutions, we are here to help.
Contact us today at 1830 N Winchester Ave, Chicago, IL 60622. Schedule your free consultation today to get started on your home improvement project!