


Start With a Safe, Code-Compliant Egress Window Plan
A proper egress window installation creates an emergency exit, brings daylight and fresh air into a basement, and can help make a finished room suitable for legal bedroom use. Before any digging or cutting begins, confirm the window provides a minimum 5.7-square-foot clear opening, at least 20 inches of clear width, 24 inches of clear height, and a sill no more than 44 inches above the finished floor.
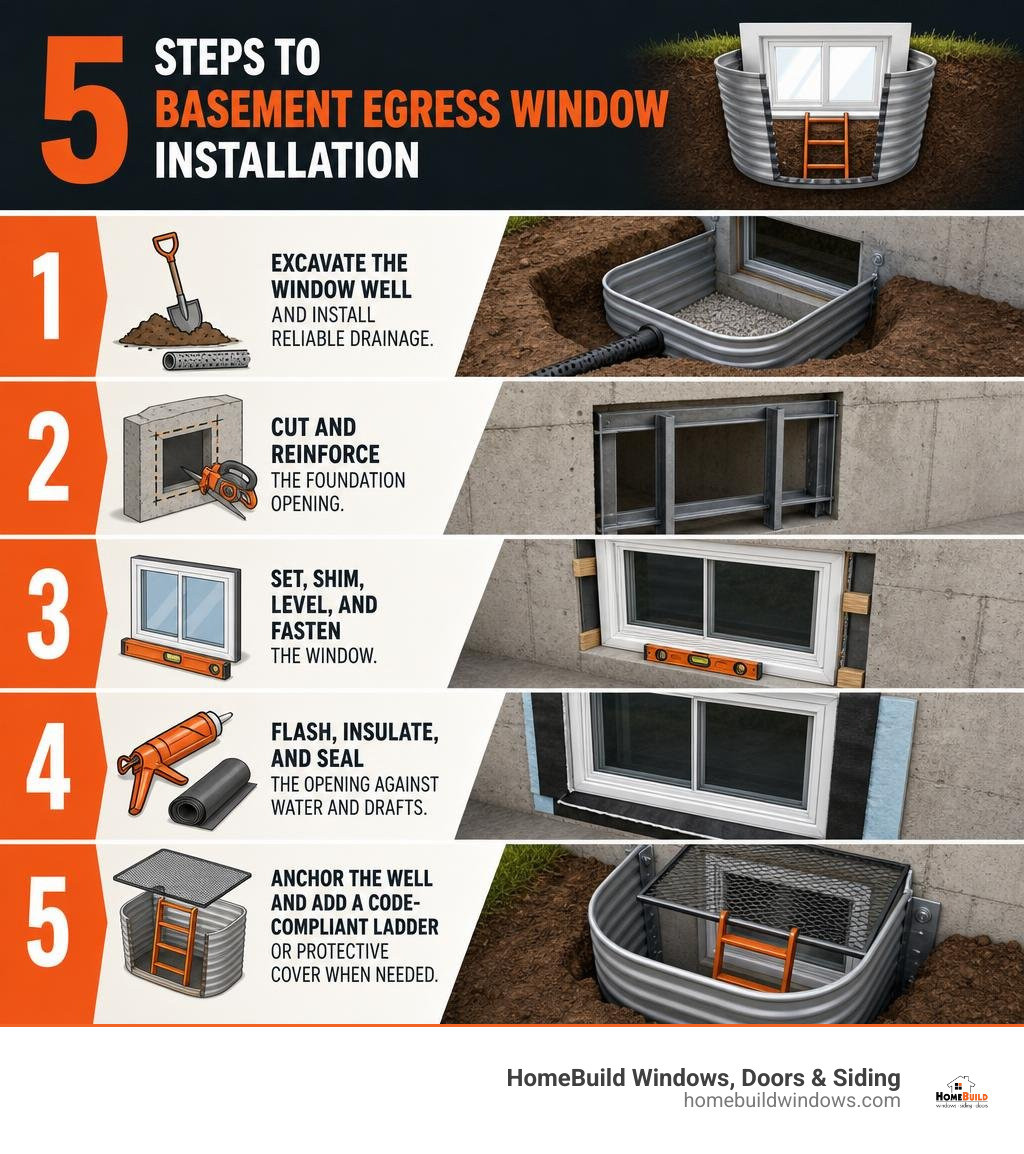
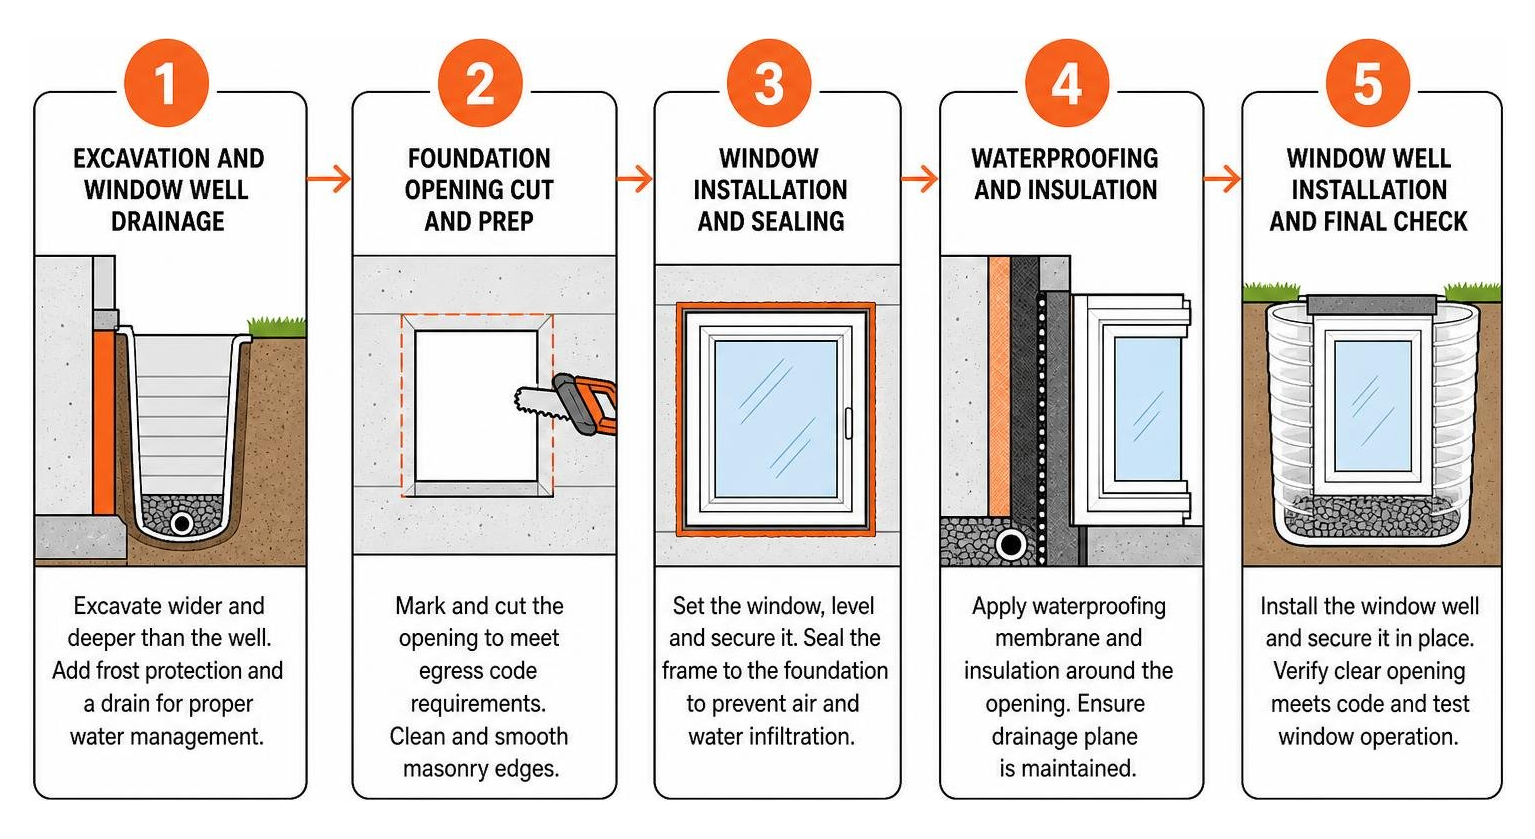
The five essential steps are:
- Excavate the window well and install reliable drainage.
- Cut and reinforce the foundation opening.
- Set, shim, level, and fasten the window.
- Flash, insulate, and seal the opening against water and drafts.
- Anchor the well and add a code-compliant ladder or protective cover when needed.
This is not a standard replacement-window project. Cutting a foundation wall, managing below-grade water, and meeting Chicago-area permit rules require careful planning and durable materials. For many homeowners, professional installation is the best way to protect the home’s structure, energy performance, and basement from moisture problems.
I am Steve Mlynek, founder of HomeBuild Windows, Doors & Siding, with more than 20 years of experience in residential window work. Our licensed and insured team brings the same careful approach to egress window installation that has earned HomeBuild Elite Platinum Pella Certified Contractor and Andersen Certified Contractor credentials.
Key terms for egress window installation:
Understanding Egress Code Requirements and Benefits
Transforming a subterranean basement into a bright, livable space requires more than just drywall and flooring. Building codes demand safe emergency exit pathways, especially when turning lower-level areas into bedrooms or family recreation suites. To understand the wider regulatory landscape across municipalities, reviewing a Window Replacement Standards and Permits Guide provides valuable context for how local codes govern openings.
When choosing a window design, different styles provide varying clear opening areas within identical wall dimensions. Casement and European in-swing tilt & turn units remain the most efficient styles for meeting egress rules without requiring overly wide foundation cuts.
| Window Style | Typical Clear Opening Mechanism | Efficiency for Egress Codes | Best Suited Space |
|---|---|---|---|
| Casement (Hinged) | Sash cranks or pushes out 90° | Highest (entire frame opens) | Narrow foundation cutouts |
| Tilt & Turn (In-Swing) | Sash swings inward like a door or tilts | Exceptional dual-action function | Tight exterior property lines |
| Gliding / Sliding | One sash slides horizontally | Moderate (50% clear opening) | Wide wall expanses |
| Double-Hung | Bottom sash slides upward | Lowest (under 50% clear opening) | Tall vertical foundation walls |
Essential Egress Window Installation Building Codes
The International Residential Code (IRC) establishes baseline safety requirements to guarantee that adults, children, and fully outfitted emergency personnel can safely exit or enter through an emergency escape opening during a fire.
To satisfy the standard IRC provisions:
- Net Clear Opening Area: Must be a minimum of 5.7 square feet (reduced to 5.0 square feet for grade-floor openings).
- Clear Opening Width: Must be at least 20 inches wide.
- Clear Opening Height: Must be at least 24 inches tall.
- Maximum Sill Height: The bottom of the clear opening must sit no higher than 44 inches from the finished interior floor.
- Window Well Clearance: The exterior well must provide a horizontal projection of at least 36 inches and a total clear floor area of at least 9 square feet (3 feet by 3 feet) with the window fully opened.
Combining the bare minimum width (20 inches) and minimum height (24 inches) results in only 3.33 square feet, which violates the 5.7-square-foot rule. A 20-inch wide window must be at least 41.2 inches tall, while a 24-inch tall window must be at least 34.2 inches wide to meet the clear area standard.
Adding Value and Safety to Basement Living Spaces
Adding an egress window enhances life safety, increases daily living comfort, and introduces abundant natural daylight to banish subterranean gloom. Proper natural ventilation safeguards indoor air quality by reducing humidity and preventing stale air buildup.
For complete project guidance on lower-level upgrades, our Basement Window Installation Guide walks through the practical aspects of planning below-grade improvements. Converting an informal basement den or home gym into a legally conforming bedroom requires two approved forms of egress. Installing a certified escape window fulfills that standard, creating a compliant living area that expands usable home space.
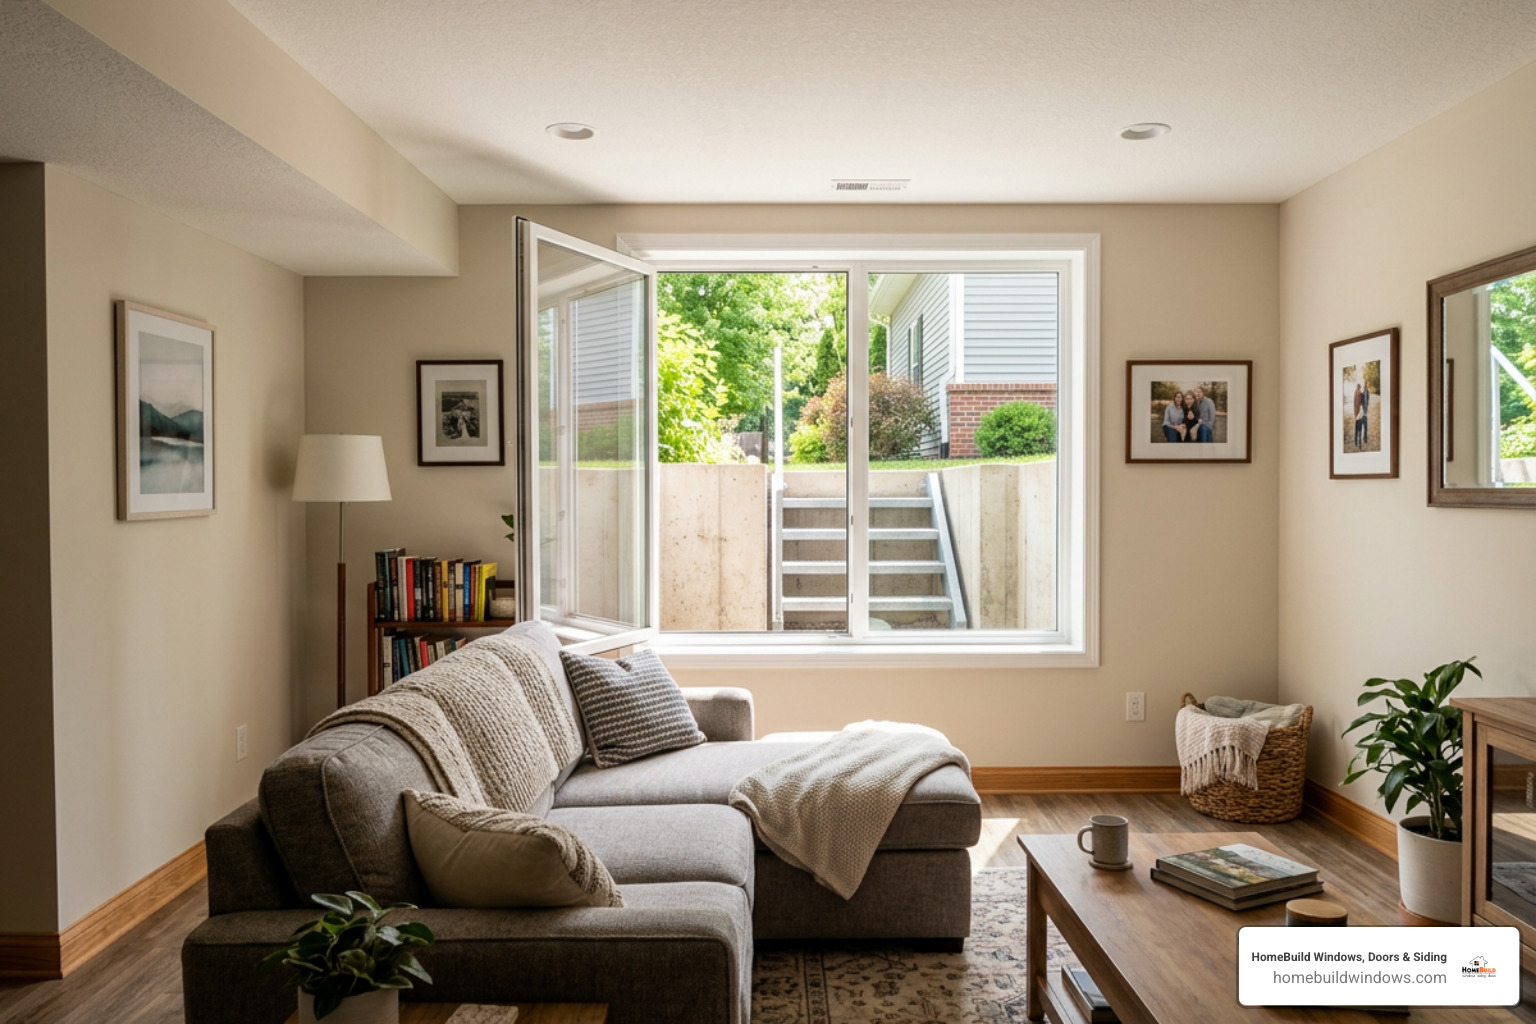
5 Steps for a Proper Egress Window Installation
Executing a successful egress project requires careful coordination between below-grade excavation, structural masonry cutting, and multi-layer weatherproofing.
Step 1: Excavation and Window Well Drainage
Every exterior project begins with ground safety. Several business days before breaking ground, contact 811 (the local utility marking service) to map underground gas, electric, water, and communication lines.
Lay heavy plywood panels over lawns to protect landscaping from equipment traffic. Excavate a pit extending at least 6 to 12 inches wider and deeper than the final window well dimensions. In northern Illinois and the surrounding Chicagoland area, severe winter freeze-thaw cycles necessitate frost protection. Place 2-inch-thick, 25-psi rated rigid foam insulation directly against the exposed footing to prevent frost heave from shifting the foundation or well liner.
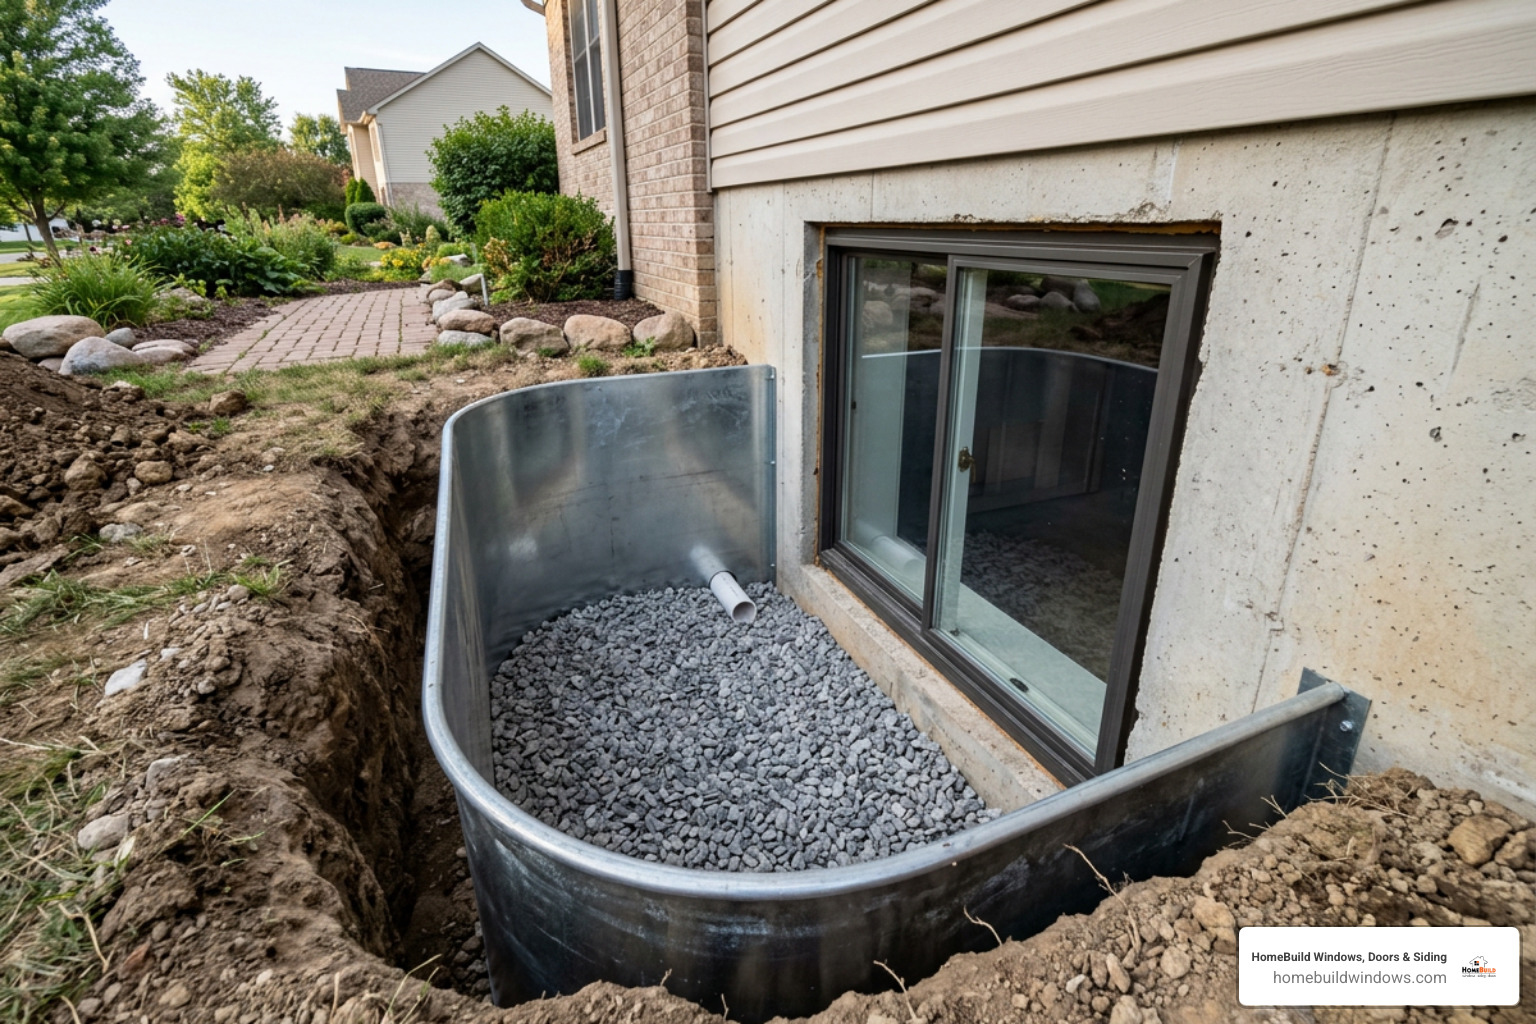
Proper drainage stops basement flooding before it begins:
- Dig a trench at the base of the excavated well down to the home’s exterior foundation footing.
- Tie a 4-inch perforated drainpipe directly into the municipal drain tile system or exterior weeping tile.
- Line the bottom of the well basin with heavy-duty geotextile fabric to prevent surrounding soil and silt from clogging the drainage bed.
- Fill the base with 4 to 8 inches of 3/4-inch clean angular stone rather than fine gravel or unwashed aggregate.
Step 2: Foundation Cutting and Header Framing
Cutting into structural basement masonry requires precision engineering and the right equipment. Depending on whether your home features poured concrete or hollow concrete masonry units (CMU), professional crews use diamond-blade concrete saws or hydraulic concrete chainsaws. A concrete chainsaw cuts completely through a 10-to-12-inch foundation wall from the outside in a single pass, eliminating the interior water runoff and toxic exhaust fumes caused by circular saws.
Before cutting the concrete opening, reinforce the structural load path above:
- Build a temporary interior support wall beneath adjacent floor joists if modifying a load-bearing wall.
- Reinforce the rim joist area overhead with a structural header (such as double 2×10 or engineered lumber) sized according to local building span tables.
- Saw the bottom horizontal cut of the opening first, followed by the sides, to prevent the heavy concrete core from binding the saw blade.
- When working with hollow CMU blocks, fill exposed hollow cores solid with structural mortar mix.
Once the opening is cleared, line the masonry perimeter with pressure-treated 2×10 or 2×12 lumber to build sturdy window bucks. Secure these bucks into the concrete using 1/4-inch diameter heavy-duty concrete masonry anchors. For precise dimensional standards on rough framing margins, see our guide to Understanding Rough Window Opening Sizes.
Step 3: Setting, Shimming, and Fastening the Window
With the rough buck installed, test-fit the window unit to confirm smooth clearance around handles and hardware. When preparing the opening, you can reference practical field techniques found in the step-by-step egress guide from Family Handyman.
Follow this proven sequence to ensure square, level mounting:
- Place solid composite or treated shims along the bottom sill plate spaced no more than 16 inches apart, securing each with a dab of sealant.
- Lock the window sash to keep the frame rigid, then lift the unit onto the sill shims.
- Insert opposing, paired tapered shims from the interior and exterior sides along the vertical jambs, spacing them no more than 24 inches apart.
- Measure diagonally from corner to corner in both directions; equal diagonal measurements confirm the frame is perfectly square.
- Pre-drill pilot holes through the vinyl or composite frame and shims to prevent cracking.
- Fasten the window using stainless steel or corrosion-resistant structural screws driven into the treated wood bucks. For masonry direct-mounts, drive rated masonry anchors into pilot holes.
- Unlock and operate the sash to confirm smooth swinging action and clear opening clearance.
Step 4: Flashing, Insulation, and Weatherproofing
Below-grade installations face constant hydrostatic pressure and soil moisture. Proper exterior flashing and internal air sealing ensure long-term energy efficiency and stop water leaks. To explore standard building envelope details, refer to our comprehensive Window Installation Guide.
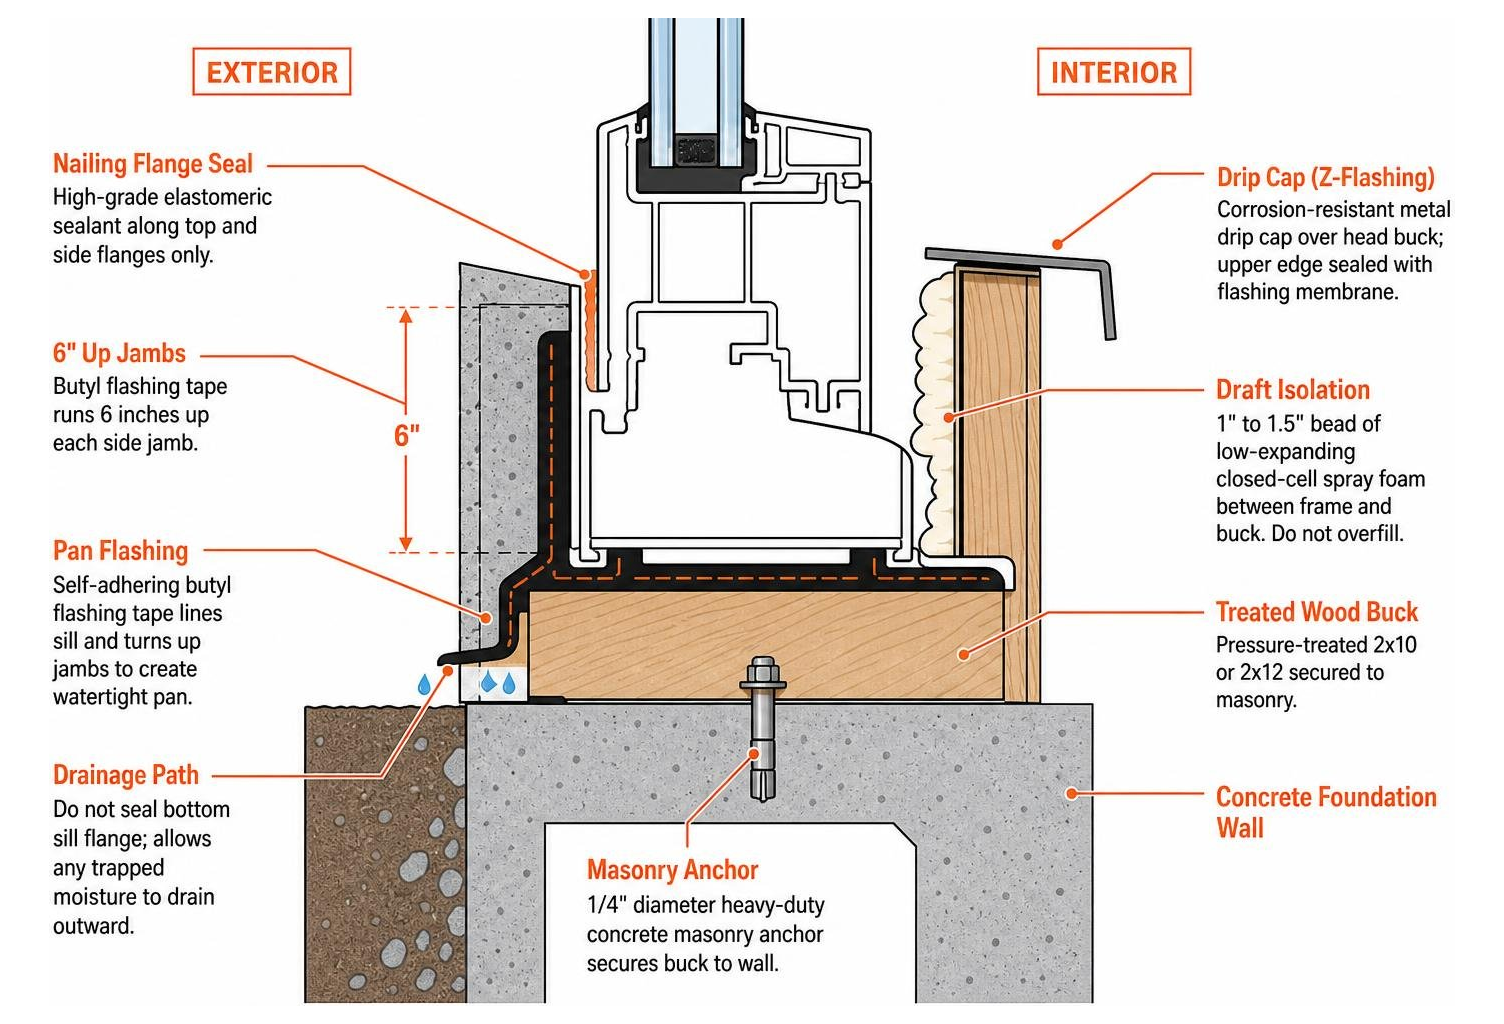
Follow these weatherproofing best practices:
- Pan Flashing: Line the treated sill buck with self-adhering, flexible butyl flashing tape, running it 6 inches up each side jamb to form a seamless, waterproof pan.
- Nailing Flange Seal: Apply high-grade elastomeric sealant along the top and side exterior flanges before setting. Never apply sealant along the bottom sill flange, allowing any incidental trapped moisture to drain outward.
- Drip Cap: Install a corrosion-resistant metal drip cap (Z-flashing) directly over the top head buck and seal the upper edge with flashing membrane.
- Draft Isolation: From the interior, apply a controlled 1-inch to 1.5-inch bead of low-expanding closed-cell spray foam between the frame and buck. Avoid overfilling, which can bow vinyl jambs and bind hardware.
- Thermal Cavity: Loosely tuck mineral wool or fiberglass insulation into the remaining cavity behind the cured foam bead without tightly compressing the fibers.
Step 5: Well Anchoring, Ladder, and Protective Covers
The final exterior step involves installing a secure, code-compliant window well liner. Position the well so its top lip sits 4 to 6 inches above the final exterior soil grade to keep surface rainwater runoff from pouring into the basin.
- Anchor the Liner: Fasten the flanges of the galvanized steel or composite well to the foundation wall using heavy-duty masonry expansion bolts spaced every 12 inches.
- Ladder Attachment: If the window well measures deeper than 44 inches from the top rim to the gravel floor, building codes require a permanently attached escape ladder. Ladder rungs must be at least 12 inches wide, spaced no more than 18 inches apart vertically, and project at least 3 inches from the well wall without encroaching more than 6 inches into the 9-square-foot clear well space.
- Protective Covers: Place a heavy-duty steel safety grate and a UV-resistant clear polycarbonate cover over the opening. This prevents accidental fall-in hazards for children and pets, blocks autumn leaves, and lets natural sunlight stream through.
- Backfilling: Backfill surrounding soil in 6-inch layers, tamping lightly as you go while ensuring the well walls stay plumb and undistorted.
Evaluating DIY vs. Professional Options
Completing an egress installation as a do-it-yourself project offers a sense of accomplishment, but it requires substantial construction experience, heavy machinery operation, and strict adherence to structural safety codes.
Homeowners evaluating project paths must consider the demanding physical tasks involved, including excavating several cubic yards of heavy soil, handling water-cooled concrete cutting tools, and engineering load-bearing framing.
When to Hire Experts for Egress Window Installation
Working with an experienced exterior remodeling contractor ensures code compliance, structural safety, and long-term performance. Foundation walls carry the immense weight of upper stories, roof structures, and soil loads. Cutting an improper opening without adequate temporary shoring or header support can cause structural settlement, cracked drywall on upper floors, or foundation failure.
Our experienced team at HomeBuild Windows, Doors & Siding manages every phase of the project:
- Securing all required municipal building permits and structural documentation.
- Using specialized diamond-cutting equipment to make clean, accurate cuts through thick poured concrete or masonry walls without creating excessive dust or water intrusion.
- Installing top-tier products from leading manufacturers including Pella, Marvin, and Alside.
- Integrating drainage systems and multi-stage flashing assemblies engineered to handle Midwest winter freezes and heavy spring rains.
- Completing neat interior jamb extensions and casing trim to blend your new egress opening with your living area.
If you are planning a lower-level renovation across Chicago or nearby northwest communities like Arlington Heights, Glenview, Palatine, or Schaumburg, exploring our dedicated Window Installation Services provides dependable peace of mind.
Frequently Asked Questions About Basement Egress
What are the minimum IRC dimensions for an egress window?
An egress window must provide a minimum net clear opening of 5.7 square feet (5.0 square feet for grade-level openings). The opening must measure at least 24 inches in clear height and at least 20 inches in clear width, with the interior sill sitting no higher than 44 inches above the finished floor.
Does a window well always require a ladder?
A window well requires a permanently attached escape ladder or integrated escape steps whenever the vertical depth of the well exceeds 44 inches below ground level. The ladder rungs must measure at least 12 inches wide and project at least 3 inches from the well wall.
Can an egress window be added to an existing older foundation?
Yes, egress windows can be installed in older foundations made of poured concrete, concrete blocks (CMU), or brick. The process involves excavating the exterior, supporting the floor joists overhead, cutting through the foundation using concrete saws, installing a load-bearing lintel or header, and sealing the opening with a waterproof buck and flashing assembly.
Conclusion
Installing a code-compliant basement egress window turns dark lower levels into bright, welcoming living areas while giving your family a certified emergency exit. Whether you want to build a legal guest suite, expand your entertainment space, or introduce natural daylight, professional installation ensures structural stability and weather resistance.
HomeBuild Windows, Doors & Siding is a locally owned and operated exterior contractor with over 20 years of hands-on experience serving homeowners across Chicago and the northwest suburbs, including Des Plaines, Mount Prospect, Elk Grove Village, and Northbrook. We specialize in residential window and door replacement, fiber cement and vinyl siding, and residential roofing systems built to withstand the demands of northern Illinois weather.
Our commitment to craftsmanship is backed by our credentials as an Elite Platinum Pella® Certified Contractor and Andersen Certified Contractor, alongside multiple Angi Super Service Awards, Nextdoor Neighborhood Faves recognitions, and more than 200 positive Google reviews. When you are ready to upgrade your home, contact our licensed and insured team for a free consultation and estimate on our professional window replacement and installation services.