


Why a Proper Exterior Door Installation Diagram Matters
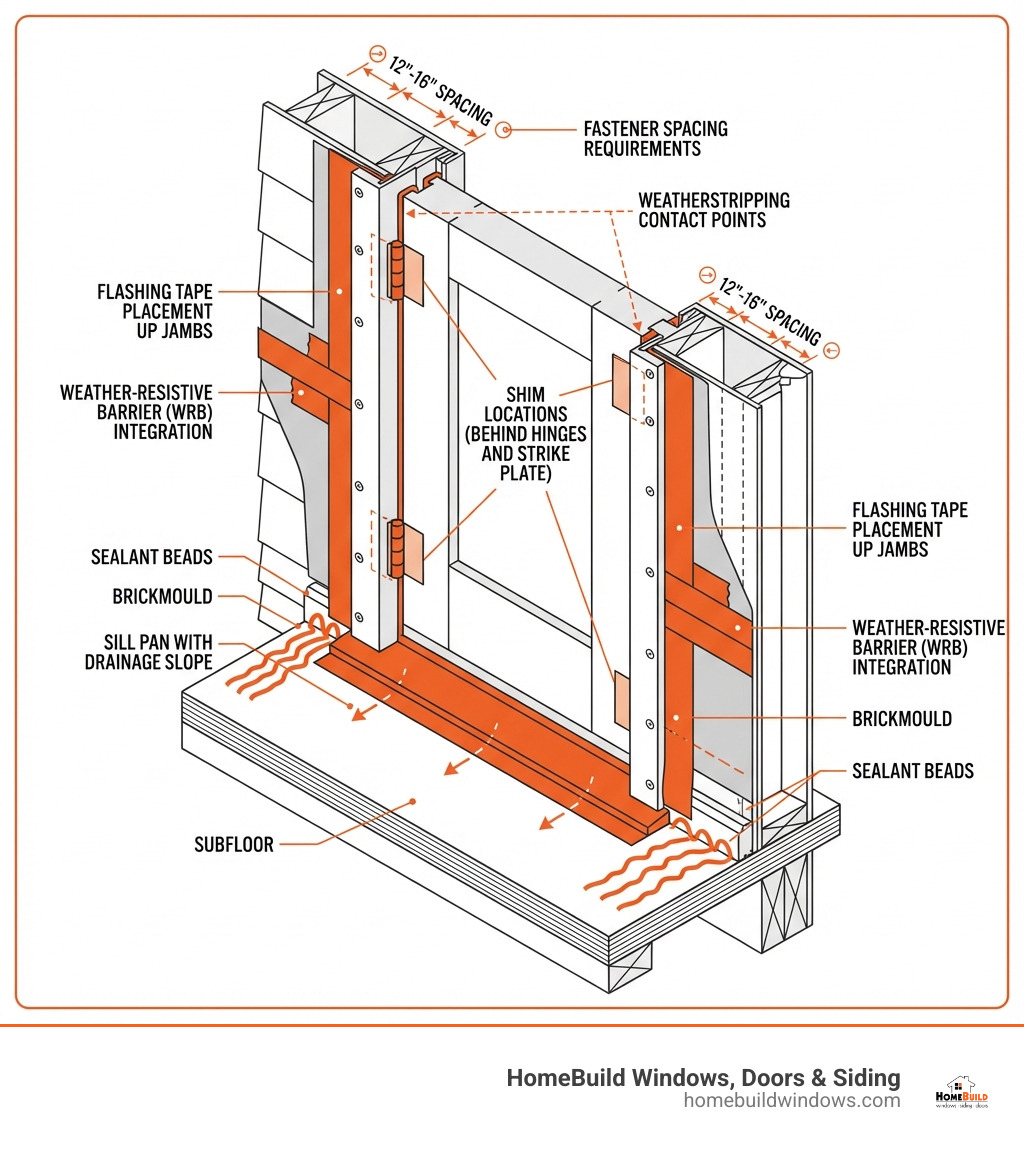
An exterior door installation diagram is the roadmap to a secure, energy-efficient, and weathertight installation. It helps prevent costly mistakes like air leaks, water damage, and warped frames, whether you’re a DIYer or working with a professional.
Key Components in an Exterior Door Installation:
- Sill Pan – Drains water away from the subfloor
- Door Frame – The hinge jamb, latch jamb, and head jamb that form the structure
- Weatherstripping – Creates an airtight seal
- Flashing – Self-adhering tape that integrates with the home’s weather barrier
- Shims – Spacers that keep the frame plumb and square
- Sealant – Exterior-grade caulk for critical joints
- Brickmould/Trim – Exterior casing that connects the frame to the siding
- Threshold – Bottom seal that stops water and air
A properly installed door improves curb appeal, boosts security, and cuts energy bills by eliminating drafts. Modern airtight homes can even draw water through tiny gaps, making a perfect seal essential.
The most common cause of leaks is failing to install a door square, level, and plumb. Tolerances are strict: 1/8″ for plumb and level, and 1/4″ for square. Small errors lead to big problems like sticking doors, failed seals, voided warranties, and water damage.
This guide details every step, from preparing the rough opening to the final sealant application. You’ll learn how to integrate flashing, the proper shimming technique, and how to verify your installation meets professional standards.
I’m Steve Mlynek, founder and CEO of HomeBuild Windows, Doors & Siding, and I’ve overseen thousands of door installations across Chicagoland over the past 20 years. Understanding an exterior door installation diagram is the foundation of every successful project we complete, whether it’s a simple single door or a complex system with sidelites and transoms.
Pre-Installation: Tools, Materials, and Preparation
Meticulous preparation is the foundation for a successful and lasting exterior door installation. This stage sets you up for a smooth process and a professional result.

First, safety is crucial. Always work with a partner for heavy lifting. Wear appropriate personal protective equipment (PPE), including safety glasses and gloves, and use all tools according to manufacturer instructions. For Chicago homes built before 1978, be aware of potential lead-based paint and follow local guidelines for safe handling and disposal.
Essential Tools and Materials
Having the right tools and materials ready makes the job more efficient. Here’s what you’ll need:
Required Tools:
- 6-foot level
- Tape measure
- Caulking gun
- Power drill
- Hammer
- Pry bar
- Utility knife
- Square (framing or carpenter’s)
- J-roller
- Screwdrivers
- Nail set
Required Materials:
- Quality exterior-grade sealant (ASTM C920 polyurethane or silicone)
- Self-adhering flashing tape (4-6 inches wide)
- Composite, non-compressible shims
- Low-expansion insulating foam for windows and doors
- Backer rod
- Appropriate fasteners (e.g., #8 x 2-1/2″ and #10 x 3″ screws, 10d galvanized casing nails)
Preparing the Rough Opening
A perfect exterior door installation diagram begins with a perfectly prepared rough opening.
- Removing the Old Door and Trim: Carefully remove the old door, trim, and casing using a pry bar and utility knife. Clean out all old caulk and insulation from the opening.
- Inspecting Studs and Header: Inspect the framing studs and header for rot or damage and repair as needed. The header must be supported by trimmer studs.
- Verifying Rough Opening Dimensions: The rough opening must be approximately 3/4″ wider and 1/2″ taller than the new door unit’s frame. This space is critical for shimming and adjustments.
- Checking for Plumb, Level, and Square:
- Use a 6-foot level to check that the side studs are plumb (vertically straight) and the sill is level. The maximum allowable deviation is 1/8″. The sill must be level or slope to the exterior.
- Measure the diagonals of the opening; they must be within 1/4″ of each other to be considered square.
- The exterior face of the opening must be a single flat plane with less than 1/8″ of twist. An out-of-plumb installation is the most common cause of air and water leaks.
For more detailed guidance on this foundational step, refer to our comprehensive guide on Exterior Door Installation 101.
The Step-by-Step Exterior Door Installation Diagram Explained
With the rough opening prepared, the next stage involves careful placement, adjustment, and fastening of the new door. This process follows the logic of a detailed exterior door installation diagram to ensure a perfect fit.
Step 1: Weatherproofing the Sill and Opening
Proper water management is the key to preventing long-term damage, especially in the Chicago climate.
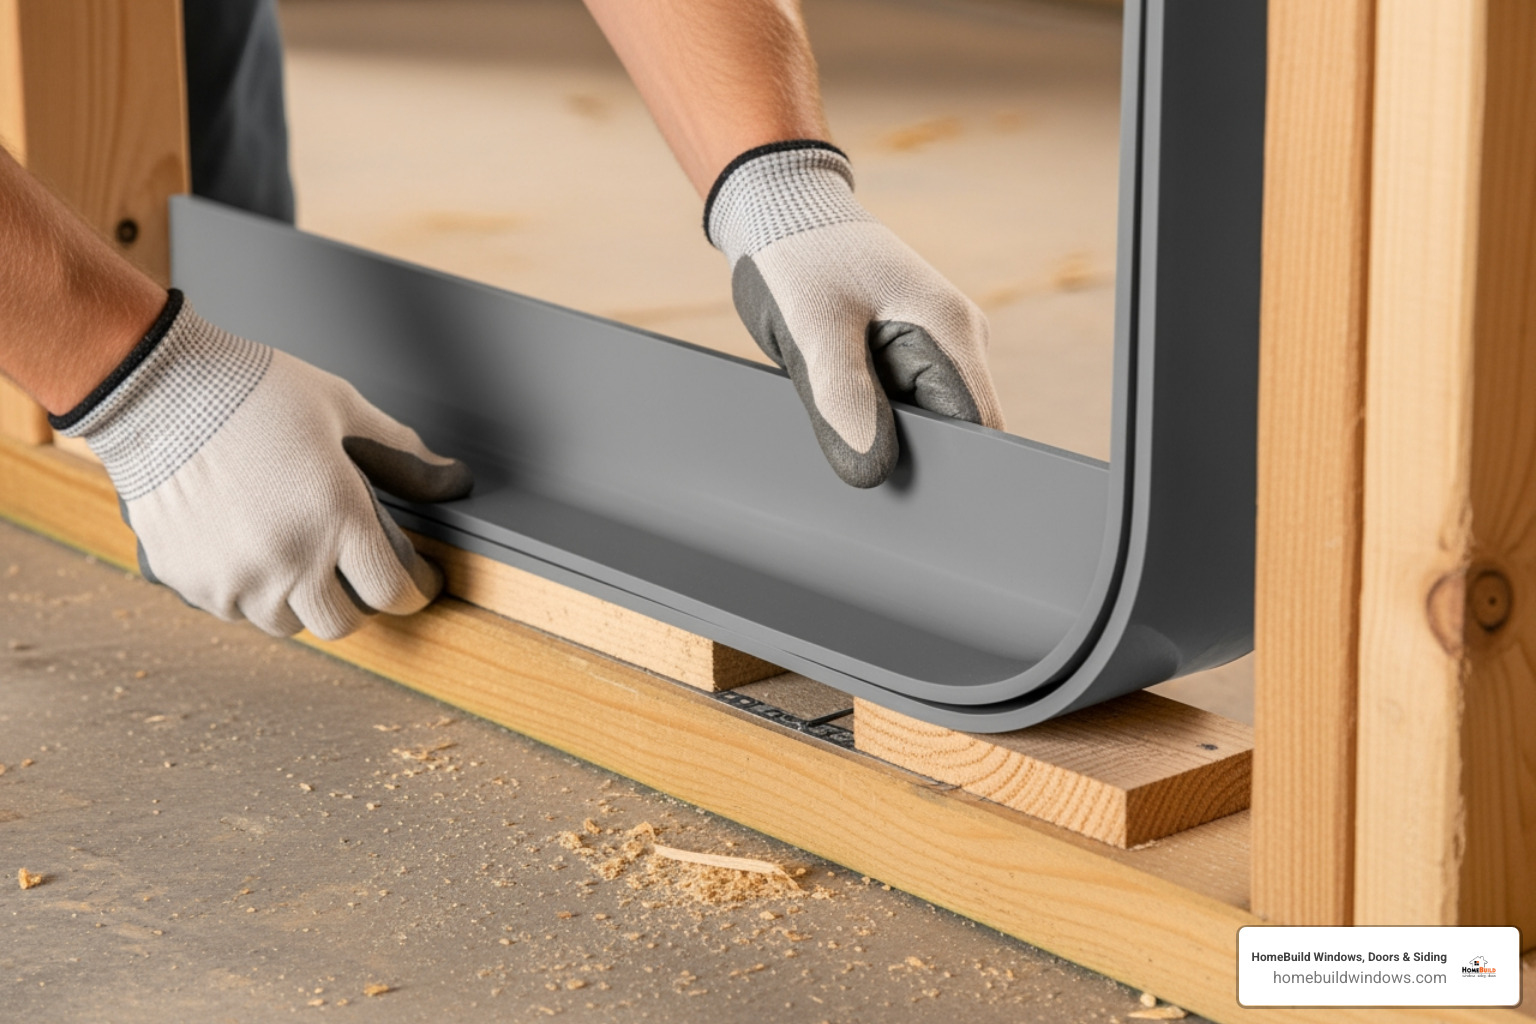
- Sill Pan Installation: Install a pre-formed or site-fabricated sill pan. Ensure it is level (shimming underneath if needed) and provides continuous support with a positive slope to the exterior.
- Applying Sealant: Apply three 3/8″ beads of sealant to the subfloor for the sill pan. On the pan’s exterior edge, apply another bead, leaving two 1″ gaps near the jambs for drainage.
- Integrating with the WRB: Integrate the flashing with the home’s Weather-Resistive Barrier (WRB). Create a flap in the WRB above the opening and wrap the jamb and sill barrier into the opening.
- Applying Flashing Tape: Apply self-adhering flashing tape along the sill, extending it up the jambs by 6-8 inches. Use a J-roller to press the tape firmly into the sealant for maximum adhesion.
For more insights on this critical step, check out Details on sealing exterior doors.
Step 2: Setting and Securing the Door Frame
This step requires precision to correctly position the door unit.
- Applying Sealant to Brickmould: Apply a continuous 3/8″ bead of sealant to the back of the exterior trim (brickmould) where it will contact the house.
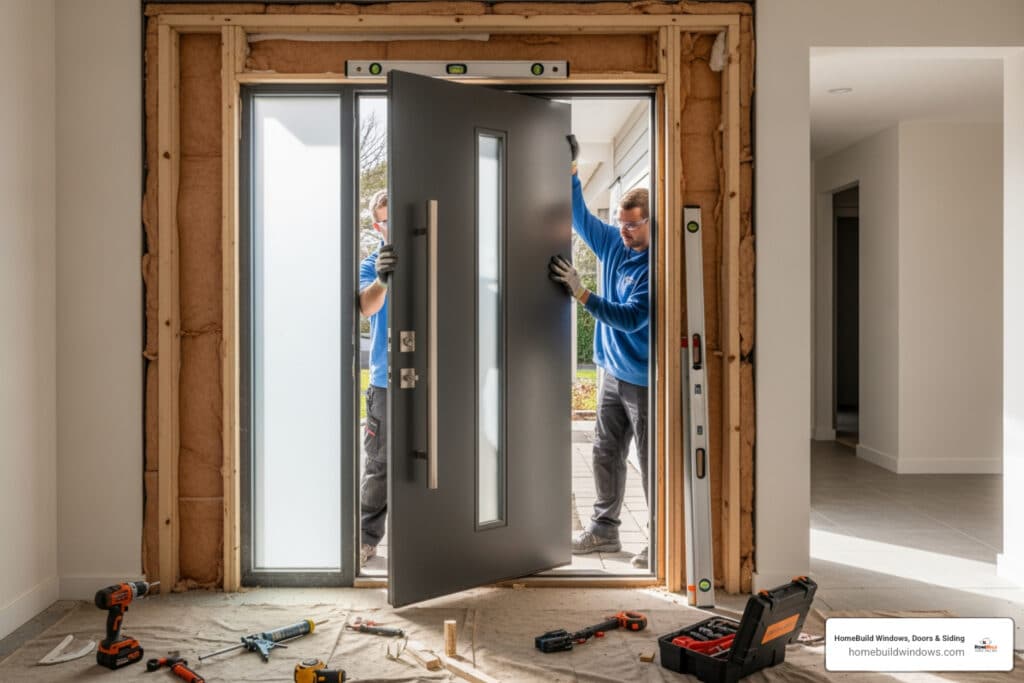
- Tilting the Door Unit: With a partner, tilt the door unit into the opening, seating the sill firmly into the sealant on the sill pan.
- Centering the Unit: Center the unit in the opening, leaving an even gap on all sides for shimming.
- Temporarily Fastening: Temporarily secure the top of the hinge-side jamb with one screw, leaving it loose enough for adjustments.
Step 3: Shimming and Fastening for a Perfect Fit
Proper shimming is critical for a door that operates smoothly without leaks.
- Placing Shims: From the interior, place composite shims behind each hinge, at the strike plate, and near the corners and head jamb, spaced no more than 12-18 inches apart.
- Plumbing the Hinge Jamb: Use a 6-foot level to plumb the hinge jamb, adjusting shims as needed until it is perfectly vertical.
- Checking Margins: Check for a consistent 1/8″ margin (gap) around the door slab. Shim to correct any twists in the jamb caused by the door’s weight.
- Fastening Through Shims: Once the jamb is plumb, drive #8 x 2-1/2″ screws through the jamb and shims into the wall studs. This prevents the frame from bowing. For added security, replace one screw in each hinge with a longer #10 x 3″ screw that anchors into the stud.
- Securing the Latch Jamb and Head: Repeat the shimming and fastening process for the latch jamb and head jamb, ensuring the door closes and latches correctly. Do not over-shim, as this can bow the frame.
For a deeper dive into this stage, we recommend our guide on Installing a Prehung Exterior Door.
Finishing Touches and Final Checks
With the door secured, the final steps involve insulating, sealing, and performing checks to ensure energy efficiency and longevity. These details are a crucial part of any exterior door installation diagram.
Insulating and Sealing the Gaps
Creating a continuous thermal and moisture barrier is essential for performance.
- Insulating the Gap: Fill the gap between the door frame and studs with low-expansion foam or fiberglass insulation. Low-expansion foam provides a better air seal and won’t warp the frame like high-expansion types.
- Continuous Sealant Application: Apply a continuous bead of exterior-grade sealant where the exterior trim meets the siding. On the interior, use low-expansion foam to create an air seal between the frame and rough opening.
- Completing the Weatherstrip Seal: Install any supplied foam wedges at the bottom corners to complete the weatherstrip seal. Check for gaps by feeling for drafts or seeing light.
For more information on the importance of weatherstripping, consult Weatherstripping information from Energy.gov.
Installing Hardware and Performing Final Checks
Your door isn’t finished until the hardware is installed and operation is verified.
- Installing the Lockset and Strike Plate: Install the lockset and deadbolt per the manufacturer’s instructions. Adjust the strike plate so the door latches securely without rattling.
- Testing Door Operation: Test the door’s operation. It should swing smoothly and latch easily with a consistent 1/8″ to 1/4″ gap around the edge. Adjust shims if needed.
- Checking the Threshold Seal: Use the “paper test” to check the threshold seal: a piece of paper closed in the door should have tension when pulled. Adjust the threshold if it’s too tight or too loose.
- Removing Protective Films: Remove any protective films from the door within 48 hours to prevent adhesive residue.
- Final Inspection: Perform a final visual inspection for any cosmetic issues and to ensure all fasteners are covered.
Painting and Finishing Your New Door
A proper finish protects your door and is often required for the warranty.
- Preparing the Surface: Prepare the door surface by cleaning it thoroughly. For steel and fiberglass, wipe with a solvent, lightly sand, wash, and dry completely.
- Applying Quality Finish: Apply several light coats of high-quality exterior-grade paint or stain suitable for the door material. Paint in temperatures between 50°F and 90°F.
- Finishing All Six Sides: This is a critical warranty requirement. Finish all six sides of the door slab (front, back, and all four edges) and the frame to prevent moisture damage. Do not paint the weatherstripping. Repaint every 1-7 years as needed to maintain the warranty and appearance.
For specific considerations regarding different door materials, such as steel, you can review resources like Advantages and Disadvantages of Steel Replacement Doors. And for a holistic view of the entire process, our Front Door Installation Guide 2025 offers additional insights.
Special Considerations and Common Variations
Not all door installations are the same. Understanding common variations, often detailed in a specialized exterior door installation diagram, helps you prepare for unique challenges.
Understanding the Pre-Hung vs. Slab Exterior Door Installation Diagram
The primary choice is between a pre-hung unit and a slab door, which greatly affects the installation process.
| Feature | Pre-Hung Doors | Slab Doors |
|---|---|---|
| What it includes | Door slab, frame (hinge, latch, head jambs), hinges, pre-bored for hardware. | Door slab only (no frame, hinges, or hardware prep). |
| Ideal for | New construction, new rough openings, replacing an old door with a damaged frame. | Replacing a door in an existing, square, and sound frame; custom installations where frame is built on-site. |
| Installation | Simpler, as the door is already aligned in its frame. Focus on framing the opening. | More complex, requires precise mortising for hinges, boring for locks, and fitting into an existing frame. |
| DIY Suitability | Generally more DIY-friendly. | Best left to experienced carpenters or professionals due to required precision. |
Most homeowners in Chicagoland choose pre-hung doors as they are all-in-one units that streamline installation and ensure a tight fit.
Installing Double Doors, Sidelites, and Transoms
Larger systems with double doors, sidelites, or transoms add architectural flair but also complexity to the installation.
- Adjusting Rough Opening Size: These units require a much larger rough opening. Follow the manufacturer’s specifications for exact dimensions.
- Alignment is Key: Proper alignment is critical. Ensure all components are plumb, level, and aligned using shims before fastening.
- Securing Mullions: Securely fasten the mullions (dividers) between units per the manufacturer’s instructions, shimming underneath for support where needed.
- Setting the Inactive Door: For double doors, install and plumb the inactive door first. Then, fit the active door, ensuring even margins between them. Retract the inactive door’s flush bolts during adjustment.
For those considering enhancing their entryway, our guide on Replace Front Door and Sidelights offers more specific advice.
Adapting to Different Wall Types and Storm Doors
The wall construction also influences the installation process.
- Wood Frame Construction: This is the most common type, where the door frame is secured directly to the wall studs.
- Masonry/Brick Walls: These walls often require a wood framework called a “buck” to be installed in the opening first. The door is then installed into the buck. Seal the buck and apply flashing before installation.
- Installing Storm or Screen Doors: Install storm doors after the main door is complete. Mount the storm door frame to the main door’s exterior trim, ensuring it has proper clearance and doesn’t impede operation.
Regardless of your wall type, selecting the right exterior door is crucial. Explore our range of Entry Doors to find the perfect fit for your Chicago home.
Frequently Asked Questions about Exterior Door Installation
Even with a detailed exterior door installation diagram, questions can arise. Here are answers to common inquiries from homeowners in the Chicago area.
What are the most common mistakes to avoid during installation?
The most common installation errors include:
- Improper Rough Opening Prep: Failing to ensure the opening is plumb, level, square, and free of damage is the top cause of leaks.
- Poor Weatherproofing: Forgetting the sill pan or failing to integrate flashing correctly leaves the home vulnerable to water damage.
- Warping the Frame: Using high-expansion foam or over-shimming can bow the door frame, causing operational problems.
- Ignoring Plumb and Level: You must check for plumb and level continuously throughout the installation, not just at the beginning.
- Skipping the Finish: Not finishing all six sides of the door can void the warranty and lead to warping and deterioration.
How much bigger should the rough opening be than the door?
The standard rule is that the rough opening should be approximately 3/4″ wider and 1/2″ taller than the door unit’s outside frame dimensions. This space is essential for shimming the frame to be perfectly plumb, level, and square, which is nearly impossible without it.
Does a new exterior door installation require a permit in Chicago?
Yes, in Chicago and most surrounding suburbs, replacing an exterior door typically requires a building permit, especially if you alter the opening’s size. Permits ensure the work meets safety and energy codes. Always check with your local municipal building department before starting work to avoid fines and delays. For more information, consult the Exterior Window or Door Replacement – City of Chicago page or your local equivalent.
Conclusion: Securing Your Home with a Flawless Installation
Understanding the intricacies of an exterior door installation diagram is more than just following steps—it’s about ensuring the security, energy efficiency, and longevity of your home. From the initial rough opening preparation to the final sealant bead, every detail contributes to a door that operates flawlessly, protects your interior from the elements, and improves your home’s curb appeal.
A carefully installed door prevents frustrating drafts, costly water damage, and potential security vulnerabilities. While the process can be a rewarding DIY project for the experienced homeowner, the precision required often means that a professional installation is the best choice. This ensures that every measurement is exact, every shim is perfectly placed, and every seal is watertight, guaranteeing performance and protecting your investment for years to come.
For homeowners in the Chicago area, including our neighbors in Arlington Heights, Palatine, Glenview, and throughout Chicagoland, seeking expert results, the team at HomeBuild Windows, Doors & Siding ensures every detail is handled with professionalism and attention to detail. We pride ourselves on delivering top-quality products, expert installation, and exceptional customer service, making sure your new exterior door is installed to perfection.
Ready to transform your home’s entryway with confidence? Learn more about our services and how we can help you achieve a flawless exterior door installation by visiting our Door Installation and Replacement Chicago page.