


Choosing Between Pocket Inserts and Full-Frame Replacement
To replace a new construction vinyl window, you must expose the integral nailing fin by removing or cutting back the surrounding siding and trim, cut or pull the old fasteners, and remove the entire frame down to the rough opening. Then prepare a sloped, flashed sill, set the new unit in place, shim it level and square, fasten it through the nailing fin, and integrate the weather-resistive barrier with flashing tape in a shingle-lap pattern before reinstalling the exterior cladding.
When evaluating how to update your home’s exterior envelope, one of the most significant architectural decisions is choosing between a pocket insert and a full-frame replacement. A pocket replacement window involves setting a fully assembled unit directly inside the existing, structurally sound window frame. This technique leaves the interior casing, exterior trim, and surrounding wall structure intact. It is a clean, less intrusive approach, but it slightly reduces the total visible glass area because the new unit sits within the old frame.
In contrast, installing a new construction vinyl window requires a full-frame replacement. This approach means stripping the opening down to the bare rough framing studs, removing all existing jambs, sills, exterior brickmould, and siding interfaces. New construction vinyl windows feature an integrated exterior perimeter flange—known as a nailing fin or nailing flange. This fin fastens directly onto the structural exterior sheathing of the home and integrates seamlessly underneath the weather-resistive barrier (WRB).
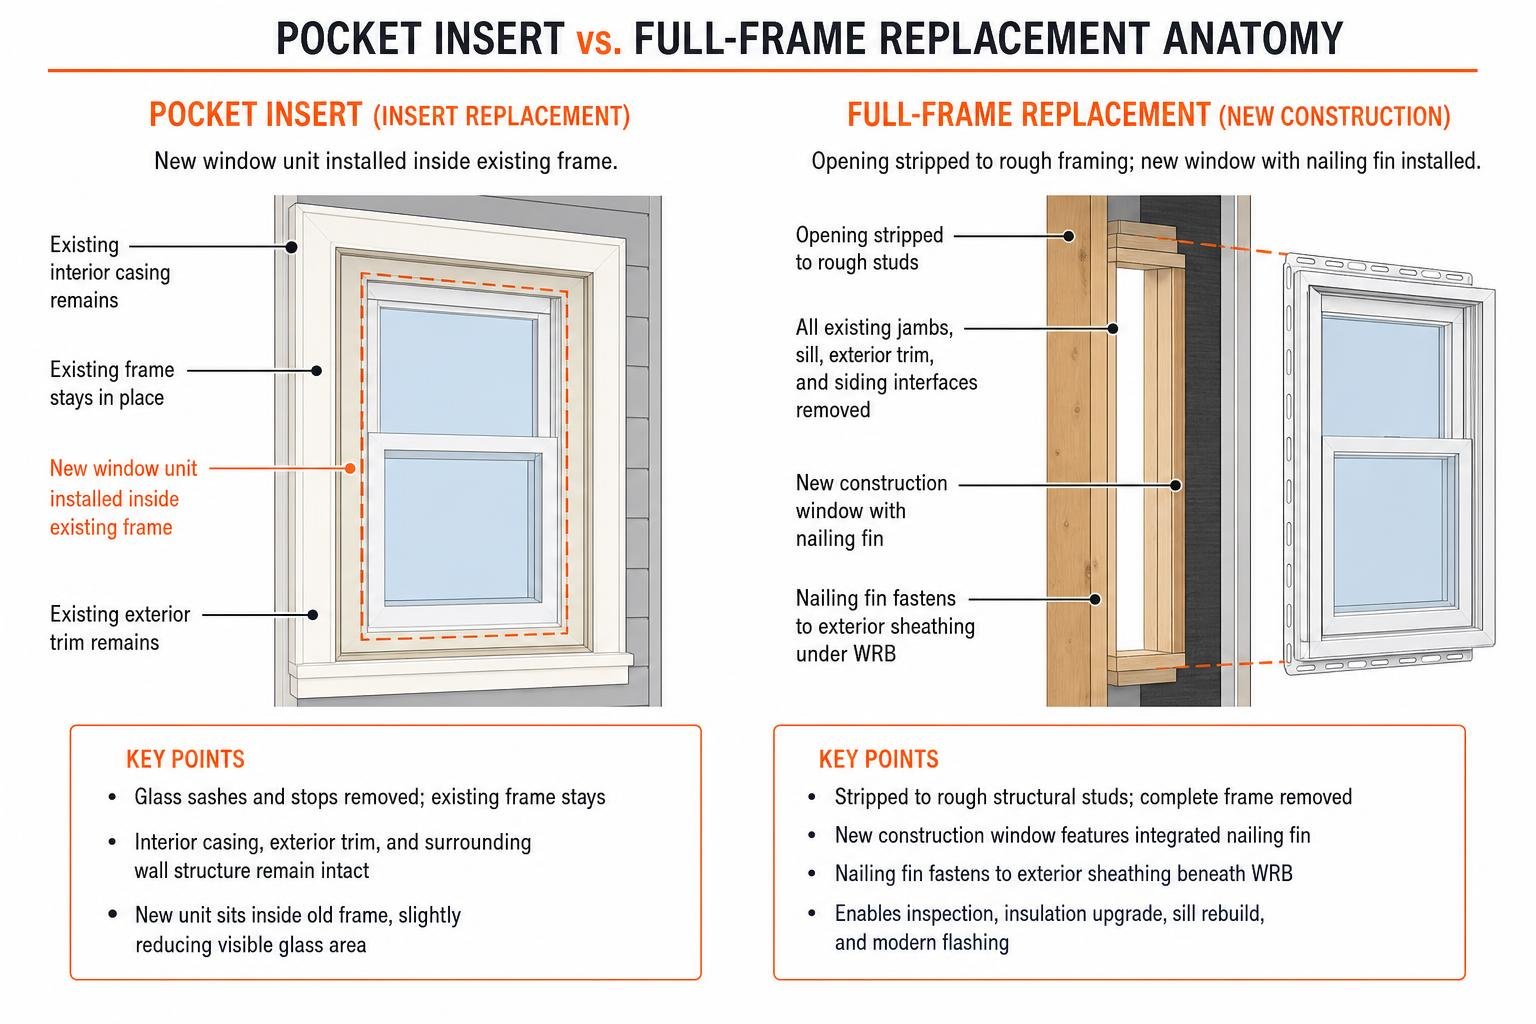
While a pocket insert preserves original casings, a full-frame replacement provides the opportunity to inspect hidden framing, upgrade insulation around the perimeter, rebuild damaged sills, and install modern, continuous flashing systems. To understand which approach matches your structural conditions, review the scope of work involved across window replacement options.
| Feature | Pocket Insert Replacement | Full-Frame New Construction Replacement |
|---|---|---|
| Scope of Teardown | Glass sashes and stops removed; existing frame stays | Stripped to rough structural studs; complete frame removed |
| Attachment Method | Fastened through side jambs into existing frame | Integrated exterior nailing fin fastened to wall sheathing |
| Exterior Cladding Impact | Minimal to none; exterior siding remains undisturbed | Requires cutting back siding, removing J-channel, or trim |
| Visible Glass Area | Slight reduction due to frame-within-a-frame design | Maximizes original daylight opening and architectural sightlines |
| Flashing Integration | Relies on exterior perimeter caulk and existing barrier | Direct integration with housewrap and self-adhering flashing tape |
| Rough Opening Inspection | Hidden; structural framing cannot be viewed | Full exposure; allows insulation upgrade and wood repair |
Identifying Signs Demanding Full-Frame Replacement
Pocket inserts are only viable when the existing structural frame is completely square, plumb, and free of moisture damage. If structural integrity is compromised, installing a pocket insert merely traps underlying decay behind fresh vinyl.
We recommend conducting a hands-on structural inspection before ordering materials:
- Screwdriver Probe Test: Take a flathead screwdriver and firmly press the tip into the exterior wooden sill, the lower corners of the side jambs, and the exterior brickmould. If the wood feels soft, spongy, or yields under light pressure, structural rot is present.
- Water Staining and Wall Damage: Inspect the interior drywall directly below the stool cap and along the rough apron. Peeling paint, bubbling drywall, dark mildew lines, or efflorescence signify long-term water intrusion around the perimeter of the existing window envelope.
- Out-of-Square and Sagging Openings: Measure the opening across both diagonals. If the diagonal measurements differ by more than 3/8 inch, or if the side jambs bow inward toward the center sash, the frame has settled. A pocket insert installed inside a racked frame will bind, bind the sash balancers, and lead to early operational failure.
- Failed or Missing Flashing: Older homes built without modern self-adhering membrane flashing often direct wind-driven rain behind the exterior siding. If water is penetrating between the exterior trim and the building paper, only a full-frame tear-out can establish a continuous drainage plane.
Energy Performance Ratings and Thermal Protection
Upgrading your home with modern new construction vinyl windows significantly improves the overall thermal envelope. Poorly sealed or aged window units can allow drafts and conditioned air leakage that accounts for up to 25% of a residential home’s heat loss.
When choosing modern vinyl windows, pay close attention to the National Fenestration Rating Council (NFRC) label and ENERGY STAR® certification criteria, particularly for our demanding Midwest climate in Chicago and the surrounding northwest suburbs:
- U-Factor (Thermal Transmittance): Measures the rate of non-solar heat flow through the complete window assembly. In cold Northern climates, aim for a U-factor of 0.27 or lower to keep warmth inside during sub-zero winter temperatures.
- Solar Heat Gain Coefficient (SHGC): Measures how much solar radiation passes through the glazing. A balanced SHGC (typically between 0.20 and 0.35 in mixed-northern zones) helps block intense summer heat while allowing beneficial passive warmth during crisp spring and autumn days.
- Insulated Glazing Units (IGUs): Double-pane or triple-pane glass packages treated with microscopically thin Low-Emissivity (Low-E) metal oxide coatings reflect infrared heat back to its source. The spaces between the panes are sealed and filled with inert, dense gases like argon, which reduce convective heat transfer through the glass unit by up to 50% compared to standard clear glass.
Rough Opening Preparation, Codes, and Tool Requirements
A weather-tight installation depends on an accurate, square, and structurally sound rough opening. The rough opening (R.O.) consists of the framing members that support the window: the header across the top, the jack and king studs on the vertical sides, and the horizontal rough sill plate at the base.
To ensure the new unit fits without binding, precise measurement is mandatory:
- Measure the Width: Measure the horizontal distance between the jack studs at three distinct points: the top, the middle, and the bottom. Record the smallest measurement.
- Measure the Height: Measure the vertical distance from the bottom of the header to the top of the rough sill at three locations: the left side, the center, and the right side. Record the smallest measurement.
- Check for Squareness: Measure diagonally from the top-left corner of the rough framing to the bottom-right corner, and then from the top-right corner to the bottom-left corner. The two diagonal numbers should be identical; any variance beyond 1/4 to 3/8 inch requires corrective shimming or framing adjustments.
- Calculate Clearances: The industry standard rough opening for a new construction vinyl window should be 1/2 inch wider and 1/2 inch taller than the outer frame dimensions of the window unit (excluding the nailing fin). This allows a 1/4-inch expansion and insulation gap on all four sides. For in-depth measurement adjustments and sizing variations, read our guide on properly sizing replacement windows.
Tools and Materials on How to Replace New Construction Vinyl Windows
Before starting the project, ensure you have gathered professional-grade materials and safety gear. Premium materials guarantee that your exterior barrier withstands seasonal expansion and contraction.
Essential Tools:
- Reciprocating saw with bi-metal demolition blades (to cut old fasteners)
- Circular saw with depth-adjustment guide
- Heavy-duty caulk gun
- 6-foot spirit level and 2-foot torpedo level
- Impact driver and corrosion-resistant fasteners
- Flat pry bar, cat’s paw, and siding unlock tool (zipper tool)
- Utility knife with heavy-duty hook and straight blades
- Laser level (recommended for setting continuous multi-window elevations)
- Personal protective equipment (safety glasses, cut-resistant gloves, hearing protection)
Required Materials:
- New construction vinyl window with an integral nailing flange
- Self-adhering butyl or advanced modified asphalt flashing tape (4-inch and 6-inch widths)
- ASTM C920 certified elastomeric or polyurethane exterior sealant
- Non-compressible, rot-proof composite shims
- Low-expansion, closed-cell or flexible open-cell polyurethane window-and-door spray foam
- Prefabricated sloped sill pan or flexible membrane sill flashing
- Beveled cedar siding or treated wood sill wedges (for back-dam construction)
- Standard accessories, such as a manufacturer-approved sill extender, if interfacing with unique exterior trim depths
To prepare your interior living space and exterior work zones before teardown, review our checklist on proper preparation for window installation.
Building Codes, Egress, and Climate Requirements
Residential installations must strictly adhere to local building codes, including the International Residential Code (IRC) and municipal amendments across Illinois.
- Emergency Egress Requirements: Sleeping rooms and basements with habitable space require at least one operable emergency escape and rescue opening. The clear opening must provide a minimum net clear opening of 5.7 square feet (5.0 square feet for ground-floor egress), a minimum net clear height of 24 inches, a minimum net clear width of 20 inches, and a maximum sill height of 44 inches above the finished floor.
- Tempered Safety Glass: Glazing situated within 24 inches of a door opening, in wet locations (such as adjacent to bathtubs or showers), or spanning large single lites located less than 18 inches above the floor must feature safety-tempered glass to meet building code mandates.
- Local Permitting: Most municipalities throughout Chicagoland require building permits for full-frame replacements because the exterior weather-resistive barrier and framing members are exposed. Always confirm local municipal requirements before commencing demolition.
How to Replace New Construction Vinyl Windows: Step-by-Step Installation
Replacing a window built with an integral nailing fin requires opening up the exterior wall material to reach the concealed fasteners. Follow these systematic phases for a flawless replacement.
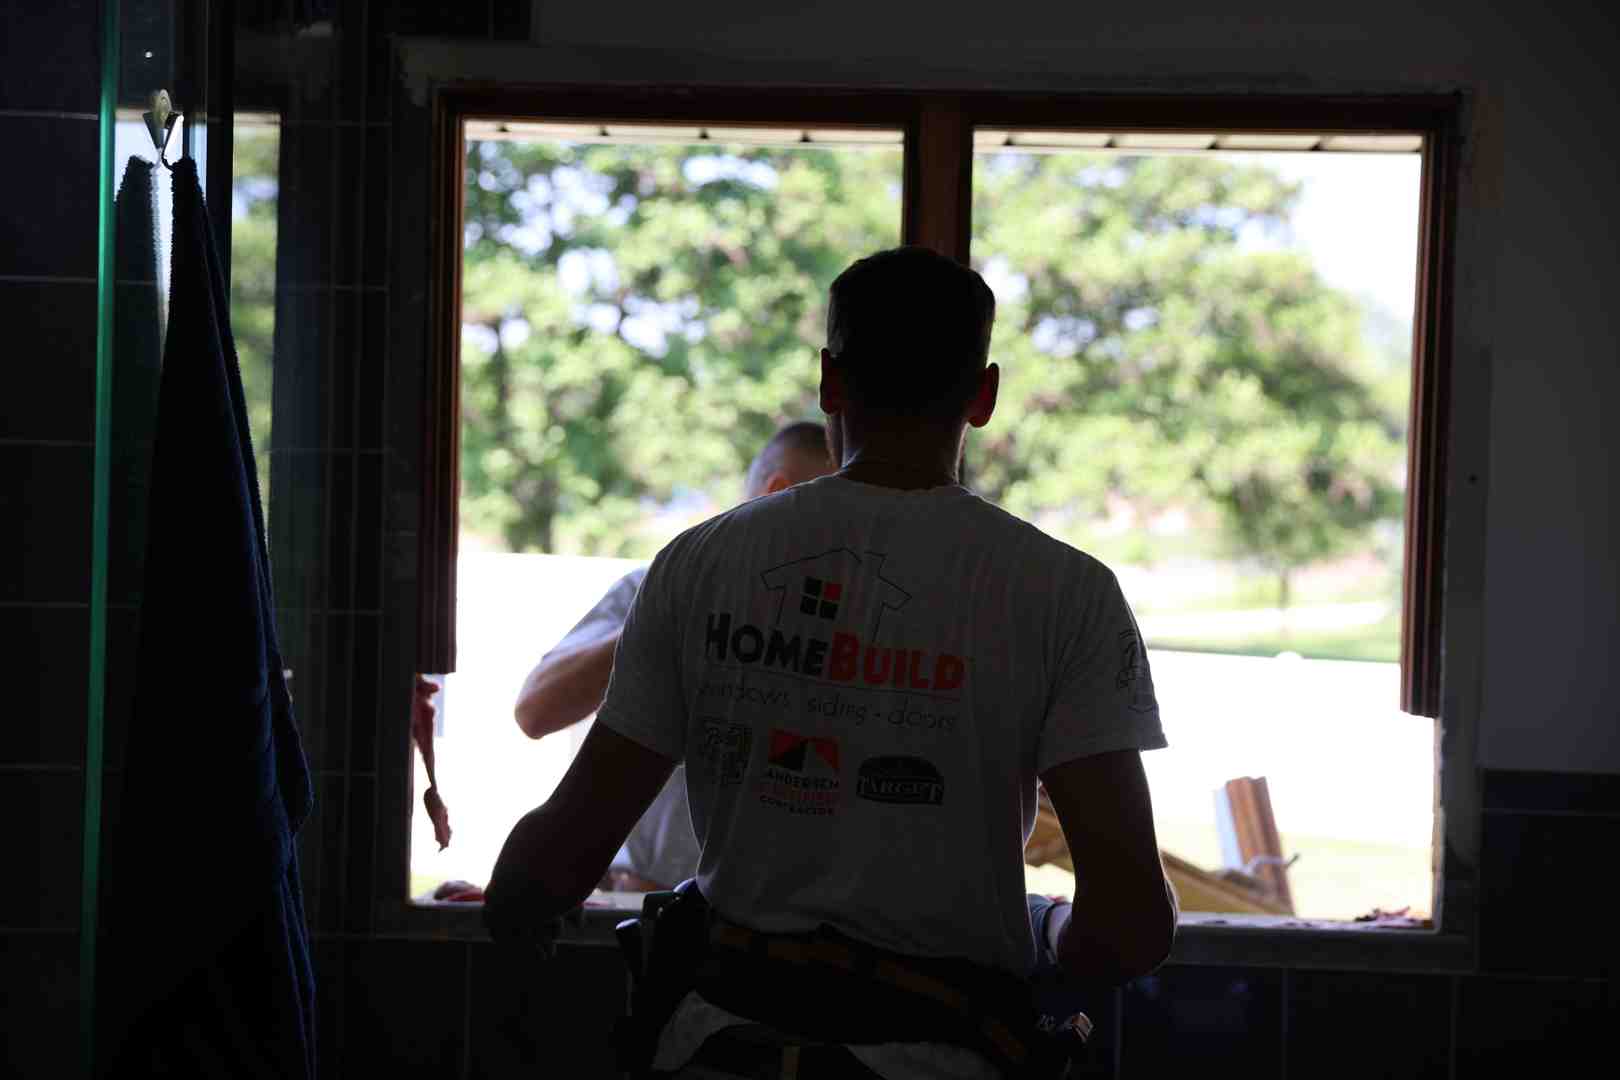
Phase 1: Exterior Cladding and Old Window Removal
- Unlock and Remove Surrounding Siding: If your home features vinyl siding, use a siding zipper tool to unlock the horizontal siding courses surrounding the window frame. Carefully unhook the panels and pull the nails to expose the existing J-channel and nailing fin. If working with wood, fiber cement, or engineered siding, set your circular saw blade depth to the exact thickness of the siding material, score a clean perimeter cut 2 inches back from the exterior trim, and remove the boards.
- Expose the Old Nailing Fin: Remove the existing J-channel, exterior casing, or brickmould. Use a utility knife to slice through old flashing tape, clearing away debris to uncover the metal or vinyl nailing fin secured to the structural sheathing.
- Extract Fasteners and Remove the Window: Use a flat pry bar or cat’s paw to extract the roofing nails or screws holding the fin to the framing. If the fasteners are rusted or embedded, carefully slide a bi-metal reciprocating saw blade behind the fin to slice through the shanks.
- Extract the Window Frame: Have a partner support the window from the outside while you push the assembly outward from the interior. Lower the old frame onto a drop cloth and dispose of it responsibly. Learn more about managing exterior siding without inflicting surface gouges in our walkthrough on replacing windows in vinyl siding without trim damage.
Phase 2: Preparing and Flashing the Rough Opening
- Inspect and Treat Framing: Check the exposed header, jack studs, and rough sill for wood rot, insect infestation, or structural deflection. Replace any soft lumber. Treat existing framing with a topical wood preservative if surface mildew is detected.
- Create a Sloped Sill Plane: A flat sill invites pooling water. Fasten a beveled siding strip or install a pre-formed sloped sill wedge across the bottom horizontal framing member, sloping down toward the exterior. Add a 1/4-inch wood back-dam strip across the interior edge of the sill.
- Apply Flexible Sill Flashing: Cut a piece of self-adhering flashing membrane 12 inches longer than the rough opening width. Center it on the sill and roll it smoothly across the base, extending it at least 6 inches up each vertical side jamb. Slit the corners, fold the flashing down over the exterior sheathing, and firmly roll it with a J-roller to eliminate air pockets.
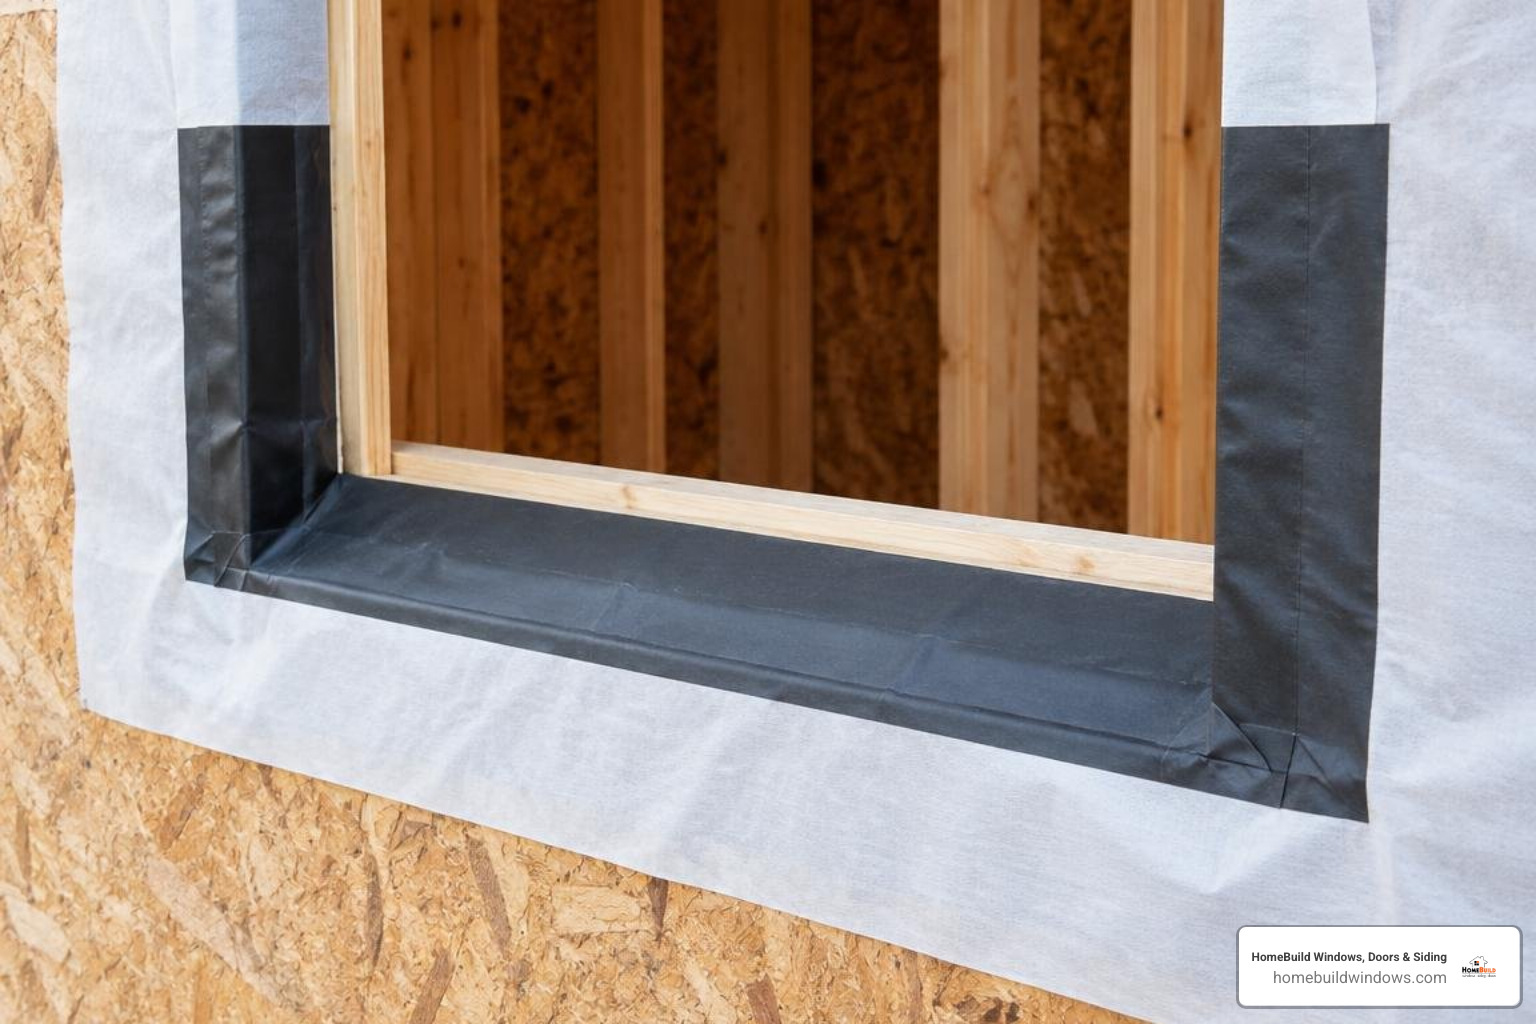
Step-by-Step Execution: How to Replace New Construction Vinyl Windows in Wall Assemblies
Once the rough opening is clean, level, and flashed at the base, it is time to set the new unit. If you are handling custom wall configurations, reference our comprehensive window installation guide alongside the specific structural wall assembly methods below.
- Dry Fit the Window Unit: Lift the vinyl window into the opening from the exterior to verify fit. Check that the nailing fin sits flush against the exterior sheathing and that a uniform 1/4-inch expansion perimeter exists on all sides. Remove the window.
- Apply Sealant to the Wall Envelope: Apply a continuous, generous 3/8-inch bead of ASTM C920 certified exterior elastomeric sealant directly to the exterior wall sheathing or WRB along the top (head) and both sides (jambs) of the rough opening. Crucial Rule: Leave the bottom horizontal rough sill unsealed along the exterior face. Leaving the bottom open allows any incidental moisture that bypasses the frame to drain freely to the exterior without becoming trapped against the wall structure.
- Set and Level the Unit: Place the window into the opening, resting the base on composite shims set atop the sloped sill. Press the side and top nailing fins firmly into the fresh sealant bead.
- Shim for Plumb, Level, and Square:
- Insert pairs of composite shims behind the side jambs at every fastener location, ensuring the shims support the vinyl frame without bowing it.
- Verify level across the horizontal sill.
- Verify plumb across both vertical side jambs.
- Measure diagonal corners to verify perfect squareness.
- Fasten the Nailing Fin: Secure the window through the pre-punched nailing fin slots using corrosion-resistant 1-1/2 inch stainless steel or hot-dipped galvanized roofing nails or manufacturer-approved pan-head screws. Drive fasteners into every other pre-punched slot (typically every 8 to 12 inches) and within 3 inches of every corner. Fasten straight and snug; do not over-drive fasteners to the point of distorting or cracking the vinyl fin.
- Verify Smooth Sash Operation: Before sealing, slide or crank the sashes open and closed. Test the locking hardware. The sashes should glide effortlessly, and the reveal (gap) between the sash and frame should be perfectly consistent all around.
Special Wall Assemblies: Wood Frame, Masonry, and Stucco
- Wood Frame with Vinyl or Lap Siding: The nailing fin fastens directly to the OSB/plywood sheathing. Siding interfaces require an exterior J-channel fastened over the flashing tape with a 1/4-inch thermal expansion gap between the siding ends and the vinyl window channel.
- Masonry and Concrete Openings: In solid brick or concrete block construction, secure pressure-treated wood bucks to the masonry using masonry anchoring screws. Install the new construction window into the treated buck, or utilize a block-frame configuration with exterior flush-flange details sealed directly against the masonry opening with structural masonry-compatible sealants.
- Stucco and EIFS Assemblies: Stucco requires a two-layer weather-resistive system. Integrate the nailing fin with self-adhering butyl flashing, install an approved casing bead (weep screed/stop), and maintain a continuous 3/8-inch perimeter sealant joint backer rod configuration adhering to ASTM C1193 guidelines.
Critical Flashing and Weather-Resistive Barrier Integration
To maintain a durable building envelope, install flashing in a sequential, weatherboard (shingle-lap) pattern where upper layers always overlap lower layers.
- Install Jamb Flashing Tape: Cut two strips of 4-inch or 6-inch self-adhering flashing tape. Apply the tape vertically over the left and right nailing fins, extending 2 inches above the top of the window and 2 inches below the bottom sill flashing. Roll firmly with a hard J-roller.
- Integrate the Head Flashing (Drip Cap): Install a rigid metal or vinyl drip cap over the top horizontal window fin. Apply a continuous layer of flashing tape across the upper horizontal fin and metal drip cap leg, extending at least 2 inches past each vertical jamb flashing.
- Lap the Building Wrap: Release the previously cut, folded flap of housewrap from above the window opening and fold it down over the horizontal head flashing tape. Seal the diagonal seams with approved housewrap seam tape.
- Interior Perimeter Air Seal: Move inside the home. Do not pack traditional fiberglass insulation tightly into the perimeter shim gaps, as compressed fiberglass loses its thermal insulating properties and lets air pass through. Instead, insert a foam backer rod for deep gaps, then apply a continuous bead of low-pressure, low-expansion polyurethane foam sealant formulated specifically for doors and windows. The low-pressure foam cures without expanding excessively, creating an airtight, draft-free barrier that will not bow the vinyl frame.
Common Installation Mistakes and Warranty Traps to Avoid
Even seasoned DIYers can make subtle mistakes that undermine window performance, damage wall structures, or void manufacturer warranties. Here is how to avoid the most frequent errors:
- Using High-Expansion Rigid Spray Foam: Standard expanding foam exerts immense curing pressure. Applying standard polyurethane foam around a vinyl window frame will bow the side jambs inward, causing sashes to bind, stick, and break their mechanical seals. Always select low-pressure, closed-cell window-and-door foam.
- Caulking the Bottom Exterior Nailing Fin: Sealing the exterior bottom flange is a major moisture trap. If water ever gets past the upper flashing or window trim, a sealed bottom prevents it from draining, funneling moisture directly into the floor joists and framing studs below. Always keep the bottom flange uncaulked along its exterior edge.
- Over-Driving Nailing Fin Fasteners: Vinyl expands and contracts with shifting seasonal temperatures. Driving nails or screws too tight will ripple the vinyl nailing fin and crack the corner welds. Drive fasteners straight until the head sits gently flush against the vinyl flange.
- Skipping the J-Roller on Flashing Membranes: Self-adhering flashing tapes utilize pressure-sensitive adhesives. Simply smoothing the tape with your hands leaves micro-tunnels that allow moisture migration. Always use a hard polyurethane or wooden J-roller with firm pressure.
- Ignoring Diagonal Squareness: Securing a window out of square places stress on the insulated glass unit (IGU), leading to early seal failure, condensation between panes, and difficult sash operation. Review our troubleshooting breakdown on avoiding DIY installation mistakes to keep your installation compliant.
Frequently Asked Questions About New Construction Vinyl Window Replacement
Can I install a new construction vinyl window without removing exterior siding?
Installing a new construction window with its integral nailing fin intact requires access to the structural sheathing, meaning surrounding siding, J-channels, or brickmould must be removed or cut back 2 to 3 inches. If you cannot disturb your exterior siding, you have two alternatives: cut the nailing fin off the vinyl frame with a sharp utility knife to convert it into a block/pocket frame (fastening through the inner jambs), or utilize a flush-flange retrofit window designed to cap over existing framing.
How long does it take to replace a new construction window?
For an experienced professional crew, replacing a full-frame new construction vinyl window—including siding removal, rough opening preparation, window setting, flashing, and siding reinstallation—typically takes 2 to 4 hours per window. For a homeowner completing a DIY project, plan for 4 to 6 hours per window to ensure all shimming, leveling, and water-resistive barrier integration steps are executed precisely.
What type of spray foam is safe for vinyl window frames?
Only use single-component, low-pressure, low-expansion polyurethane foam certified under AAMA standards for window and door installations. These specialty foams exert minimal expansion pressure during curing, preventing jamb deflection while forming an airtight, water-resistant seal around the perimeter rough framing.
Conclusion
Replacing a new construction vinyl window is a comprehensive structural upgrade that restores your home’s exterior defense against the elements. By stripping the opening to the framing, correcting rough sill angles, securing the unit through its integrated nailing fin, and adhering to strict shingle-lap flashing principles, you establish a reliable barrier that delivers draft-free indoor comfort and enduring curb appeal for decades.
For homeowners throughout Chicago and the surrounding northwest suburbs seeking flawless results backed by lifetime craftsmanship warranties, partnering with a trusted professional contractor provides lasting peace of mind. At HomeBuild Windows, Doors & Siding, we bring over 20 years of exterior remodeling experience to every job. As a top-rated, factory-certified contractor with over 200 positive Google reviews, our fully licensed and insured teams deliver owner-supervised precision tailored specifically to withstand demanding Midwest weather.
Whether you are planning full-frame window replacements, exterior door upgrades, siding installations, or residential roofing improvements, explore our comprehensive replacement window buying guide or contact our team today to schedule a free consultation and project estimate.