


Why Proper Window Sill Flashing Can Make or Break Your Home’s Water Defense
Window sill flashing is the waterproof layer installed at the base of a window opening that directs any water that gets behind your siding back to the outside — before it can rot your framing, grow mold, or drive up your energy bills.
Here’s a quick summary of what it involves:
- What it is: A sloped, sealed membrane (tape, rigid pan, or liquid flashing) installed at the rough sill before the window goes in
- Why it matters: It’s the last line of defense if exterior caulk or seals ever fail
- Key components: Sill pan, end dams, and proper slope toward the exterior
- How it works: Installed first (sill), then jambs overlap it, then head flashing goes on top — like shingles on a roof
- Who needs it: Every home with windows, especially in Midwest climates with heavy rain, snow, and freeze-thaw cycles
New windows look great on day one. But what you can’t see once the trim goes back on — the flashing layers underneath — determines whether those windows stay tight and dry for decades or quietly let water destroy your wall framing from the inside out. In Chicago and the surrounding suburbs, where winters are brutal and spring rain is relentless, getting this detail right isn’t optional. It’s the difference between a window that lasts 30 years and one that causes $10,000 in hidden rot damage.
I’m Steve Mlynek, CEO and founder of HomeBuild Windows, Doors & Siding, and over my 20+ years installing and replacing windows across Chicagoland, I’ve seen how often window sill flashing is rushed, skipped, or done wrong — and what that costs homeowners down the road. In this guide, I’ll walk you through exactly how to get it right.
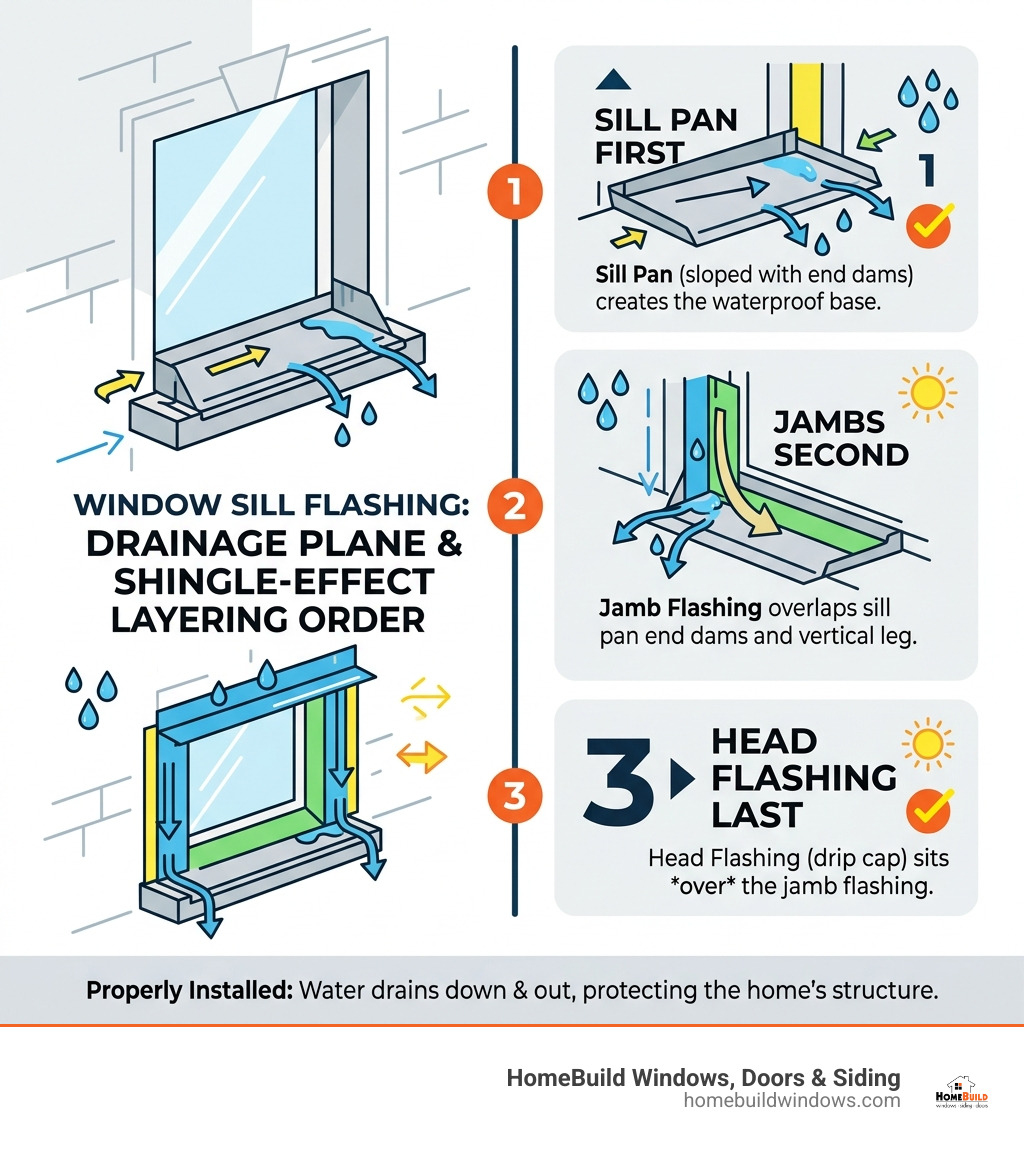
Simple guide to window sill flashing:
Understanding Window Sill Flashing and Its Critical Role
To understand window sill flashing, you have to think like a raindrop. In a perfect world, your siding and caulk would keep 100% of water out. In the real world—especially here in the North-West Suburbs—wind-driven rain eventually finds a way behind the “face” of your home.
When water gets behind the siding, it needs a clear path back to the exterior. This is where the window installation guide becomes vital. The flashing acts as a secondary drainage plane. The most important part of this system is the sill pan. Think of it as a shallow, waterproof tray with upturned ends (called end dams) that sits right under the window. If water leaks through the window frame or around the edges, the sill pan catches it and sends it safely back outside. Without this, that water sits on your wooden 2×4 framing, leading to the “hidden” rot that plagues so many homes in areas like Arlington Heights and Des Plaines.
According to Building Science Education on Sill Flashing, fully flashing the sill involves a combination of a back dam and self-adhesive membrane that ensures the building envelope remains airtight and watertight.
Why Window Sill Flashing is Essential for Your Home
Why do we make such a big deal about a piece of tape or metal you’ll never see? Because moisture intrusion is a silent killer for Chicago homes. Our region experiences extreme temperature swings—from -20°F in January to 95°F in July. This causes materials to expand and contract, which can eventually crack even the best caulk.
Properly installed flashing prevents rot and mold by ensuring that incidental water doesn’t stay trapped. If you live in a place like Crystal Lake or Barrington, you know that a single heavy spring storm can dump inches of rain in an hour. If your window sills aren’t flashed, that water can soak into your wall sheathing, leading to structural damage that can cost thousands to repair. We always tell our clients: it’s much easier to flash it right the first time than to tear out your siding and framing five years later.
The Science of Positive Drainage and Back Dams
For window sill flashing to work, it has to follow the laws of gravity. This is called “positive drainage.” If the rough sill is perfectly flat, water might just sit there or, worse, flow toward the interior of your home.
By creating a slight outward slope and installing a “back dam” (a small lip at the very back of the sill), we ensure water has nowhere to go but out. This process of building a sill pan creates a weep path. Even if the window’s own internal seals fail a decade from now, the flashing ensures your home’s structure remains dry.
Choosing the Right Materials for Your Sill Pan
Not all flashing materials are created equal. Depending on your home’s construction—whether you have standard housewrap or a specialized system like ZIP System sheathing—the choice of material matters. Some of our favorite house window installation tips involve selecting the right tape or rigid pan for the specific job.
Common materials include:
- Stretch Tape: High-performance flexible tape that can be molded into corners.
- Non-Stretch Tape: Standard straight flashing tape, often used in combination with corner patches.
- Liquid Flashing: A fluid-applied membrane that is brushed or rolled on, perfect for complex shapes.
- Rigid Pans: Pre-formed plastic or metal trays that are set into the opening.
Comparing Stretchable vs. Non-Stretchable Window Sill Flashing Tapes
If you’ve ever tried to wrap a gift with weird angles, you know how hard corners can be. In the past, installers had to do “flashing origami,” cutting and folding small pieces of tape to fit into the corners of a window opening. This created multiple seams—and every seam is a potential leak point.
Modern stretchable tapes, like ZIP System stretch tape, have changed the game. As noted by Fine Homebuilding, stretch tape allows you to use a single, continuous piece for the entire sill pan. You start in the middle, work your way to the corners, and literally “stretch” the tape up the side jambs.
- Pressure Activation: Most high-quality tapes are pressure-sensitive. We always use a J-roller to firmly bond the adhesive to the wood.
- Butyl vs. Acrylic: We generally prefer high-performance acrylic adhesives for our Chicago climate because they remain flexible and sticky across a wider range of temperatures than older asphalt-based tapes.
Durable Aluminum and Rigid Flashing Options
For some projects, especially masonry or brick veneer homes in areas like Skokie or Park Ridge, we use custom aluminum flashing. We typically use .019 thickness aluminum, which is comparable to 25-26 gauge sheet metal.
These aluminum components often feature a baked enamel coating, which is warranted against chipping or cracking for 15 years. When integrated into a full system, like the ZIP System which offers a 30-year limited warranty, you get a “belt and suspenders” approach to waterproofing. If you are dealing with older homes, you might even need aluminum flashing repair to replace rusted or improperly sloped metal sills.
Step-by-Step Guide to Installing Window Sill Flashing
Now, let’s get into the “how-to.” Whether we are doing a full-frame replacement in Schaumburg or a new installation in Mount Prospect, we follow a strict protocol.
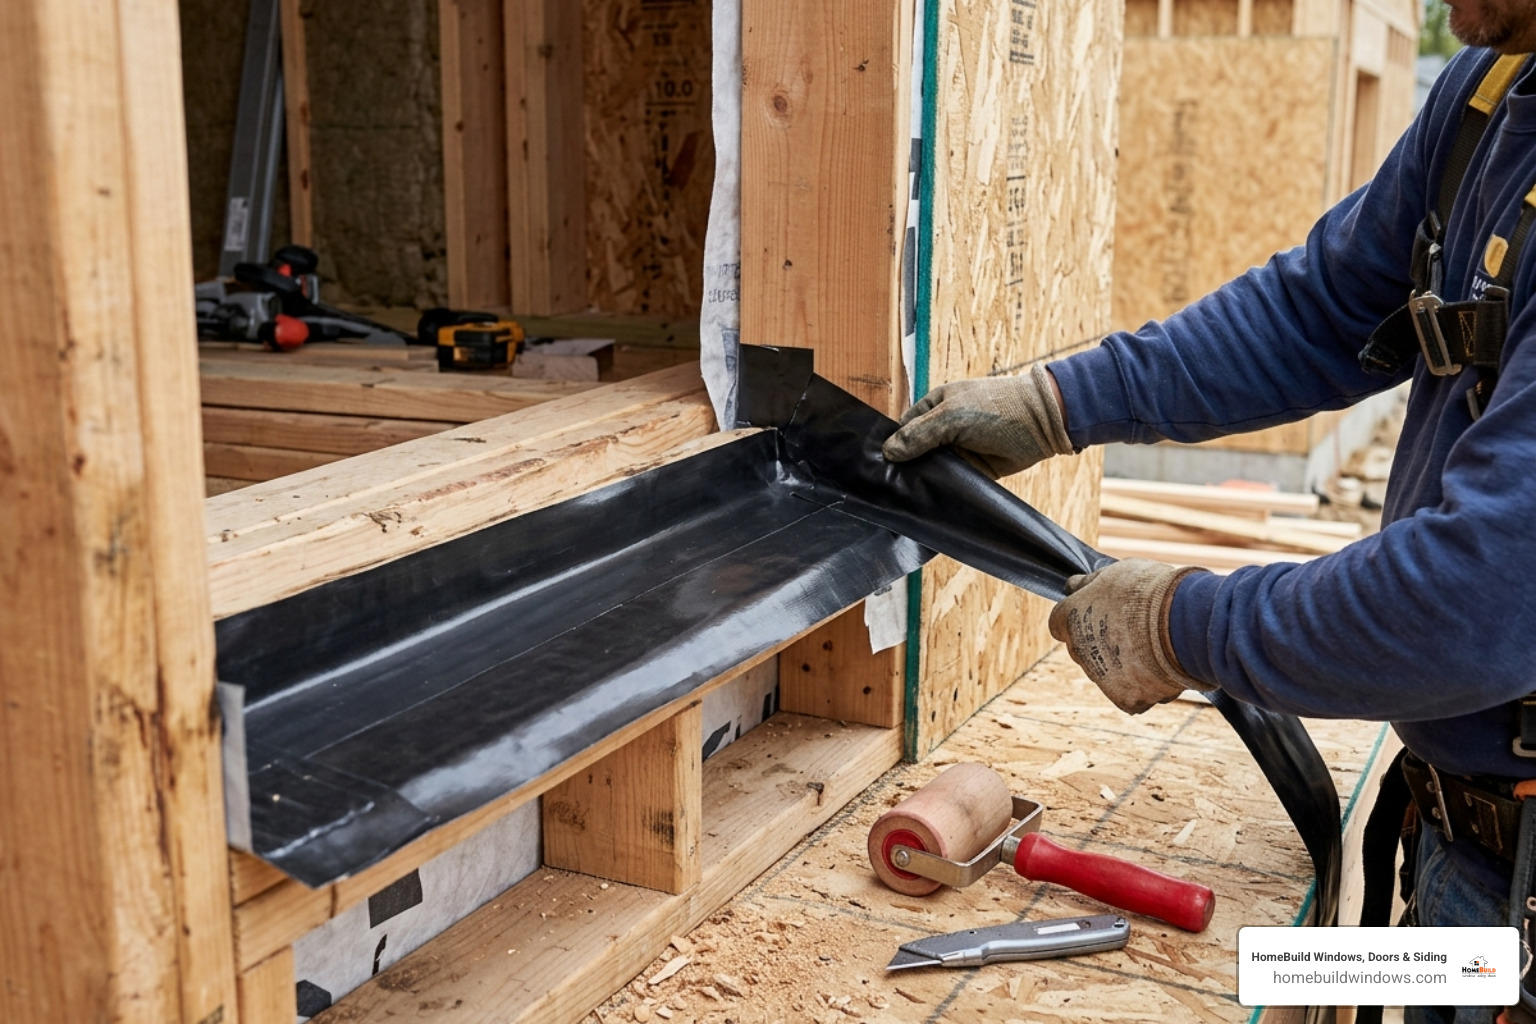
Creating a Sloped Sill for Positive Drainage
The first step happens before the tape even comes out. You must ensure the rough sill is sloped toward the exterior. We often use a piece of beveled cedar siding or specialized sloped shims to achieve a 5-degree pitch.
As we discuss in our guide to mastering casement window installation, a level window is important, but a sloped sub-sill is what saves the house. We place the thick end of the bevel toward the interior, ensuring that any water that reaches the pan is immediately pulled by gravity toward the outside.
Applying the Membrane and Integrating Jambs
Once the slope is set, it’s time for the membrane. Following the HomeFlash step-by-step method, we cut our flashing tape about 12 inches longer than the width of the window.
- Center and Stick: Start in the middle of the sill and work outward.
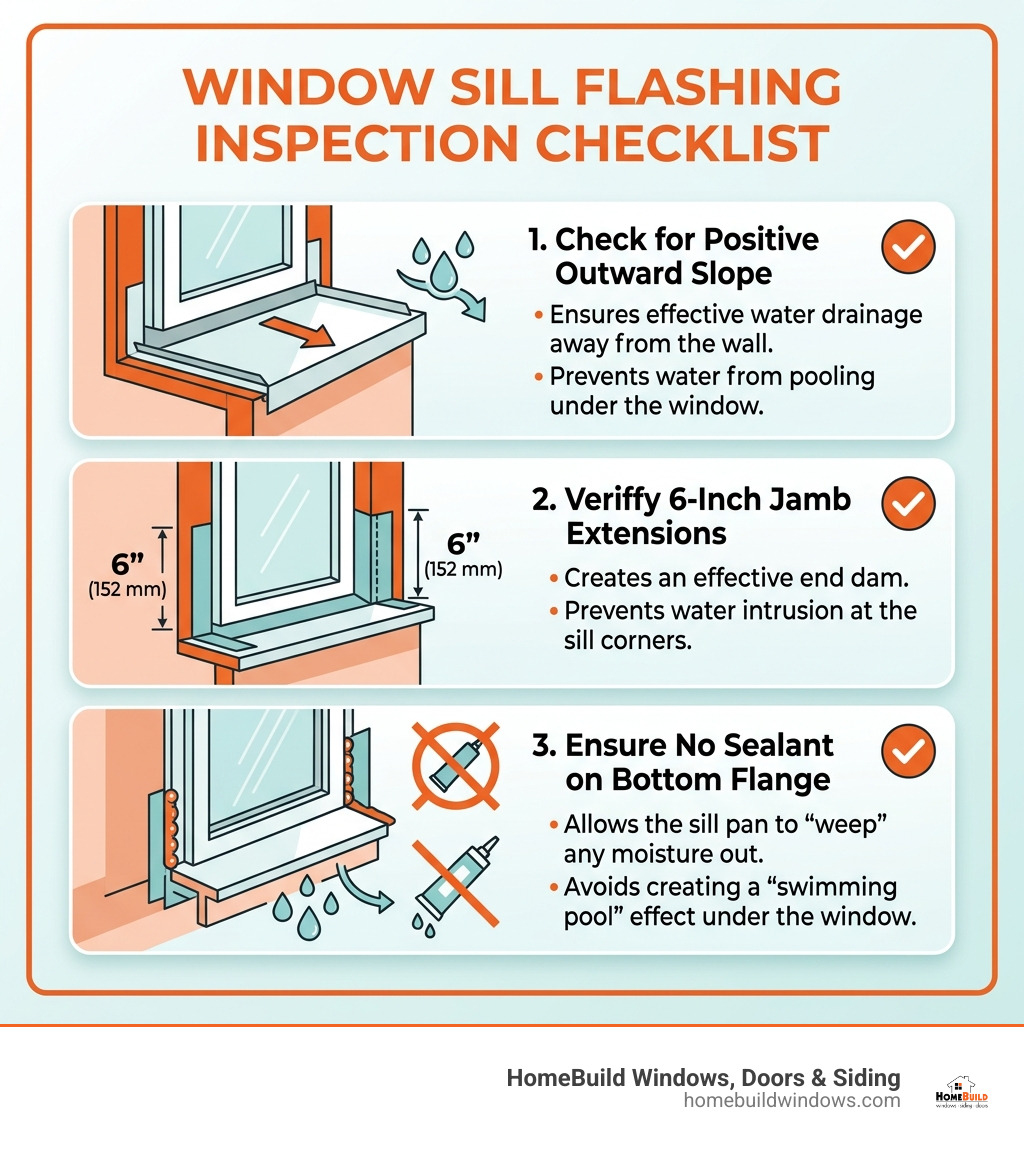
- The 6-Inch Rule: The tape should extend at least 6 inches up each side jamb. This creates a “tub” that prevents water from leaking into the corners.
- Corner Wedging: If using non-stretch tape, you must be incredibly careful to “wedge” the tape into the corners without tearing it. If using stretch tape, simply pull and mold it into the corner.
- Integration: The front edge of the tape should lap over the housewrap or weather-resistive barrier (WRB) below the window. This follows the “shingling” principle—everything on top must overlap what is below.
For flanged windows, Sto Corp’s technical details emphasize that the sill flashing must be fully integrated with the rough opening protection before the window is set. Before we even start, we make sure the preparation for window installation is handled, ensuring the opening is clean, dry, and free of debris.
Advanced Detailing for Chicago Wall Assemblies
Chicago architecture is diverse. We aren’t just flashing 2×4 stud walls; we’re working with 100-year-old brick bungalows, modern ZIP System builds, and homes with thick exterior foam insulation. Each requires a slightly different window sill flashing approach.
Window Sill Flashing for Brick and Stone Exteriors
Masonry walls are “porous,” meaning brick and stone actually soak up water like a sponge. In these homes, the flashing must include a stainless steel drip edge that extends past the brick.
We also incorporate:
- End Dams: These are 2-inch vertical “walls” at the end of the metal flashing that prevent water from running off the sides into the wall cavity.
- Weep Vents: These allow the space behind the brick to breathe and drain.
- Sealant Beads: We use high-quality US-100 or similar sealants to bed the anchors and seal the transitions.
If your brick home’s windows are leaking, you might need professional flashing repair in Chicago to retroactively install these drainage paths.
Handling Flanged vs. Block-Frame Windows
The type of window you choose changes how we flash it.
- Flanged (Nail-Fin) Windows: These are common in new construction. We apply a bead of sealant to the top and sides of the flange (never the bottom!) and then tape over the flanges. The bottom must remain open so the sill pan can “weep” any moisture out.
- Block-Frame Windows: Often used in replacement projects in older wood or masonry openings. These rely more heavily on a “wood buck” (a wooden frame inside the masonry) and a robust interior air seal.
Our certified window installers are trained to recognize which method is required to maintain the 30-year integrity of the installation.
Common Mistakes and Quality Inspection
Even with the best materials, mistakes happen. Here is what we look for during our owner-supervised inspections to ensure your window installation services are up to par:
- Reverse Shingling: This is the #1 mistake. It’s when the bottom layer is tucked under the top layer, creating a “shelf” that catches water and directs it into the house. Always remember: Top over Bottom.
- “Fish Mouths”: These are small wrinkles or tunnels in the flashing tape where it didn’t adhere properly. Water can travel through these like a straw. We use J-rollers to flatten every inch.
- Sealing the Bottom Flange: If you caulk the bottom flange of a window shut, you’ve just turned your sill pan into a swimming pool. The water has nowhere to go.
- Skipping the Slope: A flat sill is a failing sill. Always verify there is a positive pitch toward the exterior.
Frequently Asked Questions about Window Sill Flashing
Can I use standard housewrap tape for sill flashing?
No. Standard housewrap tape is designed to seal seams in the paper, not to act as a waterproof membrane. Window sill flashing requires thicker, more durable “peel-and-stick” membranes or stretch tapes that can withstand sitting water and the mechanical stress of the window sitting on top of it.
How do end dams prevent water from entering the wall cavity?
Think of an end dam like the side of a bathtub. If water gets into the sill pan, it will naturally try to run off the ends. Without an end dam (an upturned 2-inch lip at the corners), that water would pour right onto the wooden jack studs and into your wall insulation. The end dam forces the water to stay in the “tray” until it can drain out the front.
What is the best way to seal the interior after exterior flashing is complete?
Once the window is flashed and installed from the outside, we move inside. We use low-expansion spray foam between the window frame and the rough opening. It’s important to use “low-expansion” specifically so it doesn’t bow the window frame. This creates an airtight seal that improves your energy efficiency and stops drafts.
Conclusion
At HomeBuild Windows, Doors & Siding, we believe that a window is only as good as the flashing behind it. Whether you’re in Elk Grove Village, Glenview, or downtown Chicago, your home deserves a water defense system that stands up to the Midwest’s toughest weather.
As a locally owned company with over 20 years of experience, we take pride in our “owner-supervised” approach. Every project is handled with the attention to detail that has earned us the Elite Platinum Pella® Certified Contractor status, Andersen Certified credentials, and the Angi Super Service Award.
If you’re worried about drafty windows or suspect you might have rot hidden behind your siding, don’t wait for the next big storm. We provide professional, reliable window replacement and installation across the entire Chicagoland area. From Palatine to Evanston, we are here to ensure your home stays dry, comfortable, and beautiful for decades to come.
Ready to upgrade your home’s protection? Contact us today for a free estimate and let our expert team show you the HomeBuild difference.