


What to Do After a Storm: Your First Steps for Roof Inspection
A roof inspection after a storm is one of the most important things you can do to protect your Chicagoland home — and the clock starts the moment the weather clears.
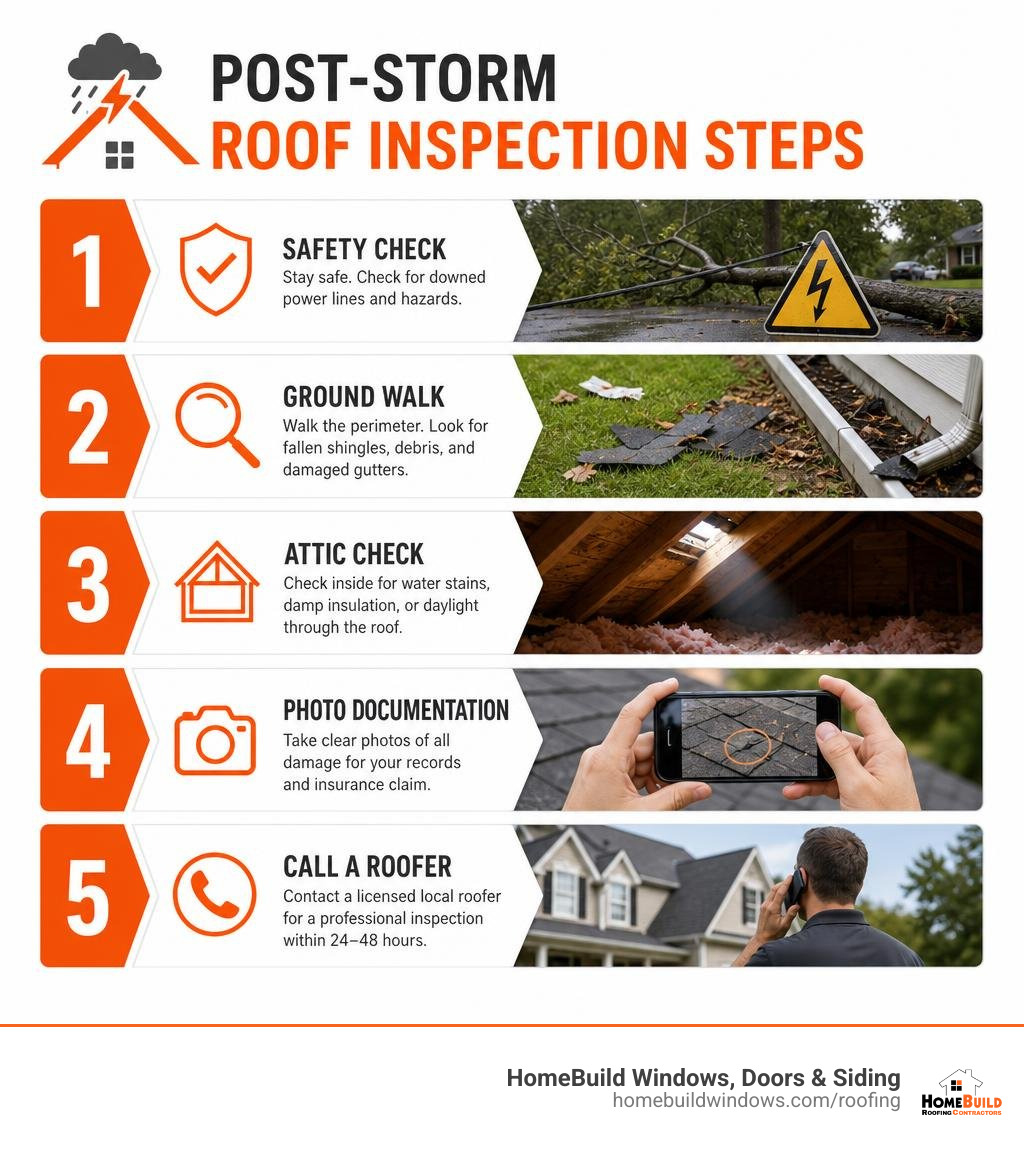
Here’s what to do right away:
- Stay safe first. Check for downed power lines, unstable trees, and structural sagging before going outside.
- Do not climb the roof. Wet or damaged shingles are extremely slippery and can hide structural weak spots.
- Walk the perimeter from the ground. Look for fallen shingles, dented gutters, and debris in your yard.
- Check inside. Go to your attic and upper floors and look for water stains, damp insulation, or daylight coming through the roof deck.
- Take photos of everything. Timestamped photos are your strongest evidence for an insurance claim.
- Call a licensed local roofer. A professional inspection should happen within 24–48 hours after a major storm.
Chicago and the surrounding suburbs — Schaumburg, Hoffman Estates, Arlington Heights — take a beating from hail, high winds, and freeze-thaw cycles. Damage that looks minor from your driveway can already be letting water into your roof deck. Roughly 40% of documented storm damage isn’t visible from street level at all.
The longer you wait, the worse it gets. One missed rain event can turn a small shingle breach into soaked insulation, rotted decking, and a ceiling collapse.
I’m Steve Mlynek, CEO and founder of HomeBuild Windows, Doors & Siding — with over 20 years of experience helping Chicagoland homeowners navigate everything from emergency repairs to full roof replacements, including guiding families through the roof inspection after storm process and the insurance claims that follow. As an Owens Corning Certified contractor, I’ve seen how a fast, thorough inspection protects both your home and your claim.
Safety First: What to Do Immediately After a Chicagoland Storm
Your safety matters more than any shingle. Never step outside until the storm fully passes. Look out for downed power lines near your driveway or yard. Report downed lines to ComEd immediately and keep your distance.
Look for large, broken tree branches hanging over your roofline. These branches can fall at any moment and cause severe injuries. Check your roofline from a safe distance to spot structural sagging. A sagging roofline means the roof deck is compromised and highly unstable.
Never climb onto your roof after a storm. Wet shingles, loose granules, and wind-damaged decking create extreme slip hazards. If your home has active, heavy leaks, you need professional help right away. We provide fast, reliable emergency services to stabilize your home. You can learn more about our fast response options for Emergency Roof Repair in Chicagoland.
How to Safely Perform a Ground-Level Roof Inspection After Storm
You can easily spot most major storm damage without ever leaving the ground. Grab a pair of binoculars and step out to your driveway or lawn. Walk slowly around your entire property perimeter to view the roof from multiple angles.
Use your binoculars to scan the shingle surface, valleys, and hips. Look for clear signs of damage on your siding, window screens, and air conditioning units. Dents on these soft metals are reliable proof of heavy hail impacts.
For a complete step-by-step breakdown of what to look for, check out this helpful Post-Storm Roof Inspection Checklist. This resource helps you track every detail during your walk.
Scanning the Shingle Field for Wind and Hail Damage
High winds lift and tear asphalt shingles easily. Look for completely missing shingles that expose the black underlayment beneath. Wind also folds shingles backward, creating sharp horizontal crease lines across the tabs. These creased shingles will eventually break off and must be replaced.
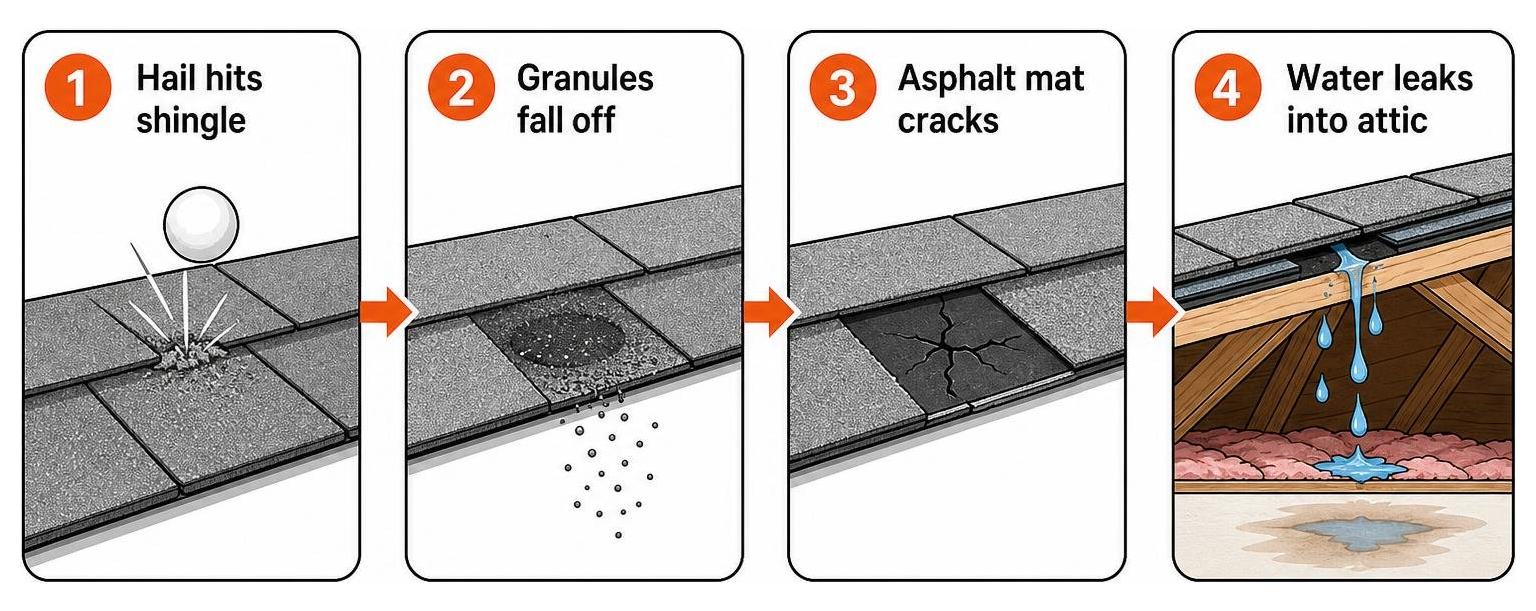
Hail damage looks different than wind damage. Look for dark, circular spots where hail knocked away the protective granules. These spots expose the raw asphalt mat to solar heat and UV rays. Over time, these spots crack and leak.
Checking Gutters, Downspouts, and Soft Metals
Your gutters tell a clear story about your roof’s health. Walk to your downspouts and look for piles of dark, sand-like granules. Heavy granule loss after a storm means your shingles took a severe beating.
Check your gutters for deep dents, cracks, or sagging sections. Look closely at your roof vents, chimney flashing, and metal valleys. Dented metal components confirm that large hail struck your home. Make sure water moves away from your foundation through clean splash blocks.
Identifying Material-Specific Storm Damage on Your Roof
Different roofing materials react to storms in unique ways. What looks like minor wear on one material could be a total failure on another. To help you identify these differences, refer to this detailed Storm Damage Roof Inspection Checklist.
You can also read this guide on the Storm Damage Roof Inspection Checklist | CA for more material insights.
Asphalt Shingle Damage Signs
Asphalt shingles are the most common roofing material in Chicagoland. Hail impacts create soft, bruised spots that feel like a bruised apple. These bruised areas quickly lose their granules and turn into bald spots.
Once the granules are gone, the fiberglass mat underneath cracks. This allows water to seep directly into your attic. If you spot these signs, you need targeted repairs to prevent mold. Learn about our local solutions for Roof Repair.
Metal, Tile, and Wood Shingle Damage
Metal roofs are highly durable but prone to denting. Look for deep dents that pool water or scratch the protective paint coating. Scratched metal will rust quickly in our humid Chicago summers.
Clay tiles and slate tiles are brittle and chip or crack under heavy hail. Look for broken tile pieces in your yard or gutters. Wood shakes split along the grain when struck by hail or debris. These splits create wide pathways for water to enter your home.
Interior Diagnostics: Checking Your Attic and Ceilings
The best way to find hidden storm damage is from inside your home. Grab a powerful flashlight and head up to your attic. Do this inspection during the day while the sun is shining.
Look closely at the underside of your roof deck and rafters. Check your insulation for dampness, packing, or standing water. Smell the air for musty odors, which indicate active mold growth.

Spotting Attic Leaks and Freeze-Thaw Weaknesses
Turn off your flashlight and look up at the roof deck. If you see tiny pinpricks of daylight, you have holes in your roof. These holes will leak during the next rain or snowstorm.
Chicagoland’s extreme freeze-thaw cycles expand tiny cracks into major leaks. Water freezes inside these cracks, forces the materials apart, and melts into your attic. Look for water stains around your chimney, skylights, and attic vents. If you have a history of ice dams, check those areas first for rotted wood.
Documenting Roof Damage for an Insurance Claim
You must prove your roof damage was caused by a specific storm event. Insurance companies will not pay for normal wear and tear. Use this table to understand the difference:
| Storm Damage | Normal Wear and Tear |
|---|---|
| Circular hail bruises | Overall granule fading |
| Folded or creased shingles | Brittle, curling shingle edges |
| Missing shingles in one area | Widespread cracking from old age |
| Dented metal vents | Surface rust on old flashing |
Keep a detailed log of the storm date, time, and maximum wind speeds. Read our guide on filing a successful Roof Insurance Claim.
Step-by-Step Evidence Gathering
Start by taking wide-angle photos of all four sides of your home. This establishes the overall context of the storm’s impact. Next, move in closer to photograph specific damaged areas.
Place a quarter next to hail dents or shingle bruises for scale. This shows the insurance adjuster the exact size of the impact. Write down a description of every photo, including the date and location on the house.
Navigating the Insurance Claim Process
Most standard homeowners policies in Illinois have a deductible between $1,000 and $2,500. If your storm damage is extensive, you will only pay this deductible amount. Your insurance company will cover the remaining cost of the work.
Be aware of strict filing deadlines, which are often one year from the storm date. We recommend scheduling a professional inspection before your insurance adjuster arrives. This ensures you have an expert on your side. Learn more about our complete Roof Replacement services for storm-damaged homes.
Choosing a Local Contractor vs. Storm Chasers
Storm chasers are out-of-state companies that flock to Chicagoland after severe weather. They knock on doors and offer “free roofs” if you sign a contract immediately. These companies use cheap materials and disappear when problems arise.
Always choose an established, local contractor with deep roots in your community. HomeBuild is fully licensed, insured, and owner-supervised. Every job is sold and managed directly by Steve Mlynek. Learn more about our honest, transparent process for Roof Inspections.
Why You Need a Professional Roof Inspection After Storm
A professional roofer has the safety gear and training to find hidden damage. We spot micro-fissures, compromised seals, and structural issues you cannot see from the ground.
We provide certified, photographic reports that insurance companies trust. We also meet directly with your insurance adjuster on-site. We advocate for your best interests to ensure your claim is approved fairly.
How to Prepare for a Professional Roof Inspection After Storm
Clear any debris from your driveway and walkways before the inspector arrives. Keep your pets indoors and make sure the attic access is clear.
Gather your insurance policy papers and any photos you took during your DIY inspection. Make a list of any active leaks or damp spots you found inside. This helps our team target the most critical areas immediately.
Frequently Asked Questions About Storm Roof Damage
Can hail damage a roof even if I do not see an active leak?
Yes. Hail bruises shingles and knocks away their protective granules without causing an immediate leak. This damage exposes the asphalt mat to heat, which causes it to crack over time. A leak may not appear until months later, leading to hidden mold and structural rot.
How long do I have to file an insurance claim after a storm?
Most insurance policies require you to file a claim within one year of the storm. However, some carriers have shorter windows of six months. It is best to document the damage and contact a professional roofer immediately to avoid missing these deadlines.
Should I let door-to-door contractors inspect my roof?
No. Door-to-door contractors are often storm chasers who use high-pressure tactics. They may exaggerate damage or perform poor repairs that violate local building codes. Always vet contractors locally and choose an owner-supervised company with verified reviews.
Conclusion
Protecting your home after a severe storm does not have to be stressful. By performing a safe ground inspection and checking your attic, you can catch problems early.
At HomeBuild, we make the restoration process simple and transparent. Steve Mlynek personally supervises every project from start to finish. We do not use subcontractors or middle-men.
We are proud of our 4.9-star Google rating across 180+ reviews. We won the Angi Super Service Award 2025 and Nextdoor Neighborhood Faves 2025. We serve Chicago, Schaumburg, Hoffman Estates, Arlington Heights, and the surrounding suburbs.
If you suspect your roof has storm damage, do not wait. Contact us today to schedule your professional inspection. We will help you restore your home with the quality and care you deserve. Explore our dedicated services for Storm Damage Roofing in Chicagoland.